


Ever wondered how to make the holiday season even more magical for your kids? The answer lies in crafting DIY Christmas decorations that ignite their creativity and fill your home with festive spirit. If you're a parent or teacher, these 16 DIY Christmas decoration ideas will make your holiday season special and memorable. From sparkling Christmas trees to cheerful reindeer pen stands, these DIY projects are not just fun activities but also serve as a playful learning experience.
20 DIY Christmas Decoration Ideas for School & Home
We make our crafts easy for kids, using stuff you can easily find and steps that are simple to follow. Let's dive into the world of festive crafting and create decorations that will brighten up your space.
1. Learn How to Make a Christmas Tree
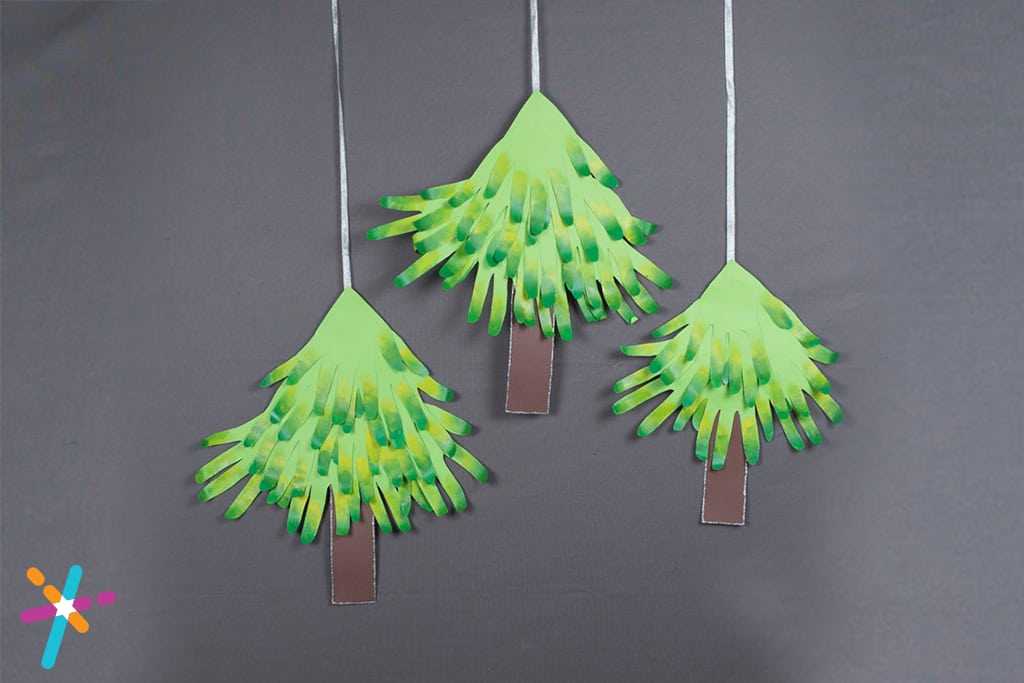
Making a Christmas tree from scratch is a fun project for children. It involves tracing, cutting, and coloring, which helps improve hand skills and color recognition.
Materials required:
-
Rangeela Tempera Colours
-
Fevicol MR
-
Light green and brown – chart paper
-
Sponge
-
Water container
-
Colour
-
Palette
Ask kids to place their palms on the green chart paper and trace around it with a pencil. Cut out approximately 12 hand-palm shapes. Use the Tempera Colours to sponge dab the fingertips of these cutouts, blending dark green and yellow to give a shaded effect.
Cut a strip of brown chart paper for the tree's trunk. Overlap the hand palm cutouts to make a tree shape. Stick them together using Fevicol MR and add the brown strip as the base.
Head to our full activity guide to create this beautiful Christmas tree which will surely give children a sense of accomplishment in creating a holiday decor.
2. Christmas Reindeer Pen Stand
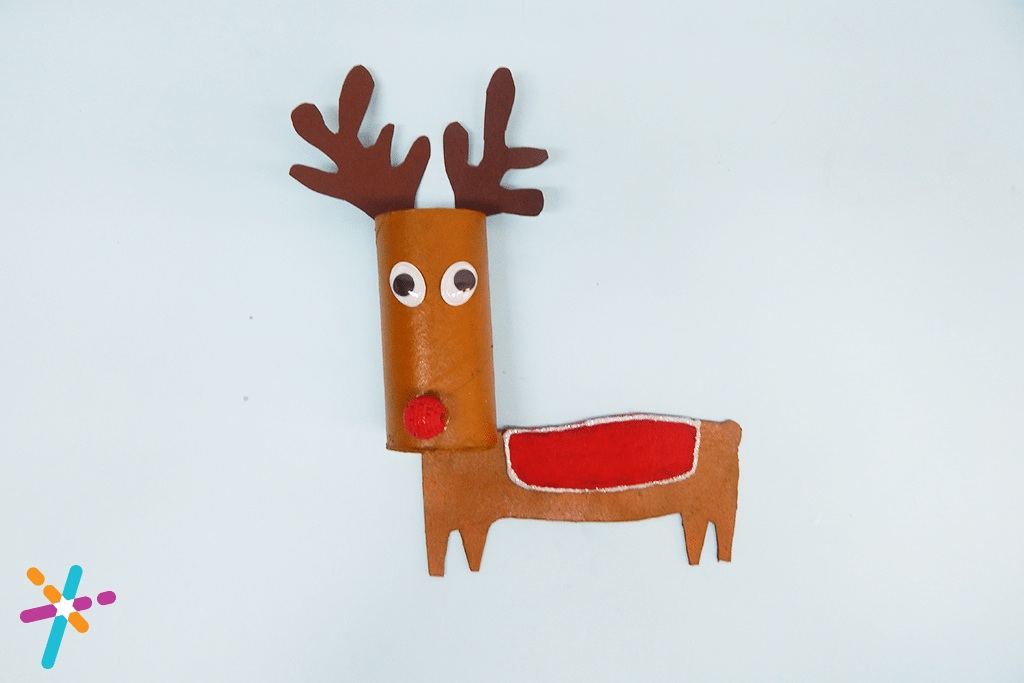
Turn a tissue roll into a cute reindeer pen holder that is both decorative and useful for organizing. This craft is a wonderful way to teach kids about upcycling and resourcefulness.
Materials required:
-
Fevicryl Acrylic Colours Crimson 04
-
Fevicol MR
-
Yellow Ochre 26
-
Burnt Sienna 01
-
Fevicryl 3D Outliner Non-Sticky Glitter - Silver 408
-
Red felt fabric
-
Tissue roll
-
Brown-coloured chart paper
-
Plastic bead
-
Google eyes
Have kids cover one end of the tissue roll with brown chart paper to form the reindeer's face. Make sure you draw the body of the reindeer on a mount board, proportionate to the tissue roll.
Cut out the antlers from brown chart paper and paint a plastic bead with Crimson 04 for the nose. Once dry, assemble the antlers, nose, and googly eyes onto the tissue roll using Fevicol MR. Cut a red felt rectangle for the reindeer's body and add silver glitter outliner for a festive sparkle
Explore our detailed guide to this DIY Christmas reindeer pen stand that not only adds to the holiday cheer but also encourages children's creativity and motor skills.
3. Learn How To Make DIY Christmas Decoration Balls
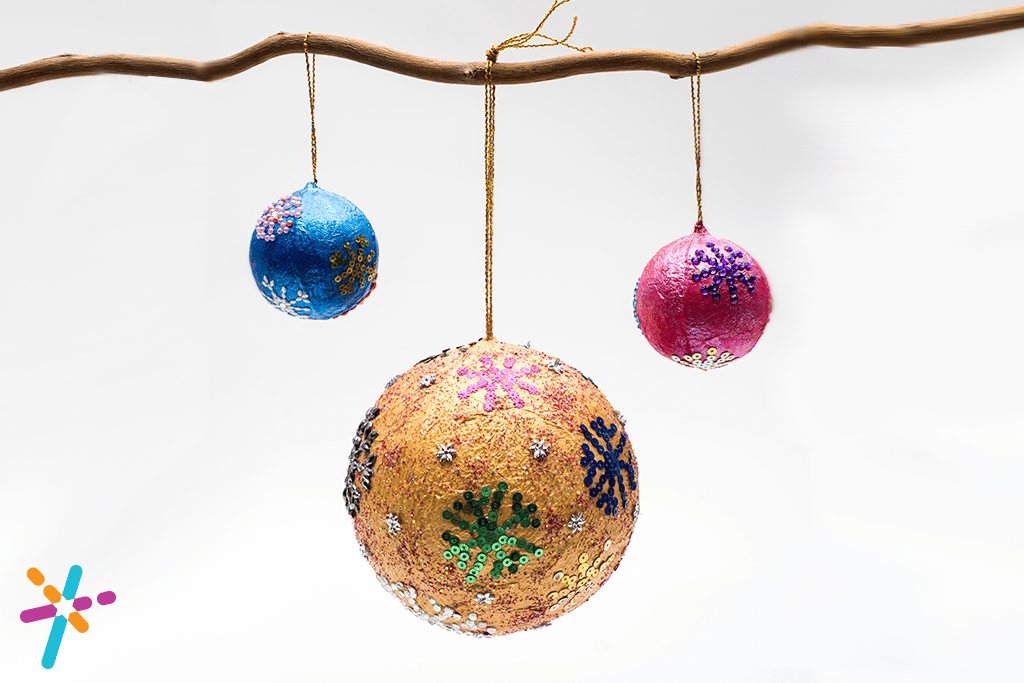
Dazzle your Christmas tree with handmade decoration balls that sparkle with creativity. This activity is perfect for kids to practise their dexterity and explore their artistic side.
Material required:
-
Fevicryl Acrylic Sparkling Pearl Color
-
Fevicol MR
-
Tissue paper
-
Plastic balls
-
Cord
-
Ornamental stones
-
Shimmer powder
-
Sponge>
To start decorating your DIY Christmas tree, choose a plastic ball that matches your decoration idea. Attach a string on the ball using Fevicol MR and add tissue paper for a smooth surface.
First, prepare the base. Then, instruct the children to use a sponge to apply their chosen Fevicryl Sparkling Pearl colors to the entire ball. Finally, allow the ball to dry. The finishing move is making cool snowflake patterns with decorative stones, sticking them on carefully with Fevicol MR.
Check out our intricate guide with step-by-step images of the DIY Christmas decoration balls.
3. Christmas Xmas Tree Craft for Kids
Enhance holiday joy with the sparkling Xmas tree puzzle craft. Let your kids explore festive delight as they piece together this sparkling masterpiece. Elevate family time with a fun and glittering activity that captures the magic of Christmas
Materials Required:
- Fevistik Power
- Fevicryl Acrylic Colours
- Corrugated Sheet
- Glitter Foam Sheet
- Paper Straw
- Barbeque Stick
- Sequins of different shapes & sizes
- Confetti
- Pencil
- Scale
- Scissors
- Paper Cutter
The sparkling Xmas tree puzzle craft is the perfect way to add a touch of festive magic to your holiday celebrations. Not only does it provide a fun, hands-on activity for your kids, but it also brings the family together to create cherished memories.
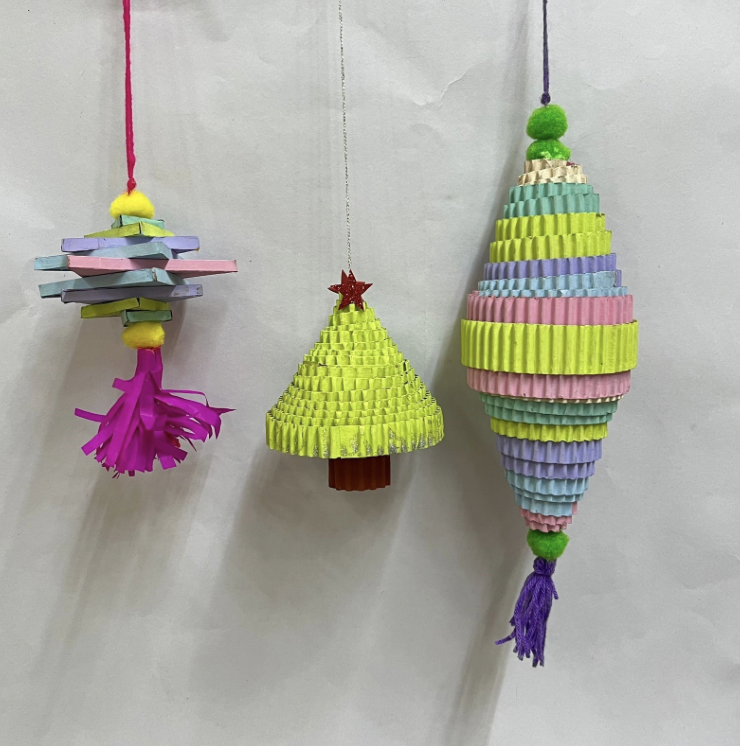
4. Christmas Dangler Craft Ideas for Kids
Create festive joy with Christmas danglers with your kids. Let them explore the magic of the season as they craft and hang these delightful decorations. Elevate your holiday decor with personalised touches that capture the enchantment of Christmas.
Materials Required:
- Fevistik Power
- Rangeela Tempera Colour
- Mount Board
- Foam
- Corrugated Sheet
- Pipe Cleaner
- Green Chart paper
- Scissors
- Pencil
- Scale
- Wool (any three color)
- Pom pom ornamental stones
As they create and hang these charming decorations, your little ones will immerse themselves in the magic of the season, adding a personal and creative touch to your holiday decor. This simple yet meaningful activity not only enhances the festive atmosphere but also creates lasting memories that capture the true enchantment of Christmas.
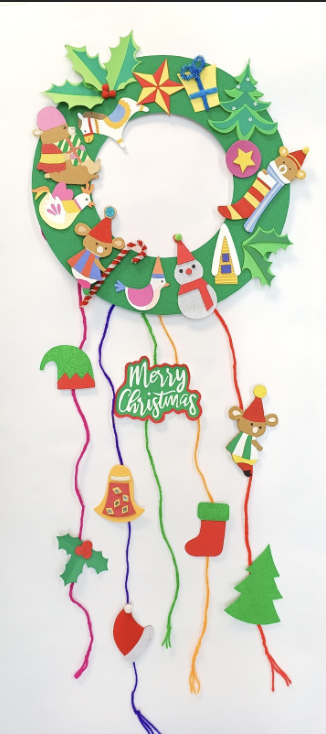
5. Engaging and Simple Christmas Wreath Craft
Deck your halls with a DIY Christmas wreath. Let your kids explore the festive spirit as they craft and customise this timeless decoration. Elevate your holiday decor with a unique and heartwarming touch that signifies the joy of Christmas.
Materials Required:
- Glue Drops
- Rangeela Glitter Liners
- Mount Board
- Coloured Felt Sheets
- Ornamental Stones
- Pencil
- Scissors
- Scale
This heartwarming activity not only enhances your home with a unique touch but also symbolizes the joy and togetherness that Christmas brings, creating cherished memories for years to come.
6. Christmas Themed Easy To Make Gift Tags
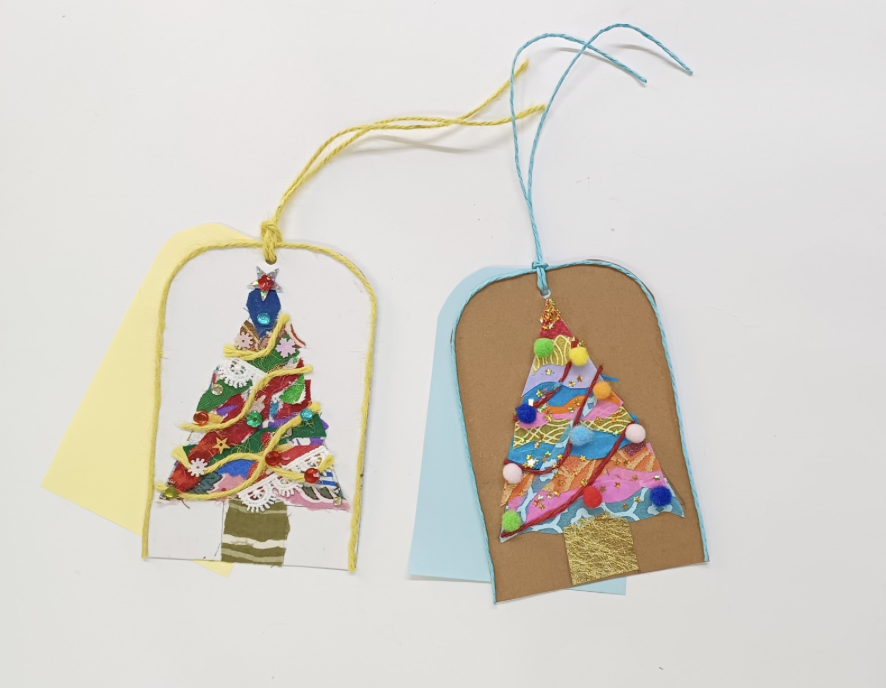
Add a personal touch to your holiday presents with our easy step-by-step guide to creating Christmas-themed gift tags! Perfect for all ages, this craft will help you design festive and unique tags that make your gifts stand out. With simple instructions and fun decorations, your handmade tags will add extra charm to your holiday wrapping!
Materials Required:
- Fevistik Power
- Thick White Sheet
- Coloured Jute Cord
- Upcycled Fabrics
- Sequins of different sizes & shapes
- Pom Pom
- Coloured Chart Paper
- Single Hole Punch
- Scissors
- Pencil
Creating Christmas-themed gift tags is a simple yet creative way to add a personal touch to your holiday presents. With easy steps and festive designs, your handmade tags will make your gifts even more special and memorable.
7. Easy DIY Christmas Ornaments for Kids
Elevate your holiday décor with charming DIY Christmas ornaments that add a personal touch to your celebrations! This hands-on activity not only allows for creative expression but also creates lasting memories, as every ornament crafted becomes a special keepsake that captures the spirit of family, togetherness, and holiday cheer.
Materials Required:
- Fevistik Power
- Rangeela Tempera Colour
- Box Board
- Felt
- Flower Wire
- Pipe Cleaners
- Foam
- Sequins
- Buttons
- Ornamental Stones
- Any Cord
- Coloured Corrugated Sheet
- Pencil
- Scissors
- Scale
- wool (brown)
- Tissue papers
Crafting DIY Christmas ornaments is a wonderful way to personalize your holiday décor while creating meaningful memories with your family. As your kids explore their creativity and craft unique ornaments, each piece becomes a treasured keepsake, symbolizing the joy, togetherness, and festive spirit that make the holiday season truly special.
8. DIY Christmas Ornaments Using Best Out of Waste Craft
Create beautiful DIY Christmas ornaments using the best out-of-waste craft materials! Perfect for kids and adults, these upcycled ornaments add a personal touch to your holiday décor while promoting sustainability and reducing waste during the festive season.
Materials Required:
- Fevistik Power
- Rangeela Tempera Unicorn Colours
- Corrugated Sheet
- Kite Paper
- Pom Pom
- Felt
- Any Cord
- Scissors
- Scale
- Pencil
Transforming waste into stunning DIY Christmas ornaments not only beautifies your home but also weaves a story of creativity and sustainability into your holiday celebrations.
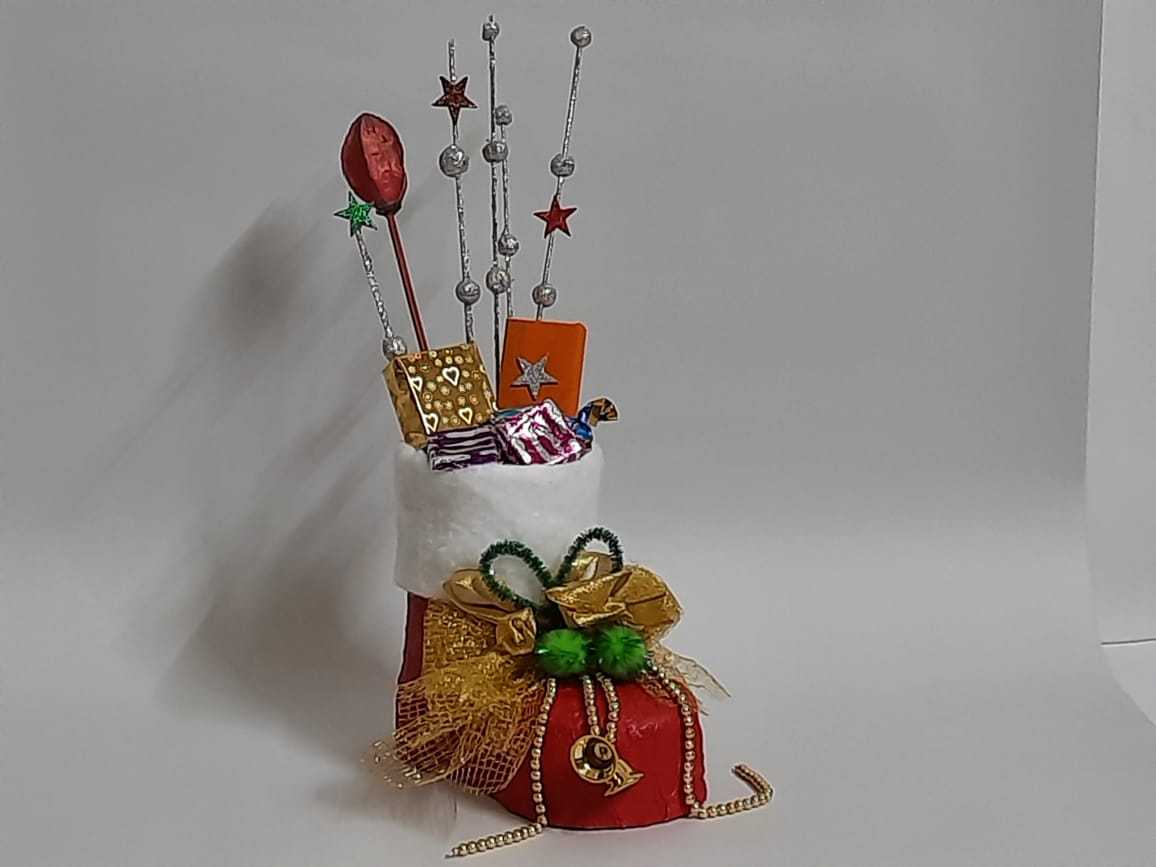
9. DIY Merry Christmas Popup Box

Surprise your loved ones with a handmade Christmas popup box that leaps to life upon opening. This craft is a fantastic way to engage kids in a more complex project that yields a delightful surprise.
Material required:
-
Fevicol MR
-
Rangeela Tempera Colours
-
Uncycled box available
-
Coloured chart Papers
-
Googly eyes
-
Pom pom
-
Pencil
-
Fine art Brushes
-
Thick flower wire
Paint a square box using Rangeela Tempera Colours and fine art brushes. Draw Santa Claus and "Merry Christmas" on the mount board, paint, and let dry. Create a spring-like structure with thick flower wire, attach it to the cutout, and then fix the Santa cutout on top. Decorate the box with festive motifs.
Explore our full guide on the Christmas pop box activity for detailed instructions and relevant visuals.
10. DIY Christmas Stocking
Make a Christmas stocking for decoration or as a handmade gift for the holidays. This project is great for teaching kids about upcycling and decorating.
Materials Required:
-
Fevicol MR
-
Fevicryl Acrylic Colours
-
Plastic bottle
-
Cotton
-
Corrugated sheet
-
Pom Pom
-
Pipe cleaner
-
Net cloth
-
Bells
-
Beads and other decorative embellishments
-
Felt Pen
-
Paper cutter
-
Tissue Paper
Cut a plastic bottle into a cylindrical base. To make a stocking, start with a wavy sheet. Use glue to put it together.
Wrap the stocking with paper to create a flat surface. Color the stocking with acrylic paint. Finally, attach cotton to create a furry border. Improve the stocking by adding pipe cleaners, bells, pom poms, net cloth, and other decorations with Fevicol MR.
Need more detailed instructions for this DIY Christmas classroom decoration? Explore our comprehensive step-by-step DIY Christmas stocking activity guide.
11. DIY Christmas Bunting
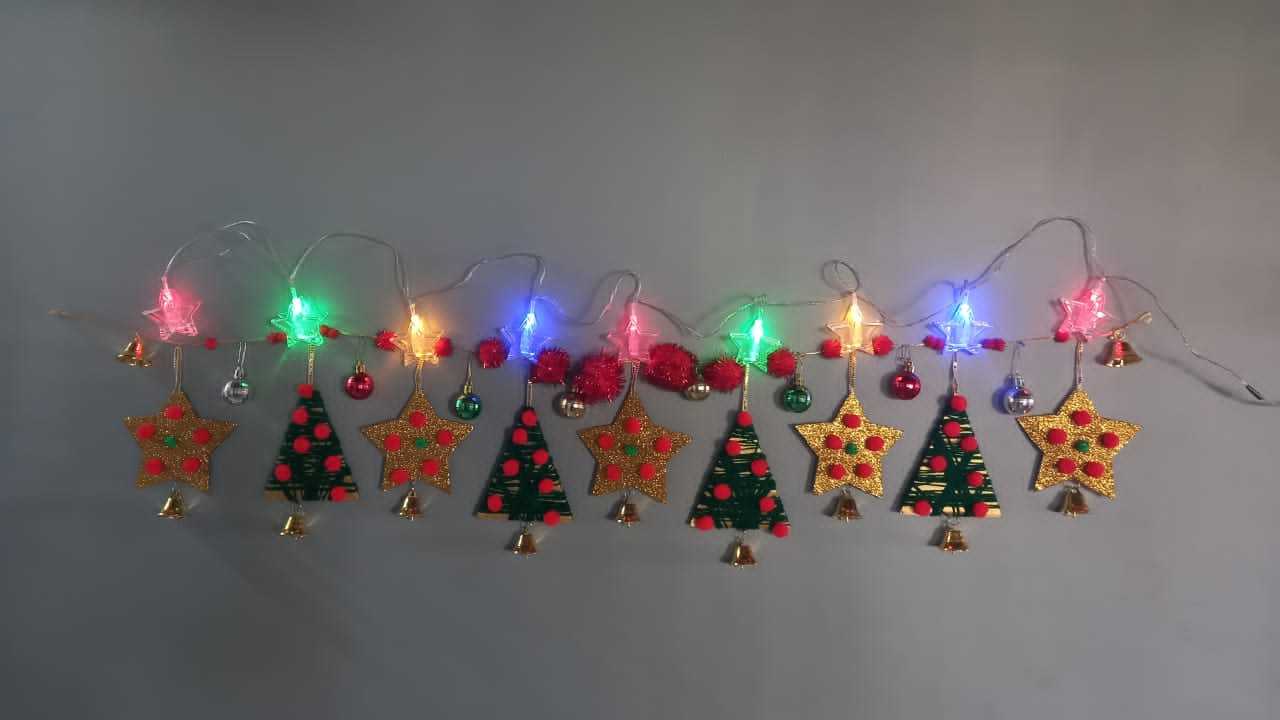
Add a festive flair to your space with DIY Christmas bunting that can be customised to your liking. This is a fantastic project for kids to learn about patterns and symmetry while having fun with colours and decorations.
Materials Required:
-
Rangeela Tempera Colours
-
Coloured wool
-
Corrugated
-
Glitter powder
-
Pom Pom
-
Bells and other embellishments
-
Any decorative cord
-
Fairy lights
-
Pencil
-
Scale
-
Paper cutter
Begin by drawing 4" x 5" triangles on corrugated sheets. Cut and paint them with Rangeela Tempera Colours. Attach a decorative cord loop at the top with Fevicol MR.
Add coloured wool, pom-poms, and bells for a festive touch. You can decorate some cutouts with glitter powder. String all the cutouts on the decorative cord and weave in fairy lights for a magical glow.
Head to Fevicreate’s full activity guide for a detailed tutorial on DIY Christmas bunting.
12. DIY Christmas Flower Decor
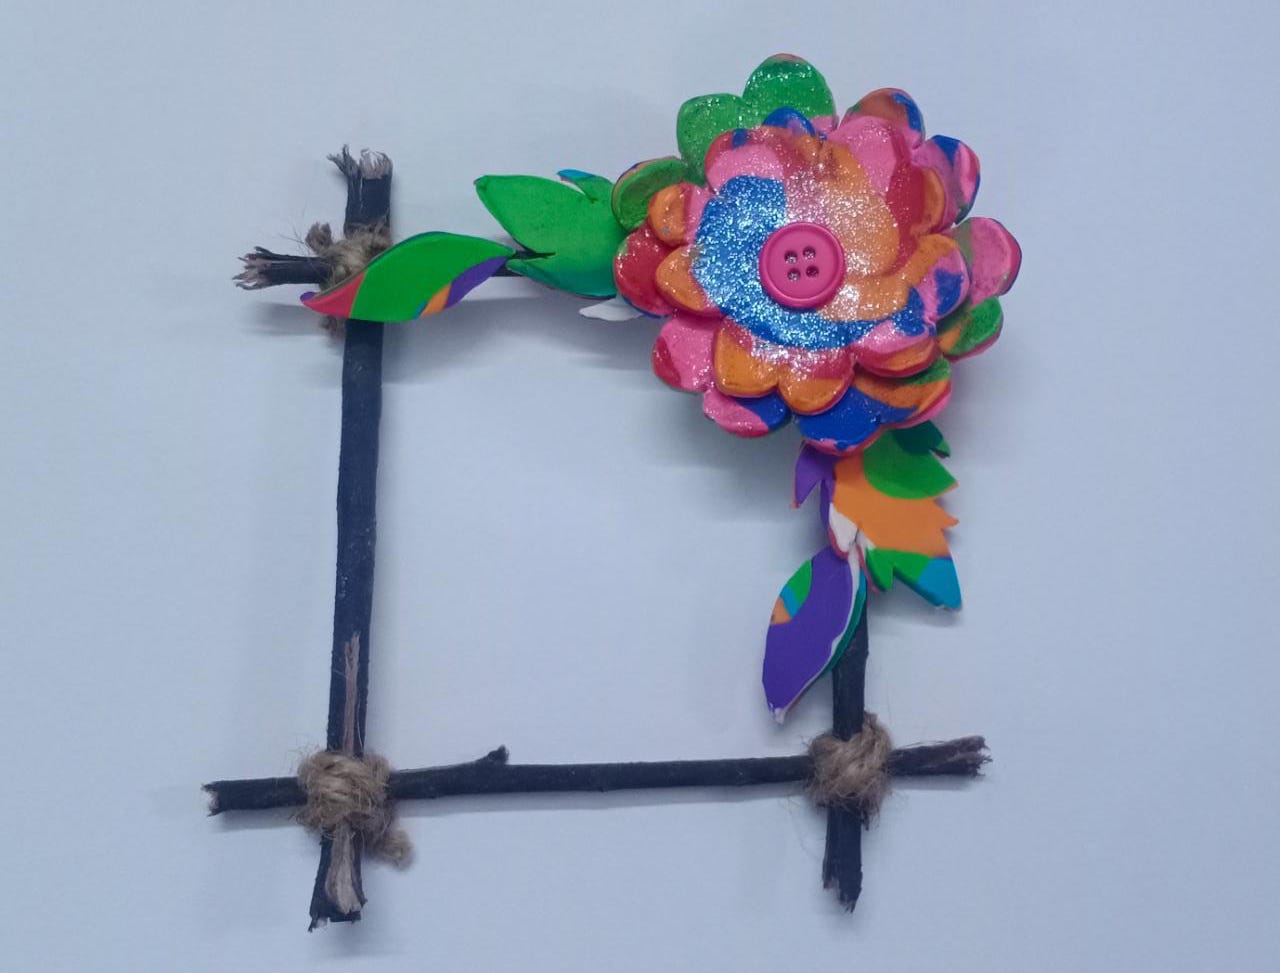
Make your own Christmas flower decor to add a natural touch of beauty to your festive decorations. This craft is an excellent way for kids to learn about colours and textures while working with their hands.
Materials Needed:
-
Fevicol MR
-
Rangeela Creative Clay
-
Fevicryl 3D Glitter Liner Silver
-
Twigs
-
Any cord
-
Paper cutter
-
Scissors
-
Pencil
-
Button
-
Fine art brush
-
Rolling Pin
To make a Christmas tree decoration, mix 4-5 clay colors together. Twist the colors to create a marbled look. Then, roll the clay into flat pieces. Cut flower petals in descending sizes, apply Fevicol MR, and embellish with Fevicryl 3D Glitter Liner Silver.
Assemble petals with a button in the centre. Create a twig frame tied with a jute cord and add clay leaves. Make various flowers in different shapes and sizes for a beautiful handmade deco.
Find step-by-step instructions for DIY Christmas flower decor on our activity page right away.
13. DIY Christmas Lamp
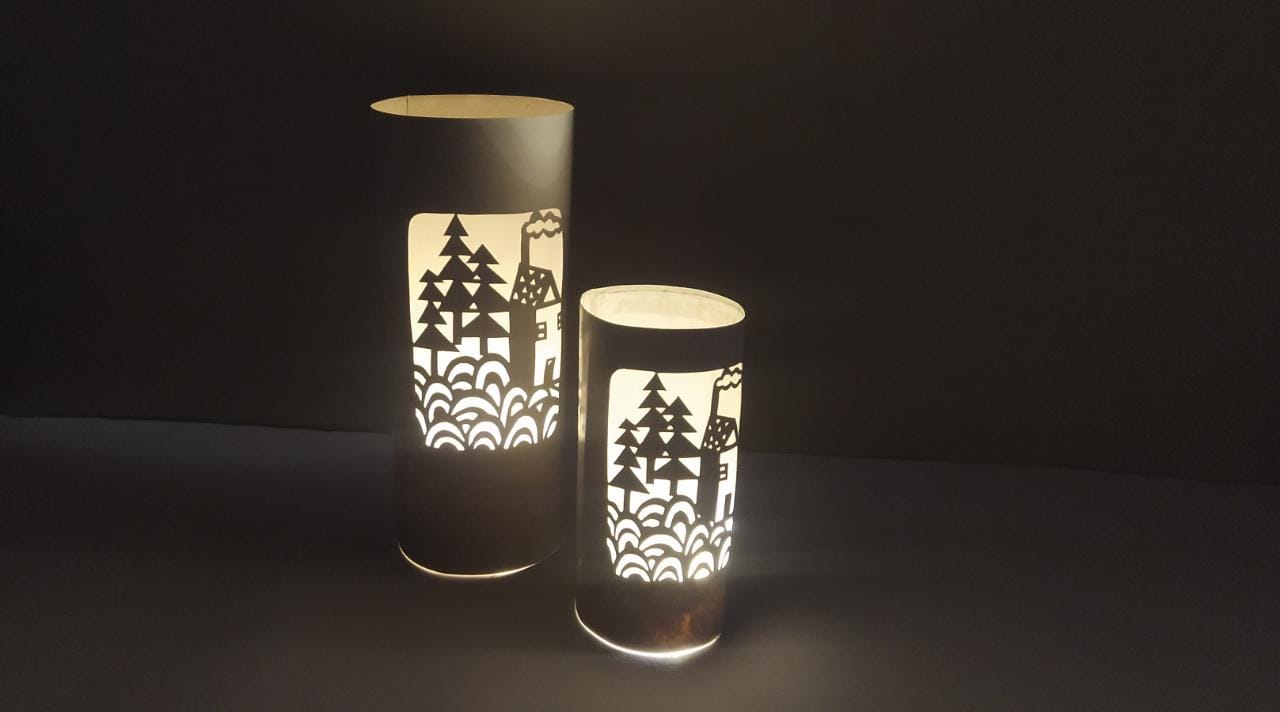
Illuminate your festive season with a DIY Christmas Lamp that's as fun to make as it is beautiful to behold. This project is perfect for older kids and teens who are ready to tackle a more challenging craft.
Adding lights to your personalized lamp creates a pleasant atmosphere. It also gives you a sense of accomplishment. This is because you have made something useful and beautiful for the holidays.
Materials Needed:
-
Box Board
-
Gateway sheet
-
Paper cutter
-
Felt pen
-
Scale
Use an A4 box board sheet, draw a lamp design with a felt pen, and carefully cut the intricate parts with a paper cutter. Take a gateway sheet, cut a rectangle to cover the design, and secure it with Fevicol MR. Once dry, fold and seal the edges with Fevicol MR to form a cylindrical shape. Your handmade lamp is ready to glow with festive lights.
So are you ready to get kids started on this activity? Head over to the full guide and let them make this DIY Christmas lamp within a few minutes.
14. Make a Gingerbread House Tissue Holder with Fevicreate
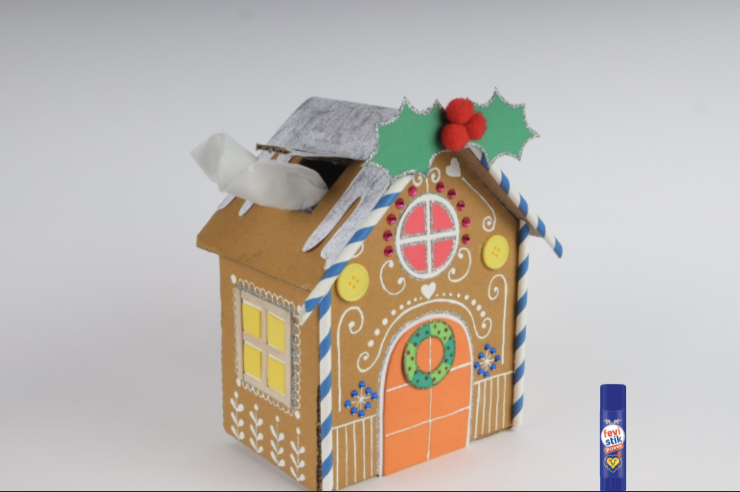
Transform a simple tissue box into a delightful gingerbread house tissue holder that's not just decorative but also practical. This craft is a super fun way to get kids involved in making useful art and getting into the holiday mood.
Materials Needed:
-
Rangeela Tempera Colours (12 Shades)
-
Rangeela Paper Glitter
-
Upcycled Corrugated Box
-
Coloured Foam Sheets
-
Candy Sticks
-
Paper Straw
-
Buttons
-
Ornamental Stones
-
Pom Poms
-
Paper Cutter
-
Pencil
-
Scale
-
Chart Papers (White)
-
(Green and Dark Green)
-
Flower Wire
-
Bead
Shape a corrugated box into a gingerbread house using Fevistik Power. Add decorative details like windows, doors, and snowflakes with chart paper and foam sheets. Sprinkle it with glitter for a festive look. This craft adds whimsy to your Christmas decor while functioning as a creative tissue dispenser for the holiday season.
Get access to the tissue paper holder’s detailed guide on Fevicreate’s activity page.
15. Learn How to Make a Christmas Star
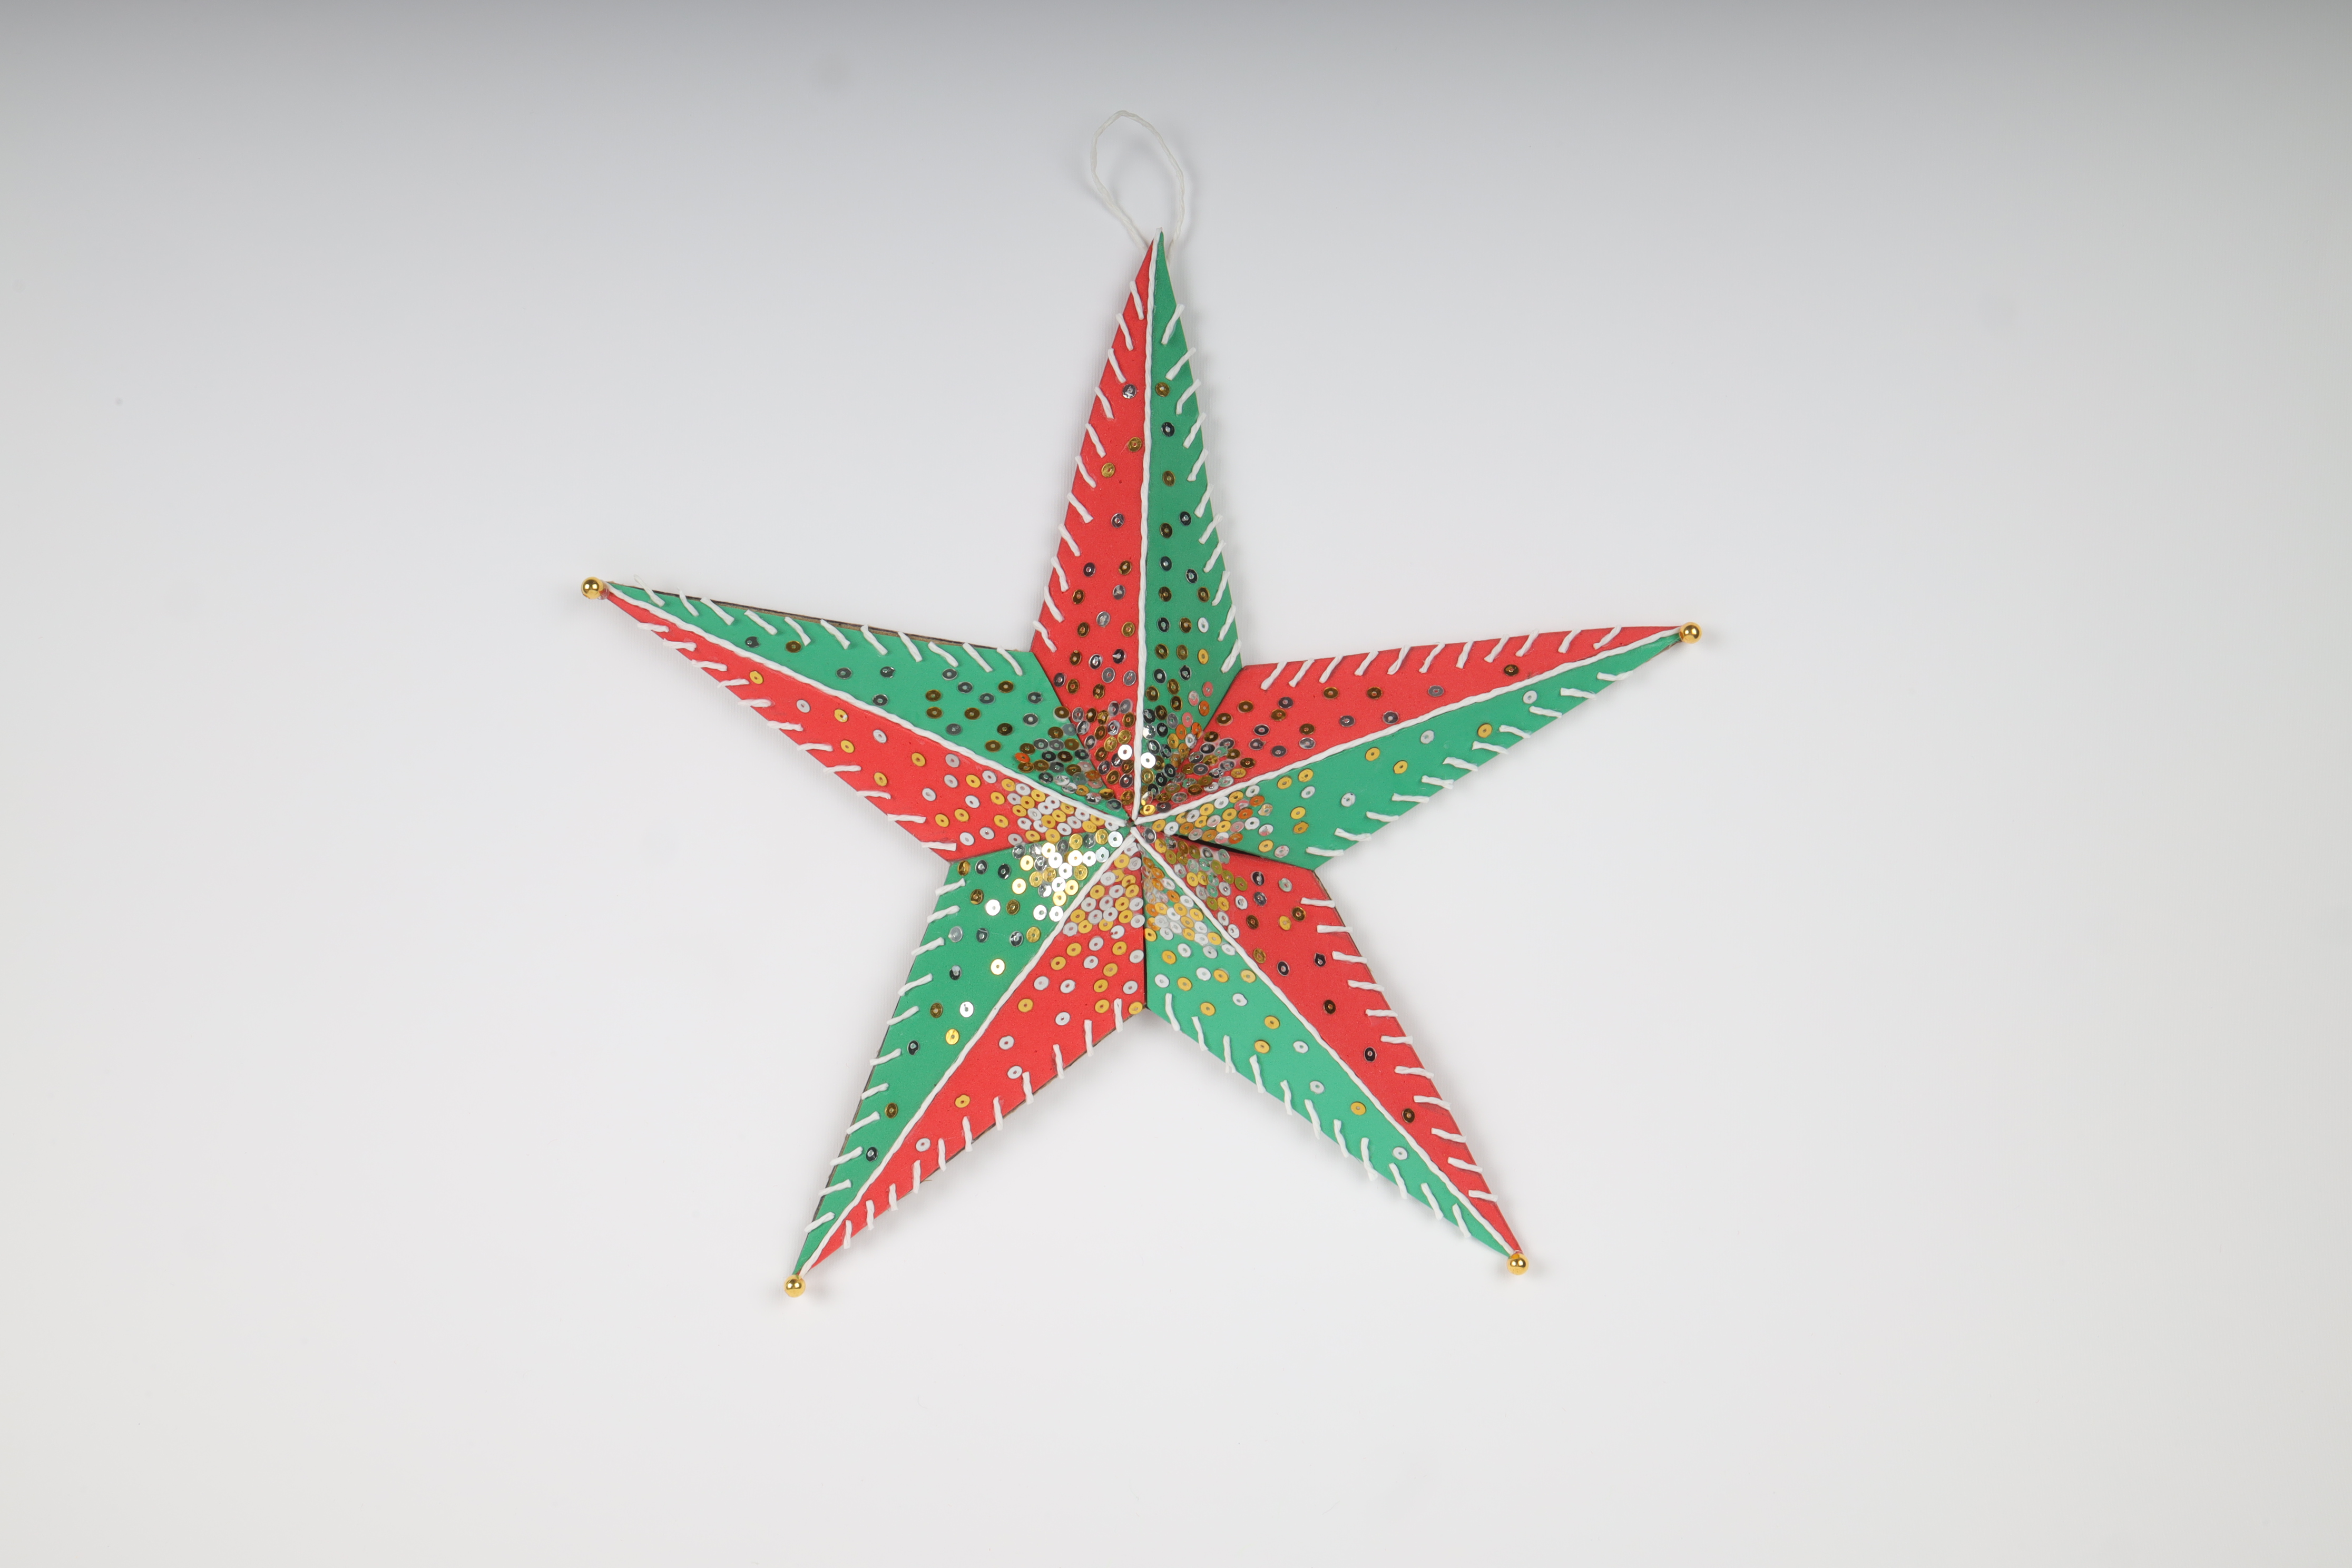
Crafting a Christmas star is a classic holiday activity that kids of all ages can enjoy. Children can create a star decoration for Christmas, hang it up, and bring the festive spirit to any place.
Materials Needed:
-
Fevistik Power
-
Corrugated sheet
-
Foam sheet (Red and Green)
-
White paper cord
-
Sequins (silver and gold)
-
Pencil
-
Scale
-
Scissors
Grab a corrugated sheet, trace a star shape using a template, cut it out, and then make a kite-like thing with Fevistik Power. Super easy and cool!
Assemble the sides onto the corrugated star cut-out. Decorate the Christmas star with paper cords and sequins using Fevistik Power. Kids can personalise it further with materials like pom poms, buttons, candy sticks, ornamental stones, shaker elements, and beads.
Your child can create the Christmas star easily with our step-by-step instructions and visuals to refer to.
16. Polaroid Christmas Tree
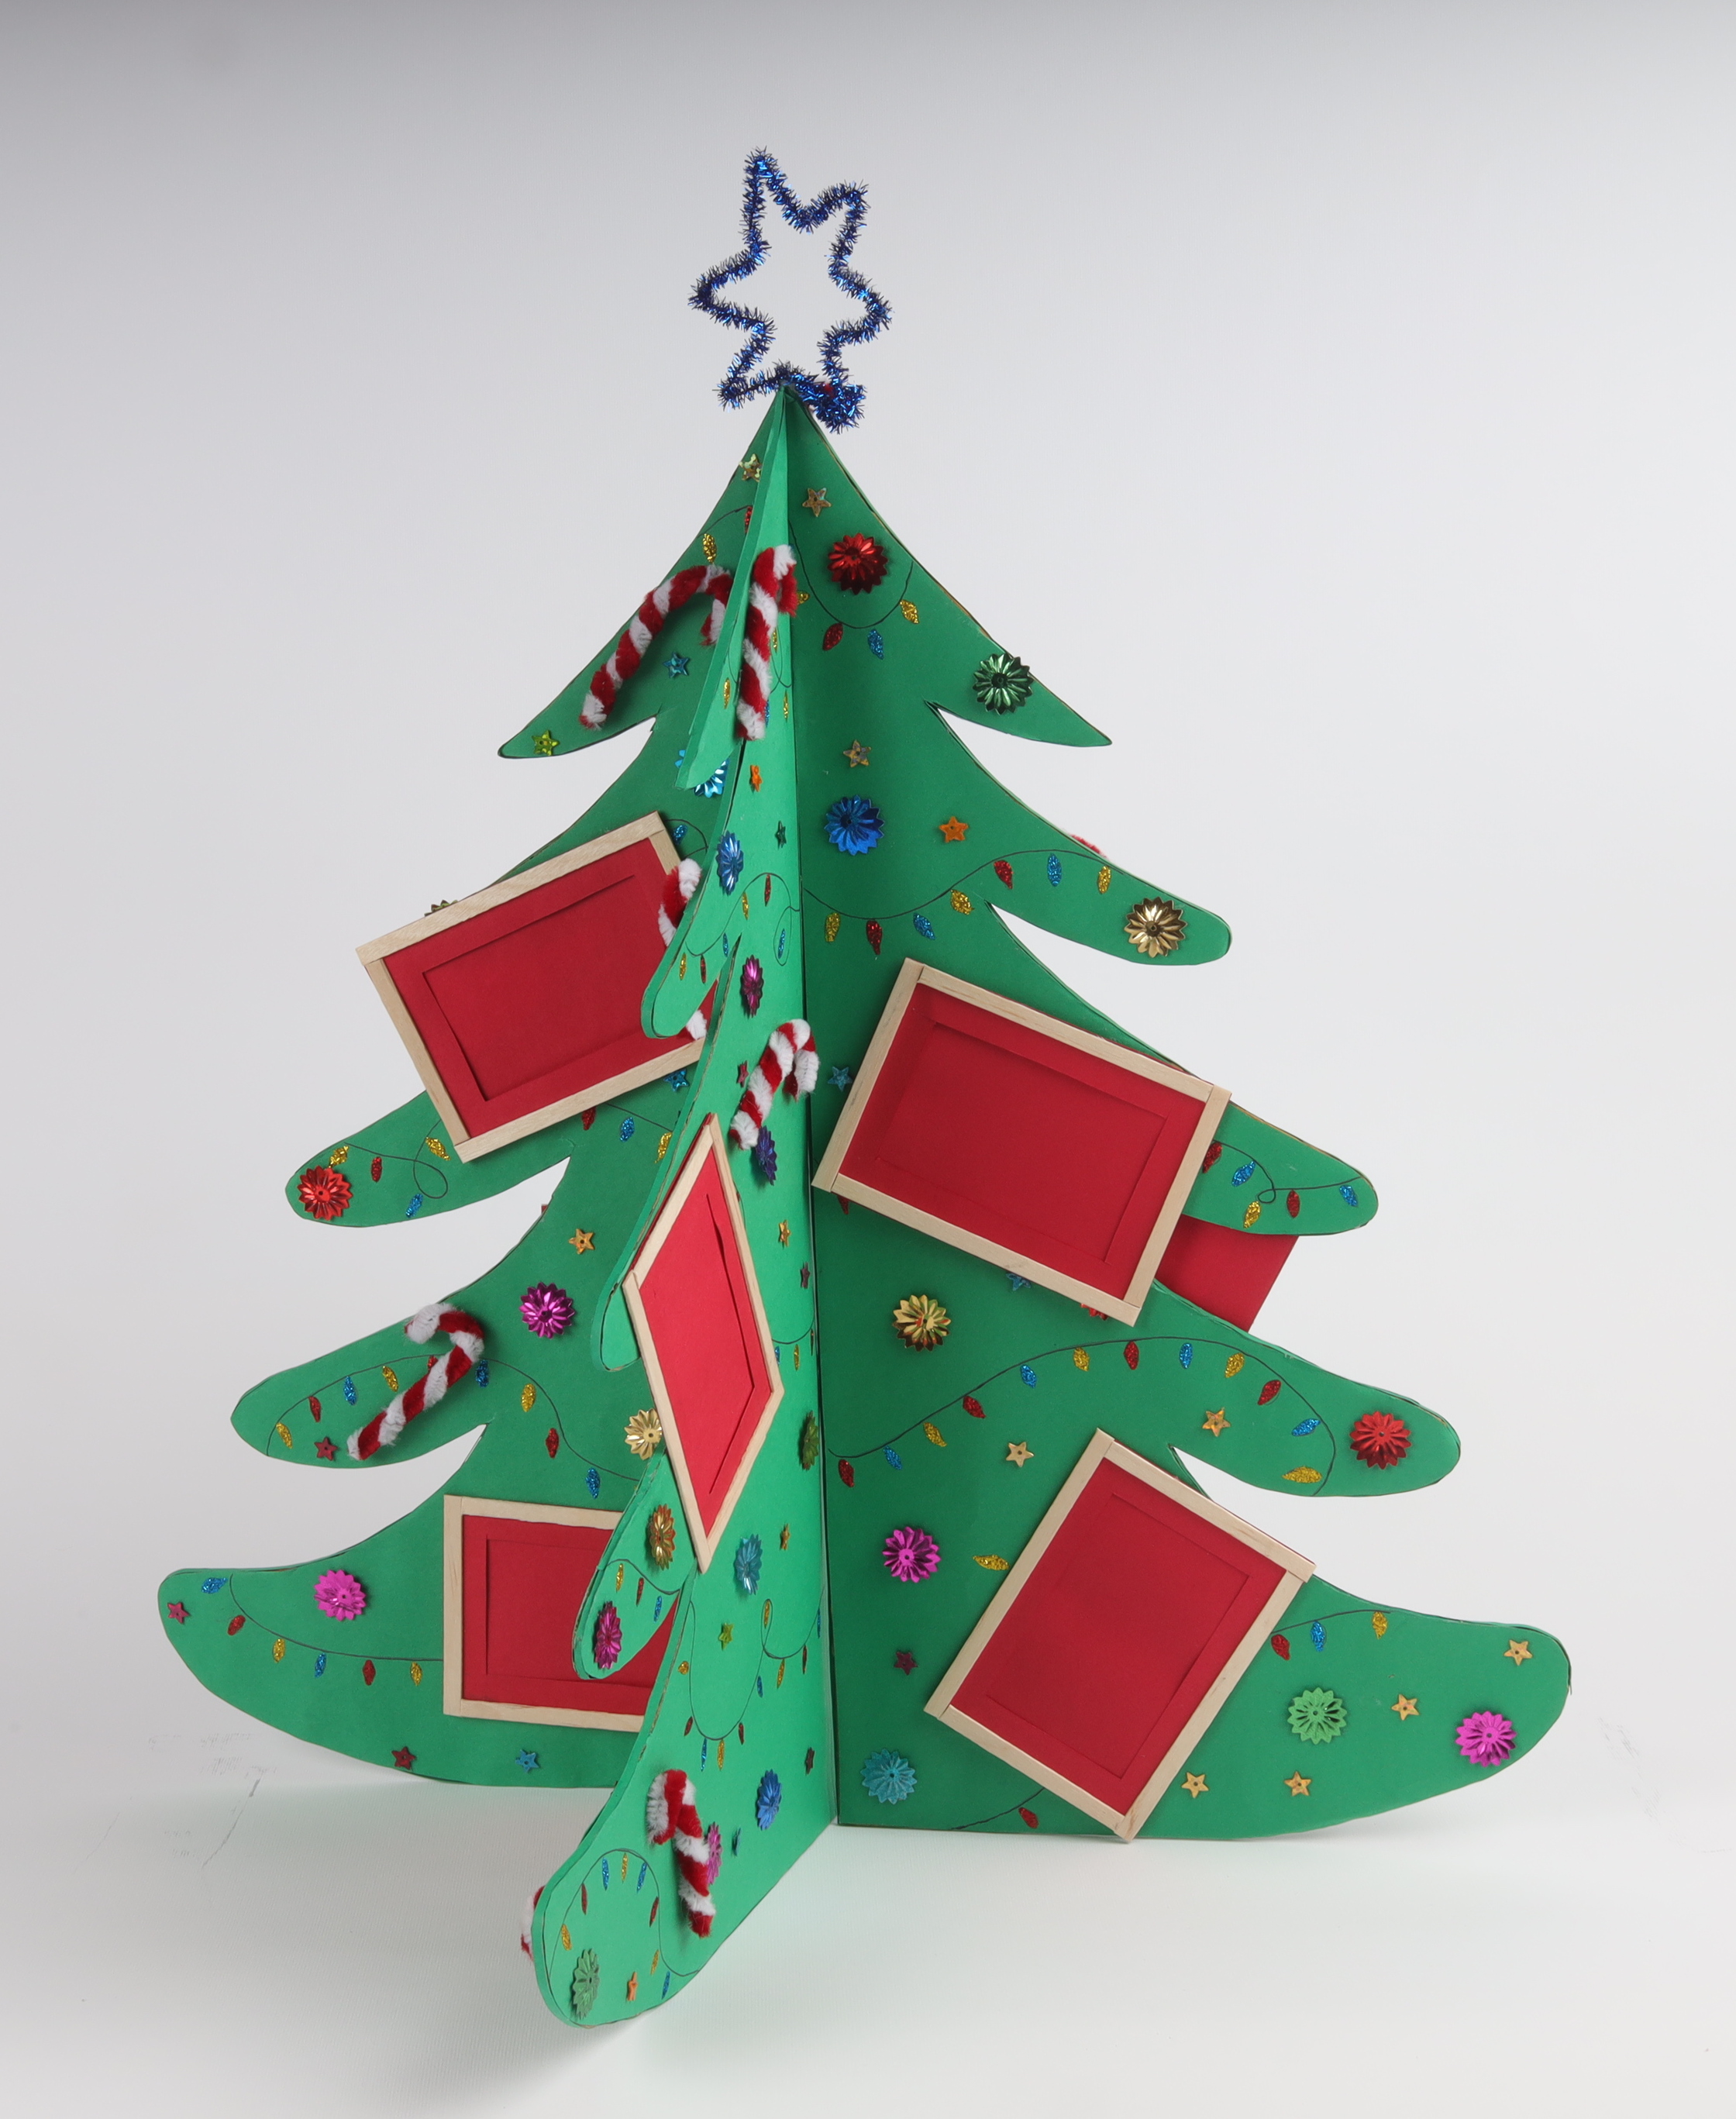
Embark on a crafty adventure with your kids as they create a Polaroid Christmas tree. This DIY paper Christmas decoration not only adds a festive flair to your home but also enhances your child’s creative skills.
Materials required:
-
Fevistik Power
-
Rangeela Paper Glitter
-
Green and red chart papers
-
Corrugated sheet
-
Sequins of different shapes and sizes
-
Pipe cleaners (red and white)
-
Black felt pen
-
Scale
-
Pencil
-
Paper cutter
-
Scissors
To make a Polaroid Christmas tree, draw and cut out a tree shape from corrugated sheets, cover it with green chart paper, and enhance the tree with a black felt pen. Make polaroid frames with red chart paper, insert images, and attach them to the tree. Add candy decorations, a pipe cleaner star, and sequins. Allow to dry and enjoy.
Explore our full guide on the Polaroid Christmas tree activity for step-by-step instructions.
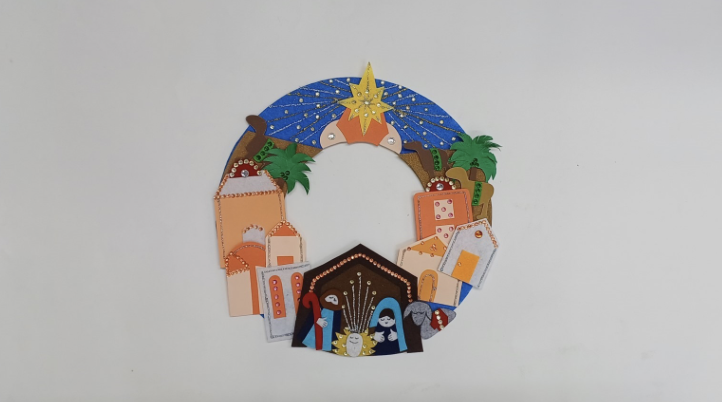
17. Learn How to Make a Christmas Wreath
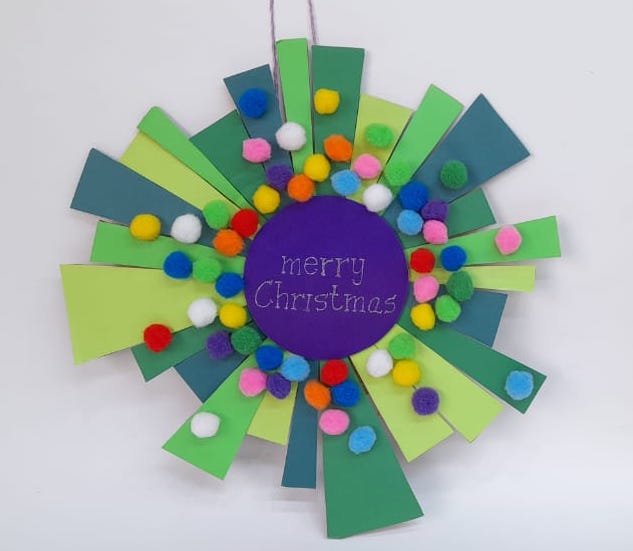
Dive into the world of Christmas crafting with your little ones and craft a charming Christmas wreath. As they design and create, they'll develop their artistic talents.
Materials required:
-
Fevistik Power
-
Rangeela Paper Glitter Packet
-
Shades of green foam sheets
-
Pom Pom
-
Any cord
-
Any coloured chart paper sheet
-
Compass
-
Scale
-
Pencil
-
Scissors
-
Paper cutter
Begin by cutting a 12 cm diameter inner circle and an 18 cm diameter outer circle from corrugated sheets using a compass. For the wreath, cut elongated trapezium shapes from corrugated sheets. Use green foam sheets to cover these shapes.
Make a centerpiece by cutting a circle from colored paper and adding "MERRY CHRISTMAS" with Rangeela Paper Glitter. Randomly attach pom poms to the wreath and place the centrepiece in the centre. Your DIY Christmas wreath is complete.
Discover detailed steps of the Christmas wreath in our full activity guide.
18. Christmas Bunting
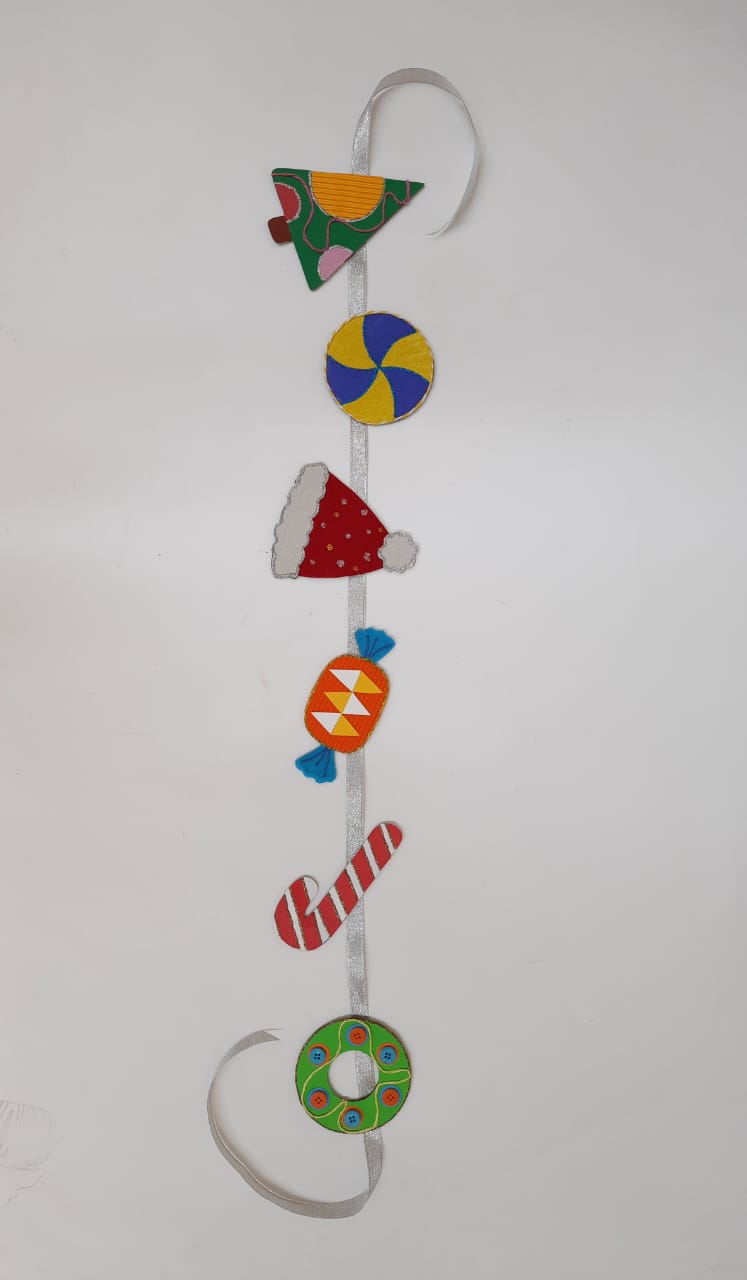
Spark the holiday spirit in your kids by crafting a cheerful Christmas bunting. This activity fosters their design, pattern-making, and crafting skills.
Materials required:
-
Fevistik Power
-
Rangeela paper glitter packet
-
Corrugated sheet
-
Coloured corrugated sheets
-
Any coloured ribbon
-
Foam sheets
-
Coloured chart
-
Buttons
-
Paper cords pencil
-
Scissors
Select an A6-sized Christmas element and cut it out from corrugated sheets. To decorate the tree, cut green chart paper for the base and use colourful chart papers and colored corrugated sheets. Stick the cut-outs with Fevistik Power.
Outline the tree with Rangeela Paper Glitter and add a paper cord. Use various materials like chart papers, coloured corrugated sheets, buttons, paper cords, and foam sheets to decorate. Stick the elements onto a coloured ribbon to create the bunting. Your DIY Christmas Bunting is complete.
For a jolly crafting session, head to our full activity guide on Christmas bunting.
19. Lapel Pin
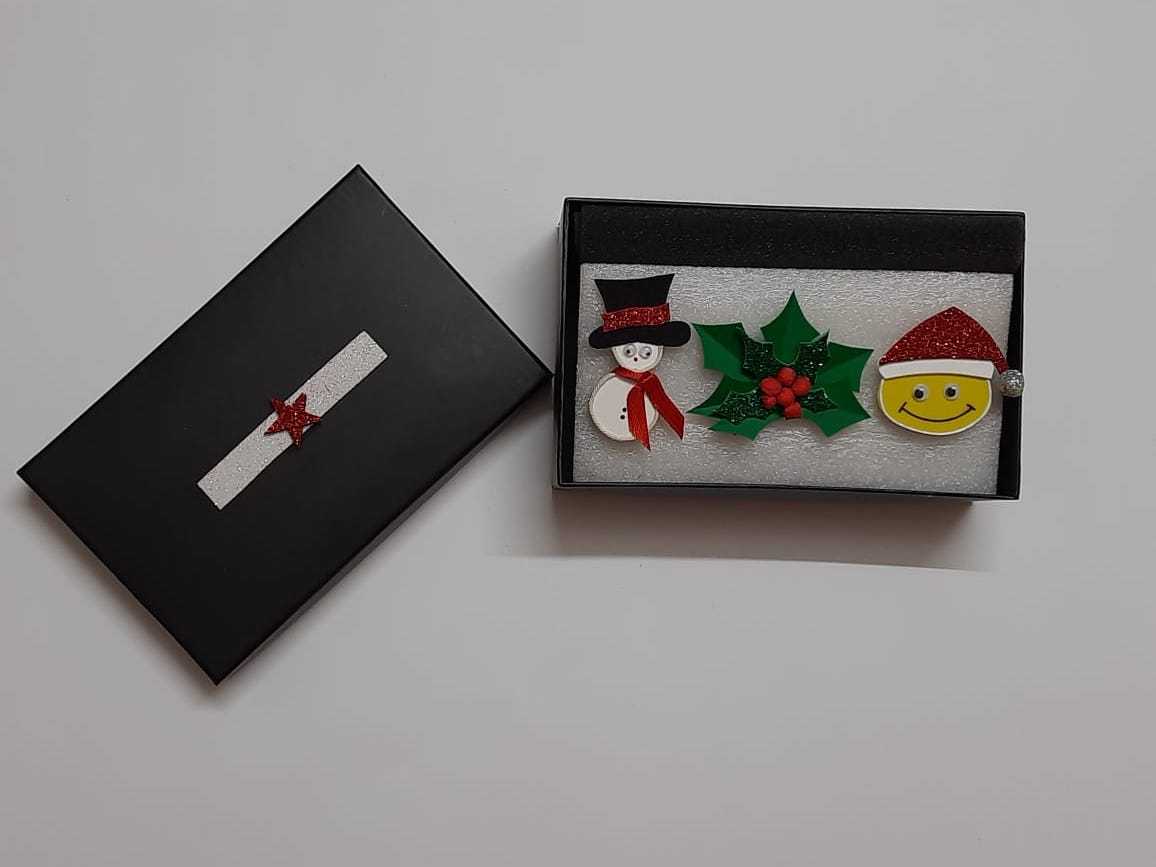

Unleash your kids' creativity as they design their lapel pins. A fantastic concept for creating festive DIY Christmas classroom decorations and a fun way to add a personal touch to accessories, all while improving their fine motor skills.
Materials required:
-
Fevicol MR
-
Mount board
-
Foam
-
Googly eyes
-
Satin ribbons
-
Fevicryl 3D Outliner
-
Any cord
-
Safety pin
-
Upcycled box
To make lapel pins, draw and cut a snowman shape from a mount board and foam sheet. Attach the foam cutout to the mount board using Fevicol MR. Draw and cut additional features based on the template.
Add details with Fevicryl 3D outliner. Create a holder with safety pins and allow it to dry. Arrange the lapel pins in an upcycled box and embellish. Your lapel pins are ready.
Find detailed instructions with a video tutorial of the lapel pin project in our full activity guide.
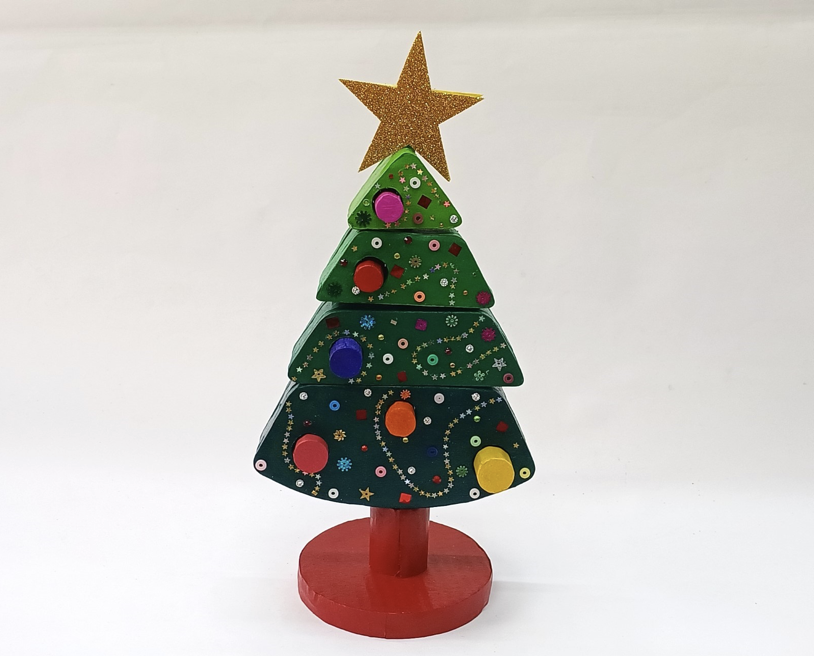
20. Xmas Tree Décor
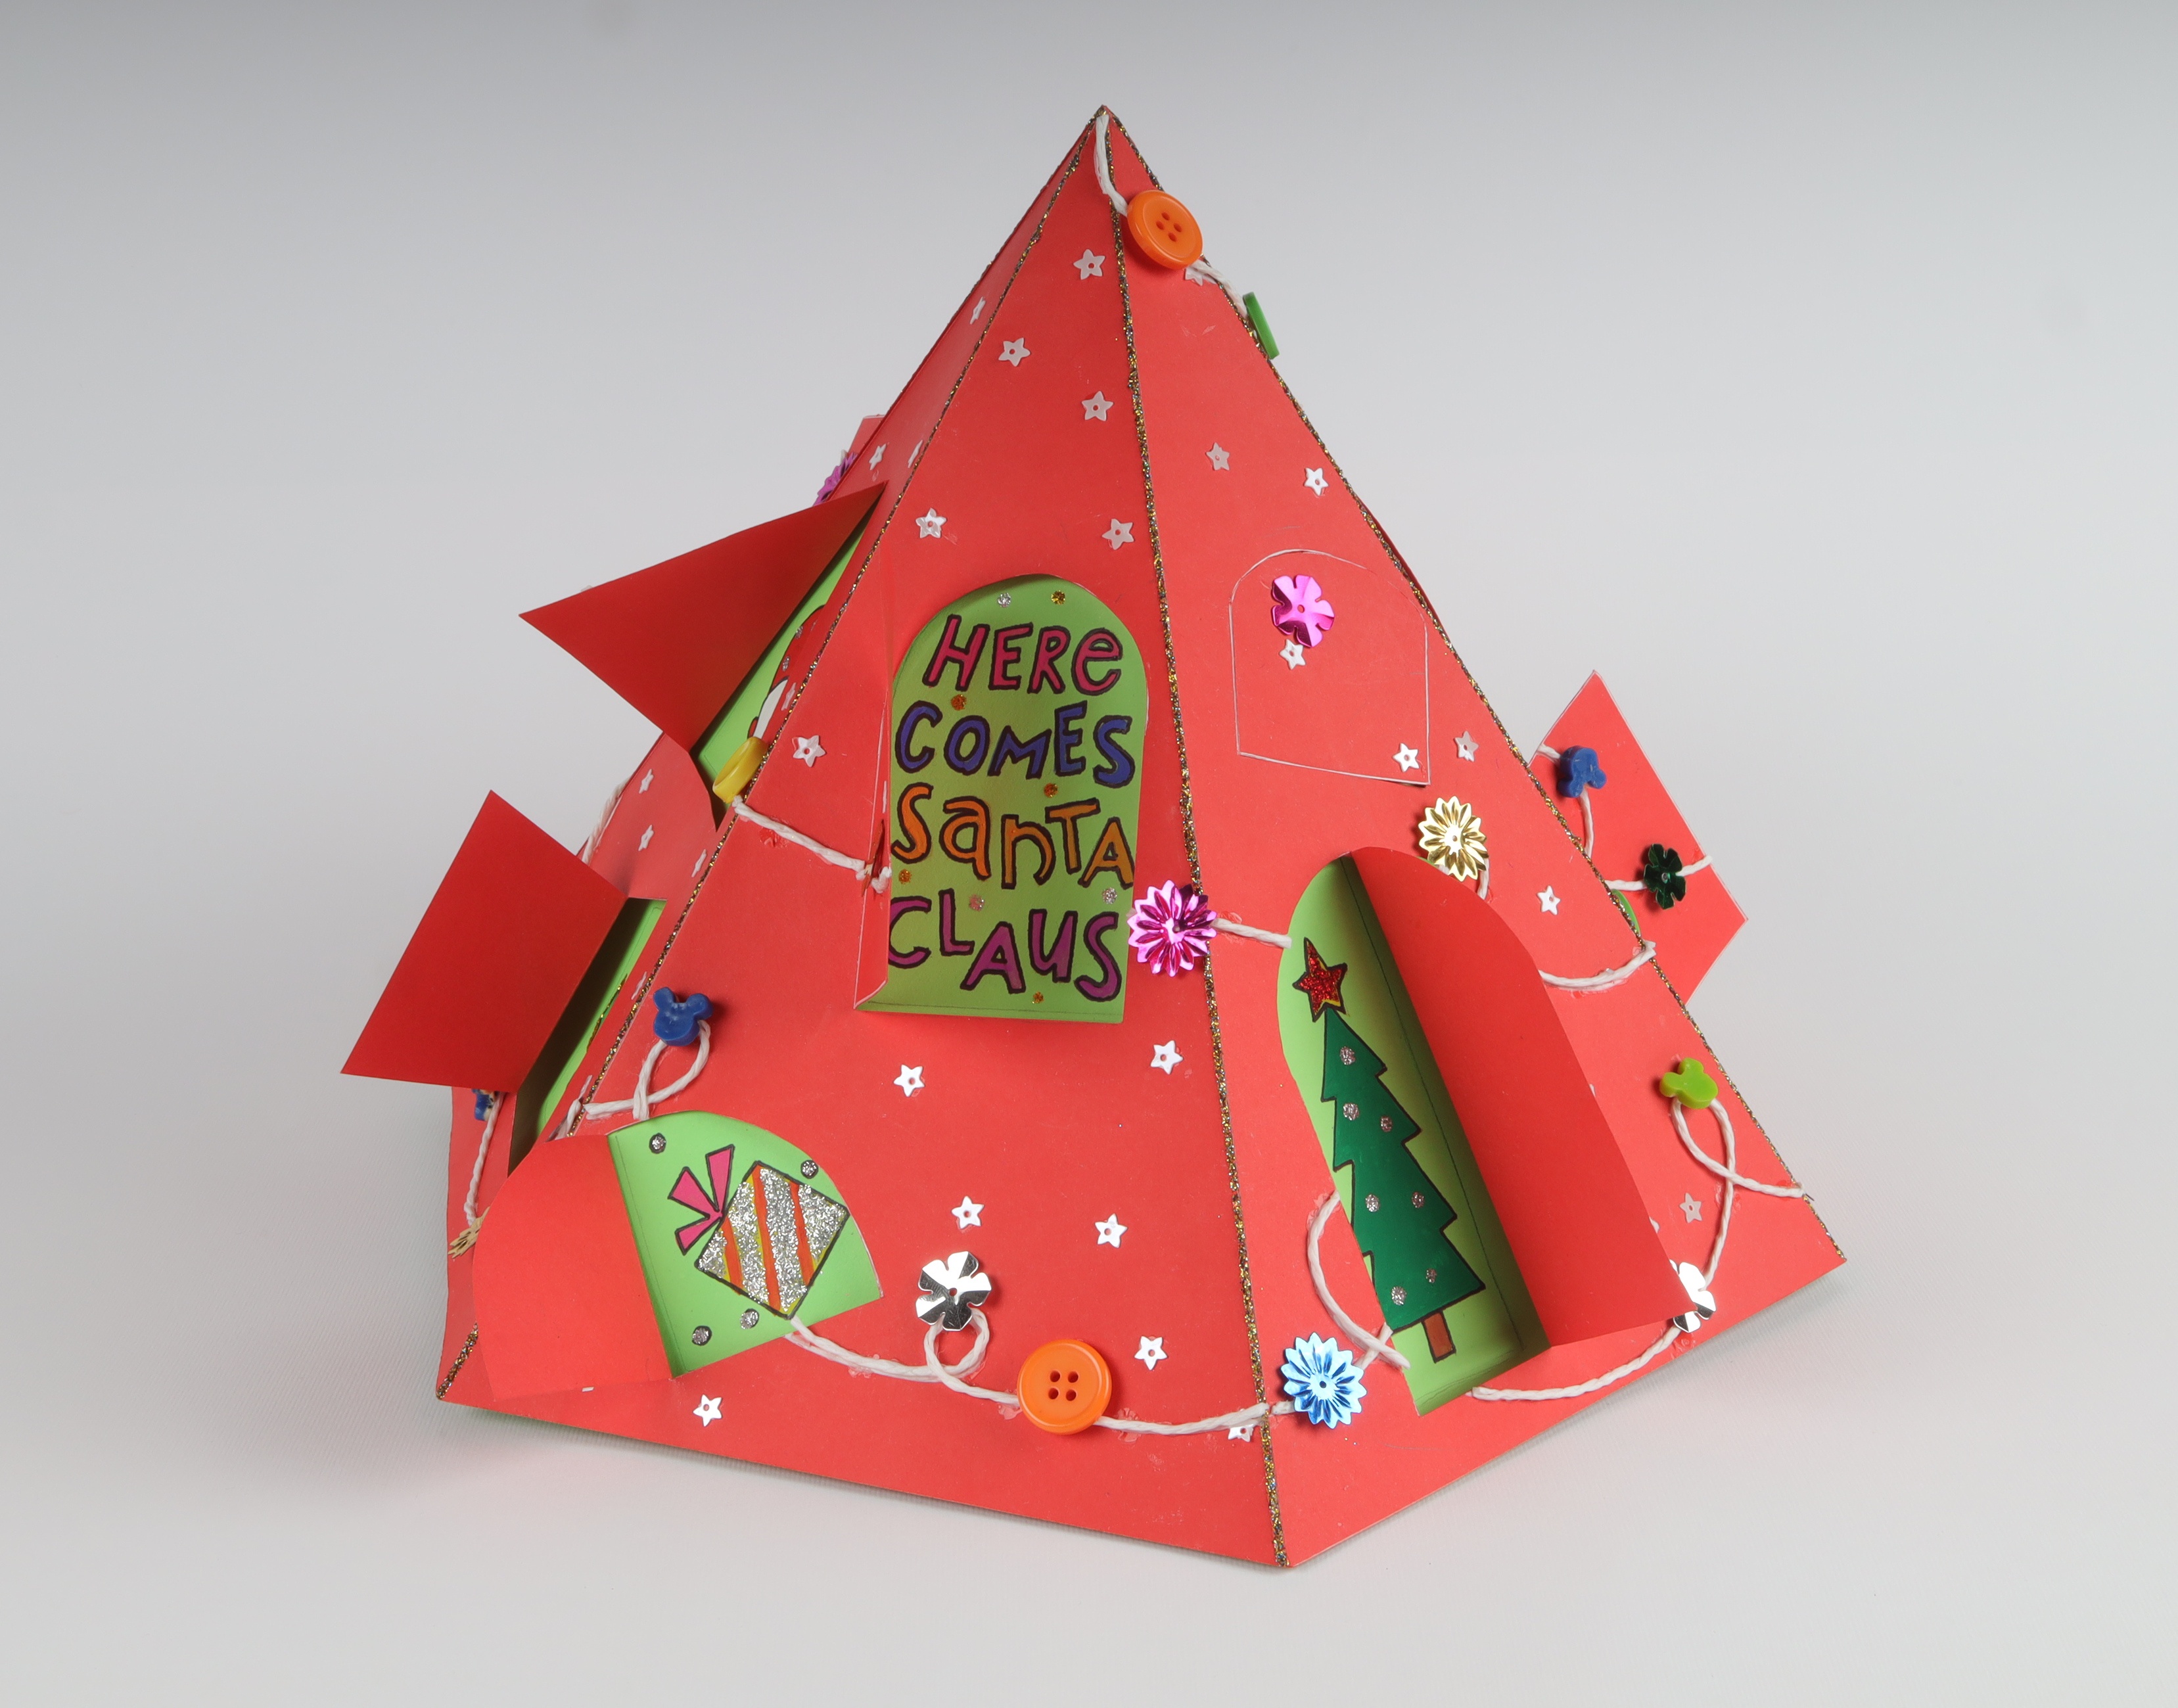
Get creative this holiday season by crafting personalised ornaments and decorations for your Christmas tree. Enhance your child's artistic abilities while adding a unique touch to your tree.
Materials required:
-
Fevistik Power
-
Rangeela Tempera Colours (18 shades)
-
Rangeela Chart Paper (Red and Light Green)
-
Sequins of different shapes and sizes
-
Buttons
-
White paper cord
-
Pencil
-
Scale
-
Scissors
-
Paper cutter
Craft a charming tabletop Xmas Tree Décor using simple materials. On red chart paper, sketch the tree outline and doors. Paint them with vibrant colours and add glittery touches. Assemble the conical structure with doors, and let your creativity shine.
For detailed crafting steps on the Xmas tree decor project, visit our full activity guide.
And It’s a Wrap!
In crafting a merry wonderland with these 16 DIY Christmas decorations, you've unlocked the magical world of holiday creativity. Every project is more than just making things look festive. It's a unique experience that encourages your child's creativity, and imagination, and brings joy and unity to your family. Get your things, gather your family, and let your holiday joy show as your kids make a magical Christmas place.


