


Festive Christmas Wreath For Kids - Activity Single - FeviCreate
Christmas Wreath Project
Children can make a festive Christmas wreath using paper, Fevistik glue, sequins, and ribbons. Each element can be layered creatively to form a vibrant, textured decoration. This activity encourages imaginative thinking, concentration, and fine skills.
Paper Crafting Celebration 30 to 60 mins 6 to 8 years Art & Craft Class 2


Steps to Create this Activity
Login to see steps

Step - 01
On a corrugated sheet, create a disc using a compass and pencil measuring a smaller circle with 12 cm diameter and an outer circle with 18 cm diameter.

Step - 02
Cut it with a paper cutter.

Step - 03
o create the wreath, on a corrugated sheet, draw a diagram of elongated trapeziums with a pencil, as shown.

Step - 04
Cut them with scissors.

Step - 05
To cover the corrugated cut-outs, take shades of green foam sheets, draw and cut out the forms, and stick them onto the corrugated cut-outs using Fevistik Power, as shown.

Step - 06
Using Fevistik Power, stick the cut-outs onto the disc made.

Step - 07
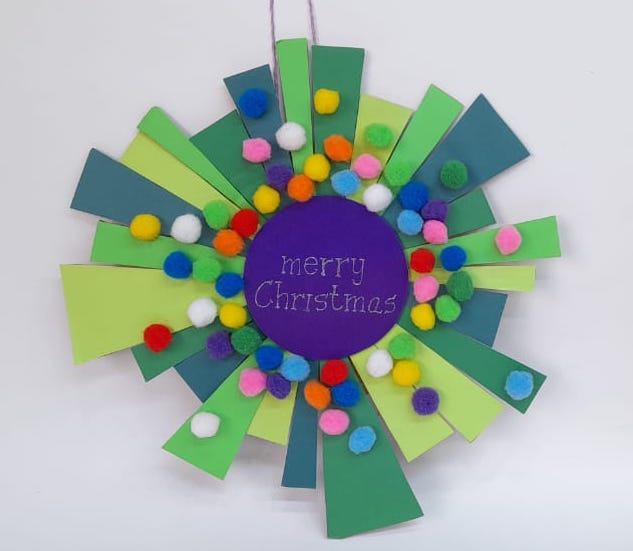
To create a centrepiece, take any coloured chart paper of your choice, draw and cut out a circle approx. measuring 11 cm. Using Rangeela Paper Glitter, write the text “MERRY CHRISTMAS” in the centre of the circle, as shown.

Step - 08
Using Fevistik Power, stick pom poms randomly around the wreath and stick the centrepiece onto the wreath, as shown. To create a wreath holder, take any cord and stick it behind. Your handmade Christmas Wreath is ready!
Steps to Create this Activity
Login to see steps
Step - 01
On a corrugated sheet, create a disc using a compass and pencil measuring a smaller circle with 12 cm diameter and an outer circle with 18 cm diameter.
Step - 02
Cut it with a paper cutter.
Step - 03
o create the wreath, on a corrugated sheet, draw a diagram of elongated trapeziums with a pencil, as shown.
Step - 04
Cut them with scissors.
Step - 05
To cover the corrugated cut-outs, take shades of green foam sheets, draw and cut out the forms, and stick them onto the corrugated cut-outs using Fevistik Power, as shown.
Step - 06
Using Fevistik Power, stick the cut-outs onto the disc made.
Step - 07
To create a centrepiece, take any coloured chart paper of your choice, draw and cut out a circle approx. measuring 11 cm. Using Rangeela Paper Glitter, write the text “MERRY CHRISTMAS” in the centre of the circle, as shown.
Step - 08
Using Fevistik Power, stick pom poms randomly around the wreath and stick the centrepiece onto the wreath, as shown. To create a wreath holder, take any cord and stick it behind. Your handmade Christmas Wreath is ready!


