


DIY Christmas Ornaments For Kids - Activity Single - FeviCreate
DIY Christmas Ornaments
Children can make Christmas ornaments with paper, glitter, sequins, and Fevistik glue. They can personalise shapes, colours, and patterns to match their holiday décor. This project develops creativity, fine motor skills, and design thinking.
Elevate your holiday décor with enchanting DIY Christmas ornaments! Let your kids explore the festive assortment, creating cherished memories as each ornament tells a story of joy and togetherness.
Mixed Media Celebration 30 to 60 mins 9 to 14 years Art & Craft Class 8


Steps to Create this Activity
Login to see steps

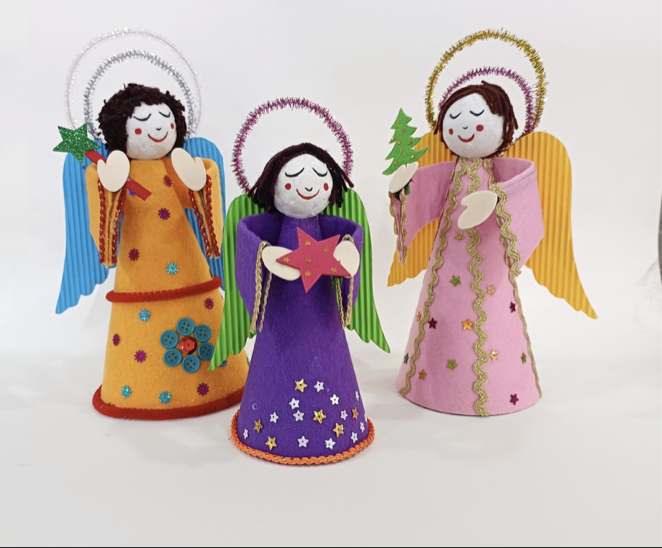
Step - 01
To create Christmas angel ornament, take a sheet of box board & felt, draw the diagram referring to the template given.

Step - 02
Cut them with scissors.

Step - 03
Using Fevistik Power, assemble the cut outs as shown

Step - 04
To create angel torso, create a conical structure as shown using Fevistik Power.

Step - 05
To create angel’s wings & hands, take colored corrugated sheet of your choice, foam sheet. Draw the diagram referring to the template given.

Step - 06
Cut the feathers with the help of scissors.

Step - 07
Make sure all the elements are ready I.e., wings, hands, sleeves & torso.

Step - 08
To create an arc like structure inside the sleeves, take flower wire insert it as shown and seal the flaps using Fevistik Power & let it dry

Step - 09
To create an angel’s face, take a table tennis ball and some tissue paper.

Step - 10
Using Fevistik Power, stick the tissue paper over the tennis ball, take some brown wool, cut them into tiny pieces and stick it over the ball as shown. Using Rangeela Tempera Colors create features referring to the image.

Step - 11
Using Fevistik Power assemble the parts as shown & let it dry.

Step - 12
Using Fevistik Power, stick the face as shown. Enhance the structure using decorative material like sequins, buttons, pipe cleaner, any cord & other embellishments.
Steps to Create this Activity
Login to see steps
Step - 01
To create Christmas angel ornament, take a sheet of box board & felt, draw the diagram referring to the template given.
Step - 02
Cut them with scissors.
Step - 03
Using Fevistik Power, assemble the cut outs as shown
Step - 04
To create angel torso, create a conical structure as shown using Fevistik Power.
Step - 05
To create angel’s wings & hands, take colored corrugated sheet of your choice, foam sheet. Draw the diagram referring to the template given.
Step - 06
Cut the feathers with the help of scissors.
Step - 07
Make sure all the elements are ready I.e., wings, hands, sleeves & torso.
Step - 08
To create an arc like structure inside the sleeves, take flower wire insert it as shown and seal the flaps using Fevistik Power & let it dry
Step - 09
To create an angel’s face, take a table tennis ball and some tissue paper.
Step - 10
Using Fevistik Power, stick the tissue paper over the tennis ball, take some brown wool, cut them into tiny pieces and stick it over the ball as shown. Using Rangeela Tempera Colors create features referring to the image.
Step - 11
Using Fevistik Power assemble the parts as shown & let it dry.
Step - 12
Using Fevistik Power, stick the face as shown. Enhance the structure using decorative material like sequins, buttons, pipe cleaner, any cord & other embellishments.


