


Lion Paper Craft Activity for Kids - Activity Single - FeviCreate
Create a Roaring Lion with Simple Paper Craft
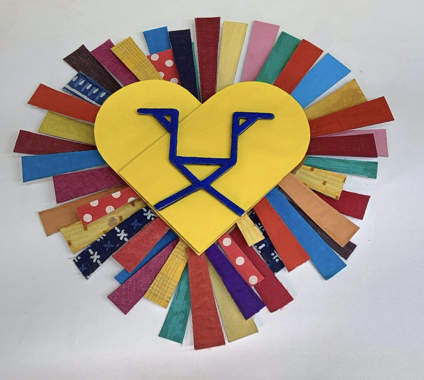
Let your kids explore creativity with the Fevicreate’s Lion Craft. It's a fun and educational guide with step-by-step instructions for their themed lion art project.
Mixed Media Best Out of Waste 30 to 60 mins 9 to 14 years Art & Craft Class 7


Steps to Create this Activity
Login to see steps

Step - 01
On a corrugated sheet, draw the diagram of a lion’s face using a pencil (refer to template).

Step - 02
Cut them with scissors.

Step - 03
Similarly, draw the lion’s face diagram onto the foam sheet, as shown.

Step - 04
Cut them with scissors.

Step - 05
Using Fevistik Power, stick foam cut-outs onto corrugated cut-outs and assemble as shown.

Step - 06
To create the lion’s features, on a mount board sheet, draw and cut the diagram as shown. Make sure the features drawn are proportionate to the lion’s face.

Step - 07
Using Fevistik Power, stick blue coloured sand onto the cut-out; let it dry.

Step - 08
Using Fevistik Power, stick the feature cut-out as shown; let it dry.

Step - 09
To create the lion’s mane, on a mount board sheet, draw and cut diagrams of elongated trapeziums of random lengths, as shown.

Step - 10
Take any upcycled fabric pieces available and cover the mane cut-outs using Fevistik Power; let it dry.

Step - 11
Using Fevistik Power, assemble the cut-outs around the lion’s face and let it dry. Your Fevistik Power Lion is ready!
Steps to Create this Activity
Login to see steps
Step - 01
On a corrugated sheet, draw the diagram of a lion’s face using a pencil (refer to template).
Step - 02
Cut them with scissors.
Step - 03
Similarly, draw the lion’s face diagram onto the foam sheet, as shown.
Step - 04
Cut them with scissors.
Step - 05
Using Fevistik Power, stick foam cut-outs onto corrugated cut-outs and assemble as shown.
Step - 06
To create the lion’s features, on a mount board sheet, draw and cut the diagram as shown. Make sure the features drawn are proportionate to the lion’s face.
Step - 07
Using Fevistik Power, stick blue coloured sand onto the cut-out; let it dry.
Step - 08
Using Fevistik Power, stick the feature cut-out as shown; let it dry.
Step - 09
To create the lion’s mane, on a mount board sheet, draw and cut diagrams of elongated trapeziums of random lengths, as shown.
Step - 10
Take any upcycled fabric pieces available and cover the mane cut-outs using Fevistik Power; let it dry.
Step - 11
Using Fevistik Power, assemble the cut-outs around the lion’s face and let it dry. Your Fevistik Power Lion is ready!


