DIY Diwali Lantern Guide | FeviCreate - Activity Single - FeviCreate

Stunning DIY Diwali Lantern
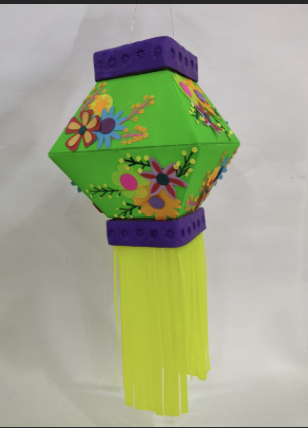
Learn how to make a festive lantern from scratch, starting with coloured gateway sheets to form the body, adding a corrugated frame, decorative flowers, fringes and clay accents. Finish by attaching ribbon to hang. A beautiful project blending art, colour, tradition and hands-on fun for kids and families.
Add a touch of Diwali magic to your child's day with this exciting DIY Diwali lantern craft activity. Watch as they craft their own lantern, embracing the beauty of tradition and colours, creating a moment of festive serenity and joy.
Mixed Media Celebration 30 to 60 mins 6 to 8 years Art & Craft Class 4
- Search Suggestions :
- diy diwali lantern
- diwali lantern craft
- handmade lantern
- homemade diwali lantern
Steps to Create this Activity
Login to see steps
Step - 02
To create a beam for the lantern, take a corrugated sheet, and draw and cut out a set of square frames referring to the template. Using Glue drops, construct the lantern as shown in the image. Make sure to stick square frames on both sides under the construction of the lantern made for it to stay intact.
Step - 03
To create a lantern holder, take a corrugated sheet, draw and cut out the diagram referring to the template given and create 1 set. Now fold the strips into a square form and seal the flap to the edge of the strip using Glue Drops. Assemble the holder above and below the lantern construction as shown in the image using Fevicol MR and let it dry.
Steps to Create this Activity
Login to see steps

Step - 01
To create a lantern structure, take coloured gateway sheet of your choice, draw and cut out the diagram of the lantern structure referring to the template given and create eight partitions as shown in the image. With the help of a scale, fold the flaps.

Step - 02
To create a beam for the lantern, take a corrugated sheet, and draw and cut out a set of square frames referring to the template. Using Glue drops, construct the lantern as shown in the image. Make sure to stick square frames on both sides under the construction of the lantern made for it to stay intact.

Step - 03
To create a lantern holder, take a corrugated sheet, draw and cut out the diagram referring to the template given and create 1 set. Now fold the strips into a square form and seal the flap to the edge of the strip using Glue Drops. Assemble the holder above and below the lantern construction as shown in the image using Fevicol MR and let it dry.

Step - 04
To decorate the lantern, take coloured chart papers and neon gateway sheets, draw and cut out different shapes and sizes of flowers, pollens, leaves, and branches of your choice, or refer to the template given.

Step - 05
Using Glue Drops, assemble the flowers onto the lantern as shown in the image.

Step - 06
To create lantern fringes, take any contrast-coloured gateway sheet draw and cut out the diagram creating two sets referring to the template given. Using Glue Drops, stick fringes under the lantern holder as shown.

Step - 07
Using Rangeela Creative Clay of your choice, fill up the holders as shown. For durability and freshness of the colour, apply a layer of Fevicol MR on it and let it dry.

Step - 08
Take any cord or ribbon, stick it on the edge of the lantern holder using Fevicol MR, and let it dry. Handmade Lantern is ready!

Step - 09
Design Template.


