


DIY Tissue Paper Dancing Doll Craft Activity for Kids - Activity Single - FeviCreate
DIY Dancing Doll Craft Activity with Tissue Paper
Get ready to groove with our DIY Dancing Doll Craft Activity! Using tissue paper, a barbeque stick, and foil, your kids can create their very own dancing doll. Watch as their creativity comes to life, and let the laughter and dance bring joy to your home!
Mixed Media Brand me More than 60 mins 9 to 14 years Art & Craft Class 6


Steps to Create this Activity
Login to see steps

Step - 01
To create a figurine, you will need a bottle cap, barbeque stick, tennis ball, foil, and OHP sheet. Poke a hole in the centre of the bottle cap and insert a barbeque stick measuring approximately 15 cm height.

Step - 02
To create a torso, take foil paper, construct a torso-like shape as shown in the image.

Step - 03
Now insert it through the barbeque stick as shown.

Step - 04
To create skirt, take an ohp sheet draw the diagram referring to the image as shown with the help of felt pen.

Step - 05
Cut them with scissors and construct a conical shape; stick the edges using Fevicol A+ and let it dry

Step - 06
Take a cobbler cord tie it up onto marking of waist now insert skirt over it as shown in the image. To make a head, stick a tennis ball over a barbeque stick using Fevicol A+ and let it dry.

Step - 07
To cover the figurine structure, create tissue paper Mache, take a bowl filled with tissue paper pieces, add some water, and Fevicol A+ until a dough is formed

Step - 08
Now apply a layer of tissue paper mâché on the figurine made as shown in the image and let it dry.

Step - 09
Using Rangeela Tempera Colours of your choice, paint the figurine with Fine Art brushes and let it dry. With a pencil, draw the facial features of the dancing doll, as shown in the image.

Step - 10
To create a crown, take gold chart paper; referring to the image, draw the crown with a felt pen. Make sure it's proportionate to the face constructed.

Step - 11
Cut them with scissors. Now cut out a strip of corrugated to create steady support to crown and stick it using Fevicol A+.

Step - 12
To enhance the figurine, you will need decorative material, i.e., ribbons, ornamental stones, bead cord, and lace of your choice.

Step - 13
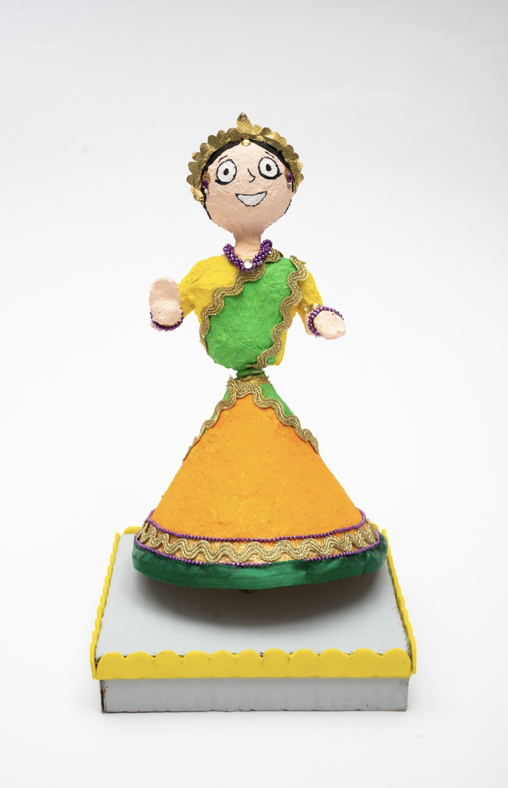
Using Fevicol A+, stick the crown and other decorative elements to enhance the figurine as shown in the image and let it dry. To create the base for the figurine, you will need an upcycled box and poke a hole in the centre, as shown. Using Rangeela Tempera Colours, paint the box with Fine Art brushes and let it dry. To enhance it further, take any coloured foam sheet, cut out a patterned strip of your choice and stick as the borders using Fevicol A+ and let it dry. Insert the figurine through the base as shown. Your handmade dancing doll is ready!
Steps to Create this Activity
Login to see steps
Step - 01
To create a figurine, you will need a bottle cap, barbeque stick, tennis ball, foil, and OHP sheet. Poke a hole in the centre of the bottle cap and insert a barbeque stick measuring approximately 15 cm height.
Step - 02
To create a torso, take foil paper, construct a torso-like shape as shown in the image.
Step - 03
Now insert it through the barbeque stick as shown.
Step - 04
To create skirt, take an ohp sheet draw the diagram referring to the image as shown with the help of felt pen.
Step - 05
Cut them with scissors and construct a conical shape; stick the edges using Fevicol A+ and let it dry
Step - 06
Take a cobbler cord tie it up onto marking of waist now insert skirt over it as shown in the image. To make a head, stick a tennis ball over a barbeque stick using Fevicol A+ and let it dry.
Step - 07
To cover the figurine structure, create tissue paper Mache, take a bowl filled with tissue paper pieces, add some water, and Fevicol A+ until a dough is formed
Step - 08
Now apply a layer of tissue paper mâché on the figurine made as shown in the image and let it dry.
Step - 09
Using Rangeela Tempera Colours of your choice, paint the figurine with Fine Art brushes and let it dry. With a pencil, draw the facial features of the dancing doll, as shown in the image.
Step - 10
To create a crown, take gold chart paper; referring to the image, draw the crown with a felt pen. Make sure it's proportionate to the face constructed.
Step - 11
Cut them with scissors. Now cut out a strip of corrugated to create steady support to crown and stick it using Fevicol A+.
Step - 12
To enhance the figurine, you will need decorative material, i.e., ribbons, ornamental stones, bead cord, and lace of your choice.
Step - 13
Using Fevicol A+, stick the crown and other decorative elements to enhance the figurine as shown in the image and let it dry. To create the base for the figurine, you will need an upcycled box and poke a hole in the centre, as shown. Using Rangeela Tempera Colours, paint the box with Fine Art brushes and let it dry. To enhance it further, take any coloured foam sheet, cut out a patterned strip of your choice and stick as the borders using Fevicol A+ and let it dry. Insert the figurine through the base as shown. Your handmade dancing doll is ready!


