


Christmas Crown Made of Paper Using Fevistik Glue - Activity Single - FeviCreate
Christmas Paper Crown
Craft a festive Christmas crown using paper and Fevistik glue, adding a personal touch to holiday celebrations. This project allows children to create their own wearable decorations, enhancing the festive atmosphere.
Let the holiday spirit shine with our Christmas crown craft! Using our easy guide, let your kids explore the art of creating head-turning holiday headgear and get them ready to dazzle with Christmas tree-themed crowns.
Paper Crafting Celebration 30 to 60 mins 6 to 8 years Art & Craft Class 4


Steps to Create this Activity
Login to see steps

Step - 01
On a corrugated sheet, draw the outline of a Christmas tree in different sizes, as shown.

Step - 02
Cut the shapes with scissors.

Step - 03
Take coloured chart papers of your choice and cover the corrugated cut-outs using Fevistik Power. Let it dry.

Step - 04
To create head gear, take a corrugated sheet, draw and cut out a strip approx. 1 inch wide. Similarly, draw and cut out a chart paper strip. Make sure the length of the strip is cut out according to your head circumference.

Step - 05
To enhance the trees, decorate them with sequins, buttons, pom pom, and ornamental stones using Fevistik Power. You can also use Rangeela Paper Glitter of your choice. Let it dry.

Step - 06
Using Fevistik Power, assemble all the cut-outs, as shown.

Step - 07
Similarly, draw and cut out a chart paper strip to stick it inwards.

Step - 08
Using Fevistik Power, stick the cut-out inwards, as shown, for better finishing.

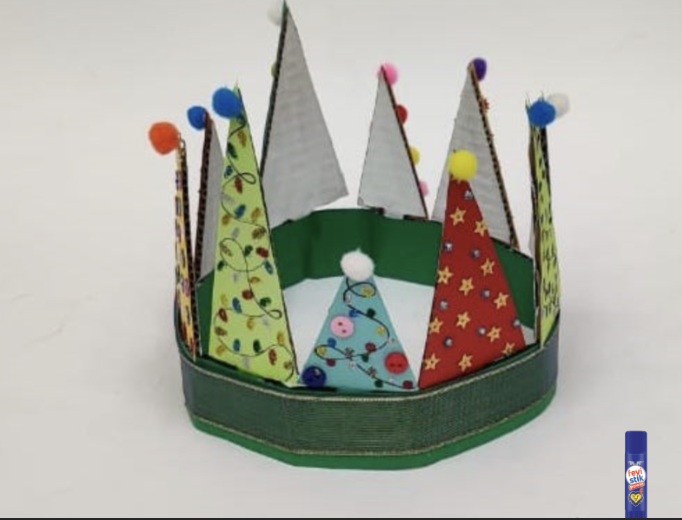
Step - 09
Using Fevistik Power, stick the edges to form a headgear. Take any coloured ribbon of your choice and stick it onto the structure as shown, and stick pom poms to the edge of each tree using Fevistik Power. Let this dry. Your handmade Christmas Head Gear is ready!
Steps to Create this Activity
Login to see steps
Step - 01
On a corrugated sheet, draw the outline of a Christmas tree in different sizes, as shown.
Step - 02
Cut the shapes with scissors.
Step - 03
Take coloured chart papers of your choice and cover the corrugated cut-outs using Fevistik Power. Let it dry.
Step - 04
To create head gear, take a corrugated sheet, draw and cut out a strip approx. 1 inch wide. Similarly, draw and cut out a chart paper strip. Make sure the length of the strip is cut out according to your head circumference.
Step - 05
To enhance the trees, decorate them with sequins, buttons, pom pom, and ornamental stones using Fevistik Power. You can also use Rangeela Paper Glitter of your choice. Let it dry.
Step - 06
Using Fevistik Power, assemble all the cut-outs, as shown.
Step - 07
Similarly, draw and cut out a chart paper strip to stick it inwards.
Step - 08
Using Fevistik Power, stick the cut-out inwards, as shown, for better finishing.
Step - 09
Using Fevistik Power, stick the edges to form a headgear. Take any coloured ribbon of your choice and stick it onto the structure as shown, and stick pom poms to the edge of each tree using Fevistik Power. Let this dry. Your handmade Christmas Head Gear is ready!


