


Smart City Model for School Project | DIY Eco-Friendly Activity - Fevicreate - Activity Single - FeviCreate
Smart City Model Craft for Environment Day
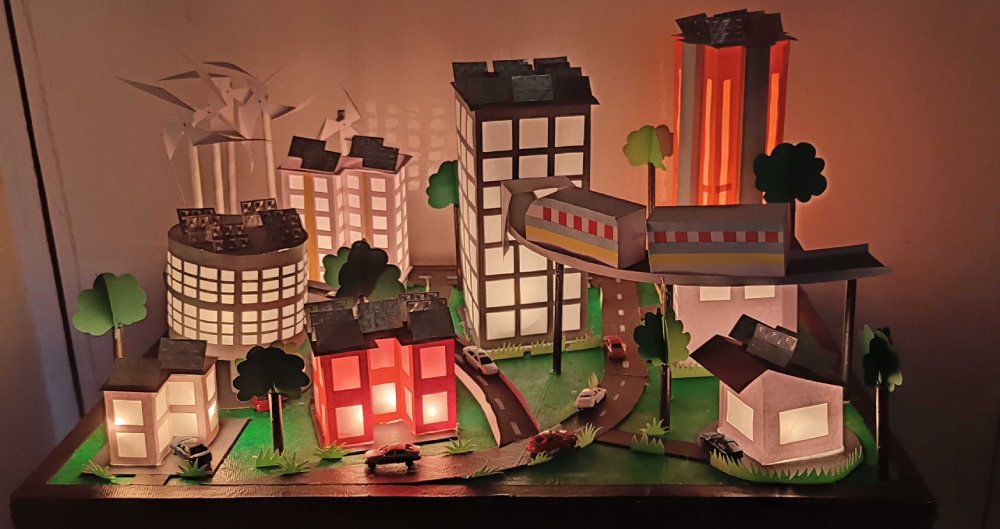
Turn old boxes, caps, and waste paper into a model city filled with green spaces and smart ideas. A fun way to think about recycling and the future.
Reuse, build, and imagine a better tomorrow!
Mixed Media Environment More than 60 mins 9 to 14 years Science Class 7


Steps to Create this Activity
Login to see steps

Step - 01
To create building structures, take thick card paper of your choice create shape of building as shown, now with the help of scale and paper cutter give detail cutting of window. To enhance it further add colourful chart papers strips & assemble it using Fevicol A+. Now insert a gateway sheet inwards the building created. To give the building support, cut-out pieces of paper straw and colour it with Fevicryl Acrylic Colour of your choice. Using Feivcol A+ stick cutouts below as shown and let it dry.

Step - 02
Similarly, create building Structures of different shapes and size. Make sure base of the building has opening to insert lights

Step - 03
To create building Base, take mount board to draw and cut out shapes according to building contour. Now poke holes through as shown with the help of barbeque stick and make sure hole poked is big enough to pass fairy light bulbs . Using Fevicryl Acrylic colour of your choice paint it with the help of fine art brushes.

Step - 04
Now to create base take sheet of mount board and paint it using Fevicryl Acrylic Colour. Now stick the building base cut-outs using Fevicol A+. Now insert fairy light bulb through each hole as shown.

Step - 05
Using Fevicol A+, stick buildings as shown and let it dry.

Step - 06
To create trees, take coloured chart papers of your choice and paper straw. Now cut out 2 contours of tree give silt in the centre up to and lock it as shown using Fevicol A+. To create the trunk of the tree, take paper straw and attach to the tree contour using Fevicol A+. Now using Fevicryl Acrylic Colour of your choice paint the trunk.

Step - 07
o create solar panels, take silver craft metallic paper and cut it small rectangular pieces as per required sizes. Now take thick card paper, cut them into small strips and create angular flap for each cutouts . Using Fevicol A+ stick it and let it dry

Step - 08
To create windmill take paper straw, toothpick and white chart paper. To create blades, take chart paper and poke a tiny hole in the centre using toothpick. Now attach it to paper straw as shown. Make sure to make at least 4 – 5 more.

Step - 09
take chart paper and poke a tiny hole in the centre using toothpick. Now attach it to paper straw as shown. Make sure to make at least 4 – 5 more. To create train bougie, take sheet of chart paper or recycled box available at home and make sure they are similar in size. Now construct it as shown to enhance, cut out coloured chart paper strips and using Fevicol A+ give details of train as shown and let it dry.

Step - 10
To create freeways and roads, take coloured chart paper of your choice, cut out into thick strips as per the roads planned in your smart city and make dotted lines in the centre with the help of Fevicryl Acrylic Colour.

Step - 11
Using Fevicol A+ assemble all the elements and let it dry. Label out the smart technologies used in your model and the working of it, Energy sources like solar panels, windmill have been used to generate power for the working of lights in the city. Monorails have been given route through the building to avoid more conjustion.
Steps to Create this Activity
Login to see steps
Step - 01
To create building structures, take thick card paper of your choice create shape of building as shown, now with the help of scale and paper cutter give detail cutting of window. To enhance it further add colourful chart papers strips & assemble it using Fevicol A+. Now insert a gateway sheet inwards the building created. To give the building support, cut-out pieces of paper straw and colour it with Fevicryl Acrylic Colour of your choice. Using Feivcol A+ stick cutouts below as shown and let it dry.
Step - 02
Similarly, create building Structures of different shapes and size. Make sure base of the building has opening to insert lights
Step - 03
To create building Base, take mount board to draw and cut out shapes according to building contour. Now poke holes through as shown with the help of barbeque stick and make sure hole poked is big enough to pass fairy light bulbs . Using Fevicryl Acrylic colour of your choice paint it with the help of fine art brushes.
Step - 04
Now to create base take sheet of mount board and paint it using Fevicryl Acrylic Colour. Now stick the building base cut-outs using Fevicol A+. Now insert fairy light bulb through each hole as shown.
Step - 05
Using Fevicol A+, stick buildings as shown and let it dry.
Step - 06
To create trees, take coloured chart papers of your choice and paper straw. Now cut out 2 contours of tree give silt in the centre up to and lock it as shown using Fevicol A+. To create the trunk of the tree, take paper straw and attach to the tree contour using Fevicol A+. Now using Fevicryl Acrylic Colour of your choice paint the trunk.
Step - 07
o create solar panels, take silver craft metallic paper and cut it small rectangular pieces as per required sizes. Now take thick card paper, cut them into small strips and create angular flap for each cutouts . Using Fevicol A+ stick it and let it dry
Step - 08
To create windmill take paper straw, toothpick and white chart paper. To create blades, take chart paper and poke a tiny hole in the centre using toothpick. Now attach it to paper straw as shown. Make sure to make at least 4 – 5 more.
Step - 09
take chart paper and poke a tiny hole in the centre using toothpick. Now attach it to paper straw as shown. Make sure to make at least 4 – 5 more. To create train bougie, take sheet of chart paper or recycled box available at home and make sure they are similar in size. Now construct it as shown to enhance, cut out coloured chart paper strips and using Fevicol A+ give details of train as shown and let it dry.
Step - 10
To create freeways and roads, take coloured chart paper of your choice, cut out into thick strips as per the roads planned in your smart city and make dotted lines in the centre with the help of Fevicryl Acrylic Colour.
Step - 11
Using Fevicol A+ assemble all the elements and let it dry. Label out the smart technologies used in your model and the working of it, Energy sources like solar panels, windmill have been used to generate power for the working of lights in the city. Monorails have been given route through the building to avoid more conjustion.


