


DIY Ravana Clay Figurine Craft | FeviCreate - Activity Single - FeviCreate
Ravana Clay Figurine
Craft a Ravana figurine using air-dry clay, shaping each of his ten heads and arms separately and then assembling them. Paint the figure in bright, festive colors and add decorative elements to bring it to life.
Let your kids explore the rich heritage of Indian folklore with Fevicreate's Ravan clay figurine craft. Unleash creativity by sculpting this mythical character using clay moulds.
Clay Modelling Celebration 30 to 60 mins 9 to 14 years Art & Craft Class 8


Steps to Create this Activity
Login to see steps

Step - 01
o create a Ravana 3D Figurine face and torso, take Rangeela Creative Clay orange and white, and mix it thoroughly. Create two different sphere sizes, as shown in the image.

Step - 02
Insert spheres through the barbeque stick as shown.

Step - 03
To create Ravana’s dhoti, take Rangeela creative clay of your choice, and with the help of your hands, form an oval form set as shown in the image. Make sure it's proportionate to the face and torso made.

Step - 04
Insert barbeque stick through the set for it to stay sturdy.

Step - 05
To create Ravana’s shoe, take Rangeela Creative clay of your choice; with the help of your hands, create a set of coils proportionate to the structure made and create a teardrop shape now insert barbeque sticks through it as shown.

Step - 06
Insert the shoes below as shown. To create a dhoti garment, take a clay strip of your choice roll it into a coil and flatten it with the help of your hands now place it around the waist as shown.

Step - 07
To create the hands of the Ravana, take some clay to create a set of coils now flatten it from either side and place it on the mark of the shoulders as shown. To create a base for the structure take any coloured clay of your choice, roll it into a sphere, flatten it, and place it below, as shown in the image.

Step - 08
To make a Ravana drape , take some Rangeela Creative Clay of Your choice and create a slab with the help of a rolling pin. Cut out a rectangular strip using a clay tool or paper cutter as shown in the image. Make sure the strip is proportionate to the structure made.

Step - 09
Place the drape on his shoulder and give details to it by creating contrasting coloured clay coils and placing them on the edges of the drapery, as shown in the image.

Step - 10
To create a Mukut for Ravana, take any coloured clay of your choice, roll it into the sphere, and with the help of your hands, form a bowl-like shape and place it on the mark of the head as shown.

Step - 11
To create the other part of the Mukut, create a flat sphere using clay of your choice and insert a piece of barbeque stick through it as shown.

Step - 12
Insert the other part of the Mukut, as shown in the image. As shown in the image, take a barbeque stick and insert it through.

Step - 13
Using Rangeela create clay of your choice, give details to Mukut and create jewellery as shown in the image.

Step - 14
Using Rangeela Creative of your choice create features of Ravana, I.e., eyes, nose, ears, mustache, lips, and tilak in a simplified manner as shown.

Step - 15
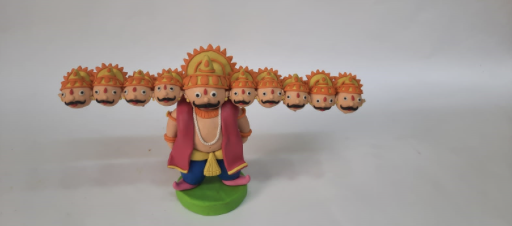
Similarly, create Ravana’s nine heads as shown in the image.

Step - 16
Insert heads through barbeque stick as shown. For the durability and freshness of colours, apply a layer of Fevicol MR to the completed article.
Steps to Create this Activity
Login to see steps
Step - 01
o create a Ravana 3D Figurine face and torso, take Rangeela Creative Clay orange and white, and mix it thoroughly. Create two different sphere sizes, as shown in the image.
Step - 02
Insert spheres through the barbeque stick as shown.
Step - 03
To create Ravana’s dhoti, take Rangeela creative clay of your choice, and with the help of your hands, form an oval form set as shown in the image. Make sure it's proportionate to the face and torso made.
Step - 04
Insert barbeque stick through the set for it to stay sturdy.
Step - 05
To create Ravana’s shoe, take Rangeela Creative clay of your choice; with the help of your hands, create a set of coils proportionate to the structure made and create a teardrop shape now insert barbeque sticks through it as shown.
Step - 06
Insert the shoes below as shown. To create a dhoti garment, take a clay strip of your choice roll it into a coil and flatten it with the help of your hands now place it around the waist as shown.
Step - 07
To create the hands of the Ravana, take some clay to create a set of coils now flatten it from either side and place it on the mark of the shoulders as shown. To create a base for the structure take any coloured clay of your choice, roll it into a sphere, flatten it, and place it below, as shown in the image.
Step - 08
To make a Ravana drape , take some Rangeela Creative Clay of Your choice and create a slab with the help of a rolling pin. Cut out a rectangular strip using a clay tool or paper cutter as shown in the image. Make sure the strip is proportionate to the structure made.
Step - 09
Place the drape on his shoulder and give details to it by creating contrasting coloured clay coils and placing them on the edges of the drapery, as shown in the image.
Step - 10
To create a Mukut for Ravana, take any coloured clay of your choice, roll it into the sphere, and with the help of your hands, form a bowl-like shape and place it on the mark of the head as shown.
Step - 11
To create the other part of the Mukut, create a flat sphere using clay of your choice and insert a piece of barbeque stick through it as shown.
Step - 12
Insert the other part of the Mukut, as shown in the image. As shown in the image, take a barbeque stick and insert it through.
Step - 13
Using Rangeela create clay of your choice, give details to Mukut and create jewellery as shown in the image.
Step - 14
Using Rangeela Creative of your choice create features of Ravana, I.e., eyes, nose, ears, mustache, lips, and tilak in a simplified manner as shown.
Step - 15
Similarly, create Ravana’s nine heads as shown in the image.
Step - 16
Insert heads through barbeque stick as shown. For the durability and freshness of colours, apply a layer of Fevicol MR to the completed article.


