


Surprise with a Fun Paper Explosion Gift Box Idea - Activity Single - FeviCreate
Exploding Gift Box Surprise DIY
Create a memorable exploding gift box that reveals a surprise inside! This fun DIY project lets you personalize a gift for someone special. Perfect for birthdays, anniversaries, or just to show you care, this craft creates an exciting moment when the box pops open. Start crafting and surprise someone today!
Paper Crafting Gifting 30 to 60 mins 9 to 14 years Art & Craft Class 8


Steps to Create this Activity
Login to see steps

Step - 01
To create explosion box lid, take a coloured chart paper of your choice, now draw the diagram referring to the template given.

Step - 02
To create explosion box, take any coloured chart paper of your choice now draw the diagram referring to the template given.

Step - 03
With help of your hands fold it into 9 equal parts, now fold the sqaure diagonally twice to get the creases as shown in the image.

Step - 04
Using Glue drops assemble the edges of a lid as shown. To create a box, fold inwards from each corner.

Step - 05
To enhance the box, stick coloured sqaure into the alternative sqaure as shown and one in the centre.

Step - 06
Now stick pictures of your sibling as shown and write message in the centre as shown.

Step - 07
With help of chart papers draw and cut out different forms in descending size and assemble it using Glue drops.

Step - 08
To create danglers inside the lid, take pieces of coloured chart paper draw shapes in pair of your choice with help of pencil.

Step - 09
Take coloured cords or wool of your choice cut out 4 strands in different lengths. Using glue drops sandwich a strand between pair of forms.

Step - 10
Using Glue drops stick danglers inwards of the lid.

Step - 11
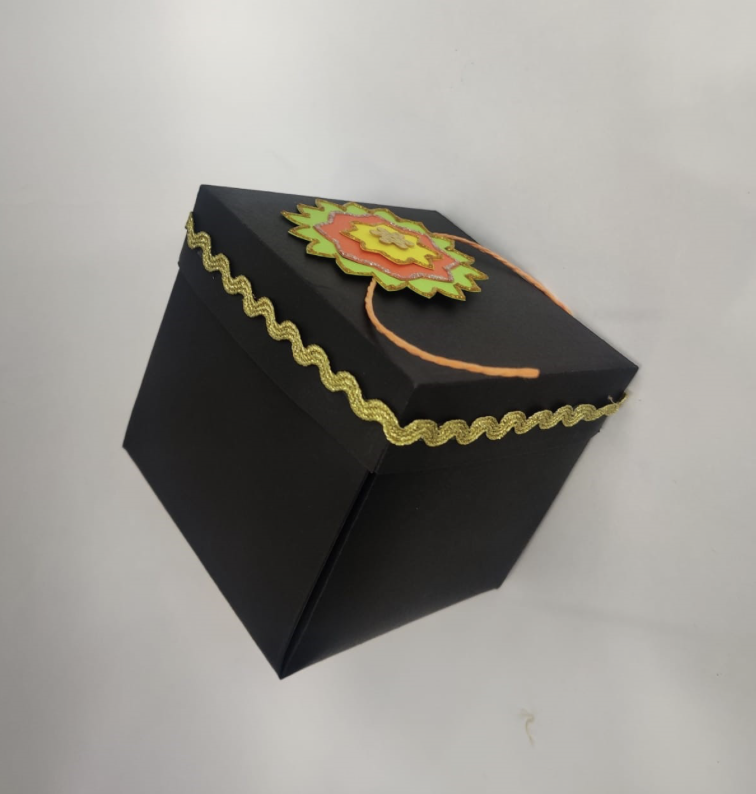
Using glue drops stick Rakhi onto the lid and to enhance it more stick decorative cord onto the sides of the lid.

Step - 12
Handcrafted explosion box is ready!
Steps to Create this Activity
Login to see steps
Step - 01
To create explosion box lid, take a coloured chart paper of your choice, now draw the diagram referring to the template given.
Step - 02
To create explosion box, take any coloured chart paper of your choice now draw the diagram referring to the template given.
Step - 03
With help of your hands fold it into 9 equal parts, now fold the sqaure diagonally twice to get the creases as shown in the image.
Step - 04
Using Glue drops assemble the edges of a lid as shown. To create a box, fold inwards from each corner.
Step - 05
To enhance the box, stick coloured sqaure into the alternative sqaure as shown and one in the centre.
Step - 06
Now stick pictures of your sibling as shown and write message in the centre as shown.
Step - 07
With help of chart papers draw and cut out different forms in descending size and assemble it using Glue drops.
Step - 08
To create danglers inside the lid, take pieces of coloured chart paper draw shapes in pair of your choice with help of pencil.
Step - 09
Take coloured cords or wool of your choice cut out 4 strands in different lengths. Using glue drops sandwich a strand between pair of forms.
Step - 10
Using Glue drops stick danglers inwards of the lid.
Step - 11
Using glue drops stick Rakhi onto the lid and to enhance it more stick decorative cord onto the sides of the lid.
Step - 12
Handcrafted explosion box is ready!


