


DIY Sharpener Craft With Paper - Activity Single - FeviCreate
Personal Homemade Sharpener Craft with Paper for Kids
Fevicreate Art & Craft Activities are structured activities that involve a step-by-step method to create an end product. This crafting journey gives you something to show, you enjoy your journey and get a sense of achievement too. What more can one ask for!
Mixed Media Celebration 30 to 60 mins 9 to 14 years Art & Craft Class 8


Steps to Create this Activity
Login to see steps

Step - 01
Mix equal quantities of Fevicryl Mouldit resin and hardener till it uniformly mixes and becomes completely white.

Step - 02
Using a rolling pin, make two slabs. On one slab, trace the detailed design; and, on the other, trace just the contour of Ravana.

Step - 03
With a paper cutter, cut the contour of Ravana as shown.

Step - 04
To create Ravana’s features, take Mouldit and make a slab; trace the features; cut the contour with a paper cutter.

Step - 05
Let it semi dry and later stick it using Fevicol MR onto the detailed design made as shown. Similarly, repeat the process to create the rest of features as shown.

Step - 06
With a fine art brush, paint the Ravana using Fevicryl Acrylic Colour of your choice; let it dry.

Step - 07
With a fine art brush, paint the Ravana using Fevicryl Acrylic Colour of your choice; let it dry.

Step - 08
Now secure it with the contour created for Ravana.

Step - 09
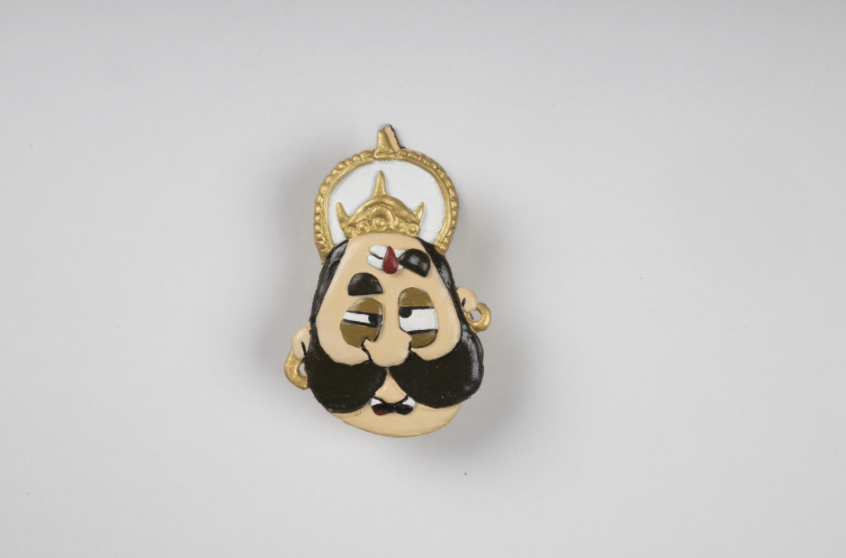
Your quirky sharpener is ready!
Steps to Create this Activity
Login to see steps
Step - 01
Mix equal quantities of Fevicryl Mouldit resin and hardener till it uniformly mixes and becomes completely white.
Step - 02
Using a rolling pin, make two slabs. On one slab, trace the detailed design; and, on the other, trace just the contour of Ravana.
Step - 03
With a paper cutter, cut the contour of Ravana as shown.
Step - 04
To create Ravana’s features, take Mouldit and make a slab; trace the features; cut the contour with a paper cutter.
Step - 05
Let it semi dry and later stick it using Fevicol MR onto the detailed design made as shown. Similarly, repeat the process to create the rest of features as shown.
Step - 06
With a fine art brush, paint the Ravana using Fevicryl Acrylic Colour of your choice; let it dry.
Step - 07
With a fine art brush, paint the Ravana using Fevicryl Acrylic Colour of your choice; let it dry.
Step - 08
Now secure it with the contour created for Ravana.
Step - 09
Your quirky sharpener is ready!


