


Learn How to Make New Year Photo Booth Frames Fevicreate - Activity Single - FeviCreate
Learn How to Make New Year Photo Booth Frames Fevicreate
Fevicreate Art & Craft Activities are structured activities that involve a step-by-step method to create an end product. This crafting journey gives you something to show, you enjoy your journey and get a sense of achievement too. What more can one ask for!
Paper Crafting Celebration 30 to 60 mins 9 to 14 years Art & Craft Class 8


Steps to Create this Activity
Login to see steps

Step - 01
To create photo frames, take an A3 size corrugated sheet; with the help of a pencil, draw an oval shape proportionate to your face.

Step - 02
Cut them with the help of paper cutter.

Step - 03
Using a Corrugated sheet, draw and cut out an A3 size frame with a width of 2” approx. as shown in the image.

Step - 04
Using the Rangeela Tempera Colour of your choice, paint the frame with the help of fine art brushes and let it dry.

Step - 05
Take any coloured A3 size chart paper of your choice and draw and cut out the diagram of an oval shape referring to the corrugated cutout.

Step - 06
Take any two coloured kite papers of your choice, cut out small rectangular strips with a width of 1cm approx., stick them around the oval shape using Fevistik Power, and let it dry. Make sure to use the edges of the strips to stick them onto the board.

Step - 07
Similarly, following the same procedure, overlap other coloured kite paper strips using Fevistik Power as shown in the image and let it dry.

Step - 08
To create ears, take any two coloured A5 size chart papers of your choice, and draw the diagram of the ears referring to the image.

Step - 09
Cut them with scissors.

Step - 10
Using Fevistik Power assemble the cut outs as shown.

Step - 11
To create a hat, take any coloured chart paper of your choice measuring 12cm square and draw the hat diagram referring to the image.

Step - 12
Cut them with scissors.

Step - 13
To create a bow, take any coloured A5 size chart paper of your choice, and draw the diagram of the bow referring to the image.

Step - 14
Cut them with scissors.

Step - 15
Using Fevistik Power, assemble the cut outs as shown and let it dry.

Step - 16
Make sure all the elements are ready I.e., hat, bow and ears.

Step - 17
Using Fevistik Power assemble the elements as shown in the image.

Step - 18
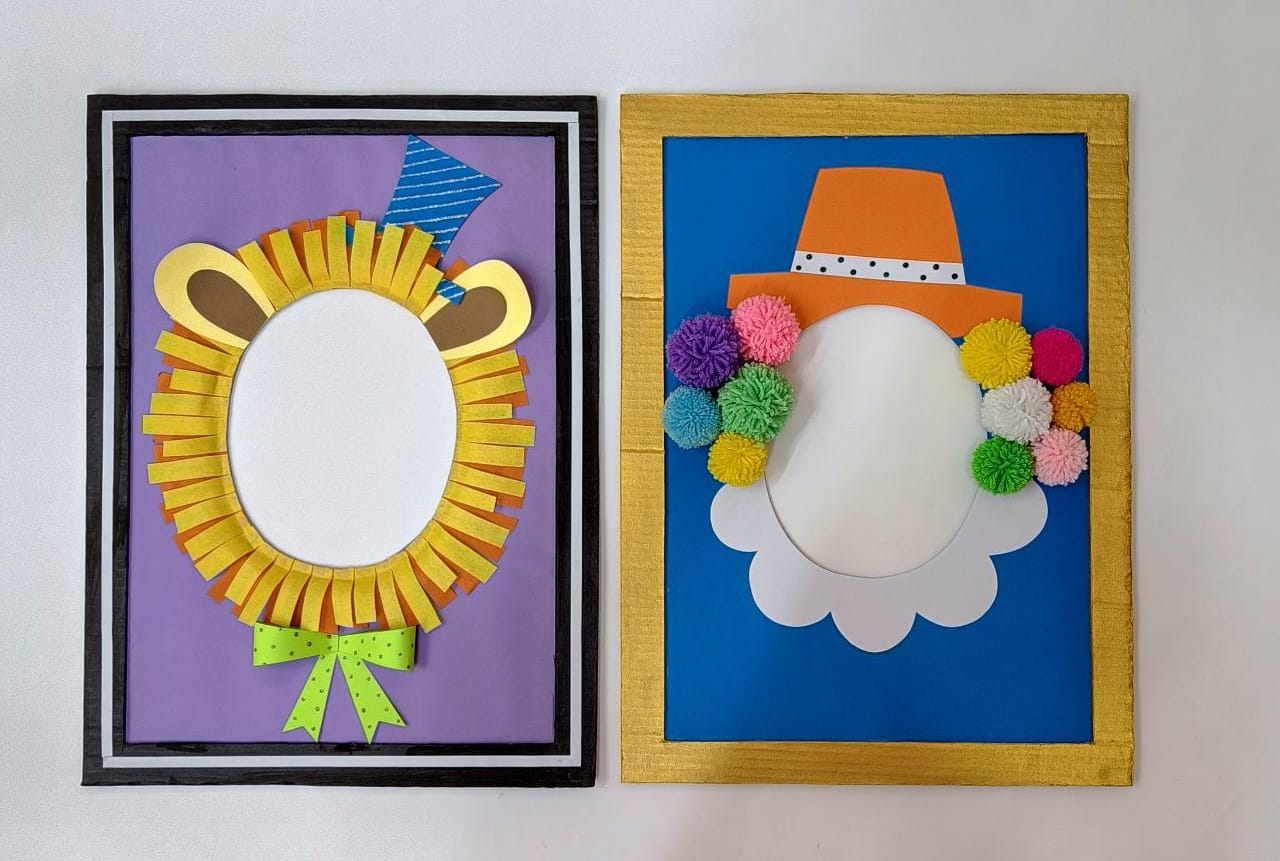
Using Fevistik Power, stick corrugated base cut out below photo poster and attach the frame above as shown, stick any coloured quilling strip to enhance the edge and let it dry. Using Rangeela Glitter give details to the elements, I.e., hat and bow and let it dry. The handmade photo of both structures is ready!

Step - 19
Similarly, you can create photo booth frames using your favorite characters and other materials like kite papers, pom pom, and chart papers.
Steps to Create this Activity
Login to see steps
Step - 01
To create photo frames, take an A3 size corrugated sheet; with the help of a pencil, draw an oval shape proportionate to your face.
Step - 02
Cut them with the help of paper cutter.
Step - 03
Using a Corrugated sheet, draw and cut out an A3 size frame with a width of 2” approx. as shown in the image.
Step - 04
Using the Rangeela Tempera Colour of your choice, paint the frame with the help of fine art brushes and let it dry.
Step - 05
Take any coloured A3 size chart paper of your choice and draw and cut out the diagram of an oval shape referring to the corrugated cutout.
Step - 06
Take any two coloured kite papers of your choice, cut out small rectangular strips with a width of 1cm approx., stick them around the oval shape using Fevistik Power, and let it dry. Make sure to use the edges of the strips to stick them onto the board.
Step - 07
Similarly, following the same procedure, overlap other coloured kite paper strips using Fevistik Power as shown in the image and let it dry.
Step - 08
To create ears, take any two coloured A5 size chart papers of your choice, and draw the diagram of the ears referring to the image.
Step - 09
Cut them with scissors.
Step - 10
Using Fevistik Power assemble the cut outs as shown.
Step - 11
To create a hat, take any coloured chart paper of your choice measuring 12cm square and draw the hat diagram referring to the image.
Step - 12
Cut them with scissors.
Step - 13
To create a bow, take any coloured A5 size chart paper of your choice, and draw the diagram of the bow referring to the image.
Step - 14
Cut them with scissors.
Step - 15
Using Fevistik Power, assemble the cut outs as shown and let it dry.
Step - 16
Make sure all the elements are ready I.e., hat, bow and ears.
Step - 17
Using Fevistik Power assemble the elements as shown in the image.
Step - 18
Using Fevistik Power, stick corrugated base cut out below photo poster and attach the frame above as shown, stick any coloured quilling strip to enhance the edge and let it dry. Using Rangeela Glitter give details to the elements, I.e., hat and bow and let it dry. The handmade photo of both structures is ready!
Step - 19
Similarly, you can create photo booth frames using your favorite characters and other materials like kite papers, pom pom, and chart papers.


