


Simple DIY Kaleidoscope Goggles Craft for Students - Activity Single - FeviCreate
DIY Goggle Craft for Students
Paper Crafting Brand me More than 60 mins 9 to 14 years Art & Craft Class 7


Steps to Create this Activity
Login to see steps

Step -01
To create goggles, take thick card paper of your choice draw the diagram following the image with the help of compass, pencil and scale. Make sure to draw diagram according to your goggle size.

Step-02
Cut them with scissors.

Step-03
Take cut-outs I.e. circles and piece of rectangle. Now with the help of paper cutter poke holes in centre as shown, make sure hole cut-outs are uniform. To create nose pad, take a cut-out of rectangle and fold it inwards approximately 1cm from both ends as shown.

Step-04
Take OHP sheet, again draw the diagram referring to the image given, make sure diagram is drawn according to your goggle size. Now cut them with the help of scissors as shown.

Step-05
To create kaleidoscope, take a piece of corrugated draw 6 squares exactly measuring done on OHP sheet with the help of scale and pencil. Now cut them with the help of paper cutter.

Step-06
Now take any dark coloured chart paper of your choice, draw and cut 6 squares exactly to the size of corrugated square cut outs .

Step-07
Using Fevicol A+, stick chart paper cut outs on corrugated cut outs as shown and let it dry.

Step-08
Take OHP square cut outs, make sure they are exactly measured to corrugated square cut out.

Step-09
To create kaleidoscope, assemble squares into triangle shape using Fevicol MR and let it dry, make sure while creating a triangles side of chart paper is stuck inwards as shown. Now take OHP square cut outs slide it into triangle construction as shown.

Step-10
To create goggle body, take thick card paper and OHP cut outs as shown, make sure cut outs are measured uniformly.

Step-11
Using Fevicol MR, stick OHP cut out below the cut of thick card paper as shown and let it dry.

Step-12
Using Fevicol MR, seal the edges forming cylindrical shape as shown and let it dry.

Step-13
To create goggle, make sure to cut outs as shown in the image.

Step-14
Insert triangle construction into cylindrical shape as shown.

Step-15
Using Fevicol A+, stick circles covering the cylindrical shape as shown and let it dry

Step-16
Now take a piece of corrugated sheet and cut out a strip measuring to cylindrical body, keep the width of the strip measuring 1cm approximately. Using Fevicryl acrylic colour of your choice, paint the strips with brush.

Step-17
Using Fevicol MR, seal the edges of corrugated cut out forming a ring and to enhance it more give pipping of quilling strip as shown. Now take OHP cut outs.

Step-18
To create kaleidoscope caps, stick OHP cut outs as shown using Fevicol MR and let it dry .

Step-19
Take coloured sheet of gelatine papers cut them into tiny shape and size, also add foil mirror of different shapes and size. Now again take OHP cut outs & make sure the cut outs are measured according to ring size.

Step-20
Now insert cut out into the cap made and cover it by inserting with OHP cut out as shown.

Step-21
Fit those caps to goggle body as shown.

Step-22
Now collect an elastic band and nose pad as shown

Step-23
Using Fevicol MR, stick nose pad as shown and attach elastic band and let it dry.

Step-24
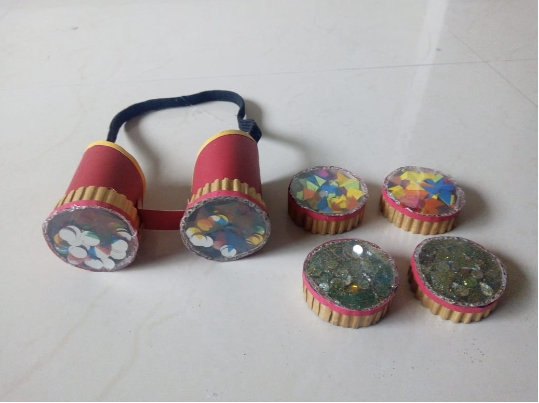
Similarly, you create different kaleidoscope caps using different material and other embellishments. Personalized quirky kaleidoscope goggles are ready.
Steps to Create this Activity
Login to see steps
Step -01
To create goggles, take thick card paper of your choice draw the diagram following the image with the help of compass, pencil and scale. Make sure to draw diagram according to your goggle size.
Step-02
Cut them with scissors.
Step-03
Take cut-outs I.e. circles and piece of rectangle. Now with the help of paper cutter poke holes in centre as shown, make sure hole cut-outs are uniform. To create nose pad, take a cut-out of rectangle and fold it inwards approximately 1cm from both ends as shown.
Step-04
Take OHP sheet, again draw the diagram referring to the image given, make sure diagram is drawn according to your goggle size. Now cut them with the help of scissors as shown.
Step-05
To create kaleidoscope, take a piece of corrugated draw 6 squares exactly measuring done on OHP sheet with the help of scale and pencil. Now cut them with the help of paper cutter.
Step-06
Now take any dark coloured chart paper of your choice, draw and cut 6 squares exactly to the size of corrugated square cut outs .
Step-07
Using Fevicol A+, stick chart paper cut outs on corrugated cut outs as shown and let it dry.
Step-08
Take OHP square cut outs, make sure they are exactly measured to corrugated square cut out.
Step-09
To create kaleidoscope, assemble squares into triangle shape using Fevicol MR and let it dry, make sure while creating a triangles side of chart paper is stuck inwards as shown. Now take OHP square cut outs slide it into triangle construction as shown.
Step-10
To create goggle body, take thick card paper and OHP cut outs as shown, make sure cut outs are measured uniformly.
Step-11
Using Fevicol MR, stick OHP cut out below the cut of thick card paper as shown and let it dry.
Step-12
Using Fevicol MR, seal the edges forming cylindrical shape as shown and let it dry.
Step-13
To create goggle, make sure to cut outs as shown in the image.
Step-14
Insert triangle construction into cylindrical shape as shown.
Step-15
Using Fevicol A+, stick circles covering the cylindrical shape as shown and let it dry
Step-16
Now take a piece of corrugated sheet and cut out a strip measuring to cylindrical body, keep the width of the strip measuring 1cm approximately. Using Fevicryl acrylic colour of your choice, paint the strips with brush.
Step-17
Using Fevicol MR, seal the edges of corrugated cut out forming a ring and to enhance it more give pipping of quilling strip as shown. Now take OHP cut outs.
Step-18
To create kaleidoscope caps, stick OHP cut outs as shown using Fevicol MR and let it dry .
Step-19
Take coloured sheet of gelatine papers cut them into tiny shape and size, also add foil mirror of different shapes and size. Now again take OHP cut outs & make sure the cut outs are measured according to ring size.
Step-20
Now insert cut out into the cap made and cover it by inserting with OHP cut out as shown.
Step-21
Fit those caps to goggle body as shown.
Step-22
Now collect an elastic band and nose pad as shown
Step-23
Using Fevicol MR, stick nose pad as shown and attach elastic band and let it dry.
Step-24
Similarly, you create different kaleidoscope caps using different material and other embellishments. Personalized quirky kaleidoscope goggles are ready.


