


Spectacle-Inspired Key Holder for Independence Day | FeviCreate - Activity Single - FeviCreate
Independence Day Key Holder
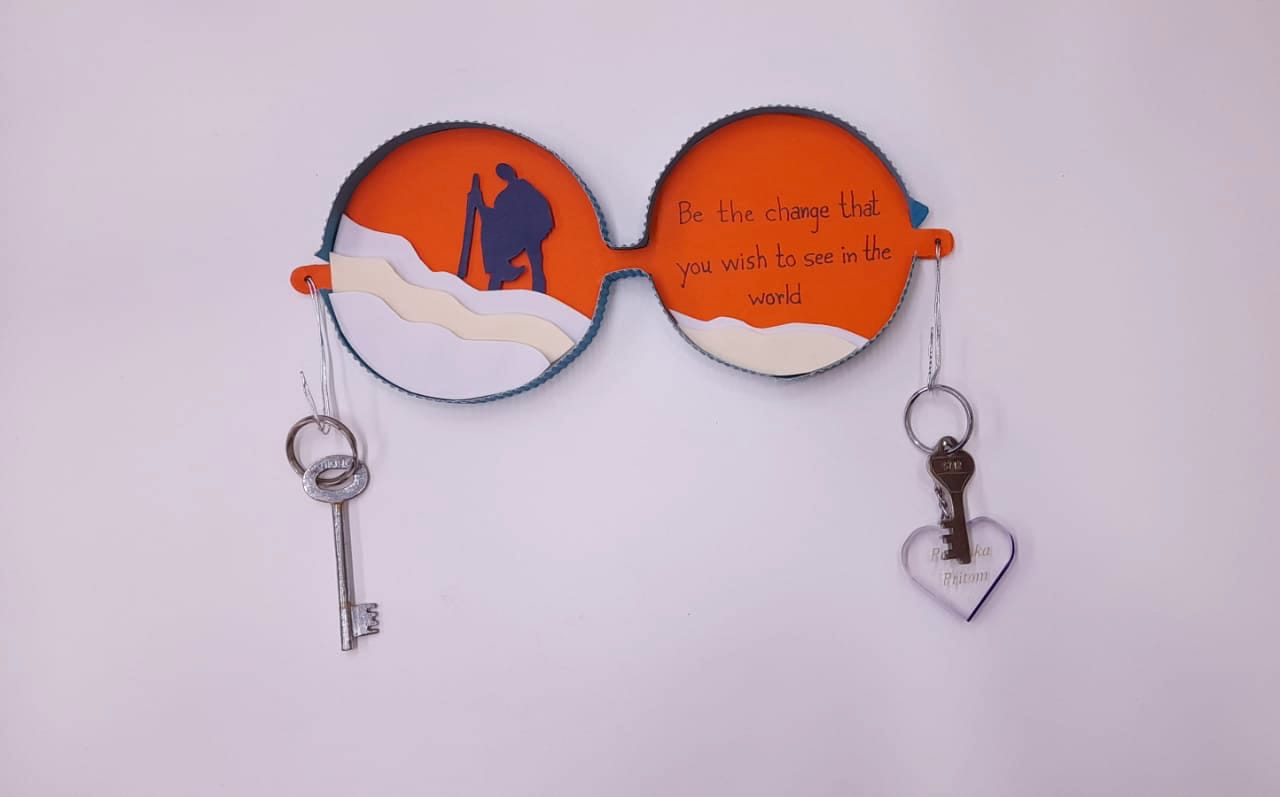
Independence Day by crafting a spectacle-shaped key holder. Using corrugated sheets, tri-coloured chart papers, and Fevistik Power, children can create this vibrant decoration. Ideal for school projects , it enhances creativity and fosters patriotism.
Paper Crafting Brand me 30 to 60 mins 6 to 8 years Art & Craft Class 3


Steps to Create this Activity
Login to see steps

Step - 01
To create the key holder, take a sheet of corrugated draw and cut out the diagram of spectacles referring to the template given.

Step - 02
To create Dandi March illustration take tri coloured chart papers as shown and draw the diagram referring to the template given. With the help of felt pen write a text inside the spectacle contour “Be the change that you wish to see in the World”.

Step - 03
Cut them with scissors. To create a relief like structure, take corrugated sheet and cut out into small pieces as shown .

Step - 04
Using Fevistik Power, assemble the cutouts and stick corrugated cutouts between each layer to make it look like relief forms on one other as seen in the final image.

Step - 05
To create the border around spectacles, take coloured corrugated sheet of your choice, draw and cutout a strip with width of 1cm approx.

Step - 06
Using Fevistik Power, stick the strip as shown. With the help of pencil poke holes to the edges of the spectales as shown.

Step - 07
Using flower wire, create a hook like structure and insert it through the hole poked as shown. Your handmade keyholder is ready!

Step - 08
Design Template
Steps to Create this Activity
Login to see steps
Step - 01
To create the key holder, take a sheet of corrugated draw and cut out the diagram of spectacles referring to the template given.
Step - 02
To create Dandi March illustration take tri coloured chart papers as shown and draw the diagram referring to the template given. With the help of felt pen write a text inside the spectacle contour “Be the change that you wish to see in the World”.
Step - 03
Cut them with scissors. To create a relief like structure, take corrugated sheet and cut out into small pieces as shown .
Step - 04
Using Fevistik Power, assemble the cutouts and stick corrugated cutouts between each layer to make it look like relief forms on one other as seen in the final image.
Step - 05
To create the border around spectacles, take coloured corrugated sheet of your choice, draw and cutout a strip with width of 1cm approx.
Step - 06
Using Fevistik Power, stick the strip as shown. With the help of pencil poke holes to the edges of the spectales as shown.
Step - 07
Using flower wire, create a hook like structure and insert it through the hole poked as shown. Your handmade keyholder is ready!
Step - 08
Design Template


