


Assemble a Hulk-Themed Sanitization Station for Kids - Activity Single - FeviCreate
Hulk-Themed Sanitization Station
Bring a superhero touch to hygiene with your own Hulk Sanitization Station! Made from simple materials, this DIY adds fun to staying clean. Perfect for kids’ rooms or study areas, it’s easy to make and even more exciting to use. Follow our guide and create your own today!
Paper Crafting Brand me More than 60 mins 9 to 14 years Art & Craft Class 7


Steps to Create this Activity
Login to see steps

Step - 01
Take a thick corrugated sheet draw the diagram referring to design sheet given with the help of CD marker and Scale

Step - 02
Cut them with the help of Paper Cutter. Use parental guidance if required.

Step - 03
Using Fevicryl Acrylic Colour of your choice, paint the parts with the help of fine art brushes

Step - 04
Using Fevicryl Acrylic Colour, paint the reverse side of the cut outs too with the help of fine art brushes

Step - 05
Now take those three cut squares and stick it overlapping each other to make a knob as shown using Fevicol A+ and let it dry.

Step - 06
Using Fevicryl Acrylic Colour paint it with the help of fine art brushes. This will be the knob for the lid. Refer to the design sheet

Step - 07
To create lid, take sqaure shape piece referring to design sheet and assemble to cut-out using Fevicol A+, and let it dry

Step - 08
Similarly, paint the other cut outs too as shown and let it dry. These will be used for separating the compartments of the sanitization centre into the tissue holder and bottle holder for the lid to be placed. These have to be placed so that the lid of the seperator stays properly.

Step - 09
Using Fevicol A+, stick small rectangular cut-outs on each part at an equal distance as shown for the lid to be placed and let it dry

Step - 10
Using Fevicol A+, assemble all the cut out together as shown and let it dry

Step - 11
Now place the lid as shown on the 4 rectangular parts.

Step - 12
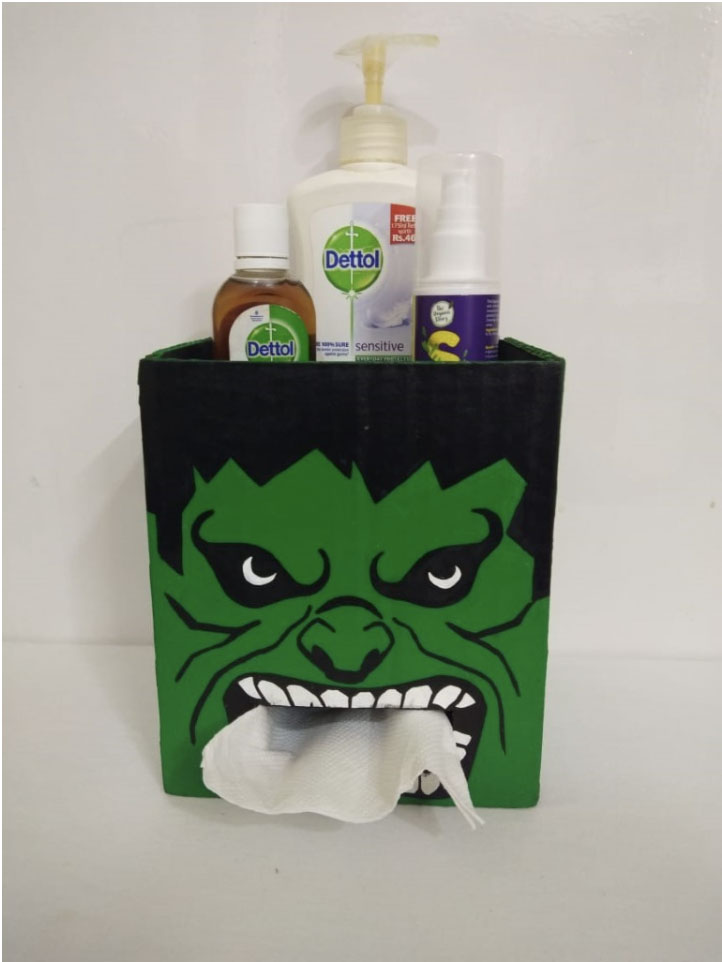
Your personalised sanitization centre is ready!
Steps to Create this Activity
Login to see steps
Step - 01
Take a thick corrugated sheet draw the diagram referring to design sheet given with the help of CD marker and Scale
Step - 02
Cut them with the help of Paper Cutter. Use parental guidance if required.
Step - 03
Using Fevicryl Acrylic Colour of your choice, paint the parts with the help of fine art brushes
Step - 04
Using Fevicryl Acrylic Colour, paint the reverse side of the cut outs too with the help of fine art brushes
Step - 05
Now take those three cut squares and stick it overlapping each other to make a knob as shown using Fevicol A+ and let it dry.
Step - 06
Using Fevicryl Acrylic Colour paint it with the help of fine art brushes. This will be the knob for the lid. Refer to the design sheet
Step - 07
To create lid, take sqaure shape piece referring to design sheet and assemble to cut-out using Fevicol A+, and let it dry
Step - 08
Similarly, paint the other cut outs too as shown and let it dry. These will be used for separating the compartments of the sanitization centre into the tissue holder and bottle holder for the lid to be placed. These have to be placed so that the lid of the seperator stays properly.
Step - 09
Using Fevicol A+, stick small rectangular cut-outs on each part at an equal distance as shown for the lid to be placed and let it dry
Step - 10
Using Fevicol A+, assemble all the cut out together as shown and let it dry
Step - 11
Now place the lid as shown on the 4 rectangular parts.
Step - 12
Your personalised sanitization centre is ready!


