


Simple Creative Dangler Designs for Children to Make at Home - Activity Single - FeviCreate
Colorful Makar Sankranti Kite Dangler Craft Idea
Encourage children to create imaginative and vibrant dangler designs as a delightful and engaging craft activity. This hands-on DIY project not only fosters creativity and artistic expression but also helps improve crafting skills like cutting, assembling, and decorating.
Mixed Media Gifting 30 to 60 mins 9 to 14 years Art & Craft Class 6


Steps to Create this Activity
Login to see steps

Step - 01
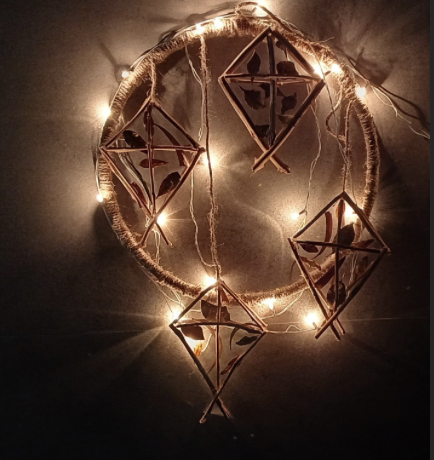
To create kit dangler, take A4 size OHPsheet, with the help of felt pen draw the diagram of kite as shown in the image.

Step - 02
Cut them with the help of scissors.

Step - 03
To decorate the kites, collect twigs & leaves.

Step - 04
Using Glue Drops, stick leaves between the kite cutouts as shown. Seal the edges of kite with the help of glue drops.

Step - 05
Similarly, using Glue Drops, give borders to the kite back & forth with the help of twigs as shown

Step - 06
Similarly, following the procedure create multiple kites as shown in the image.

Step - 07
To create a kite holder, take jute cord and attach it to the kites as shown.

Step - 08
To create dangler holder, collect fabric ring proportionate to the kites made & a jute cord.

Step - 09
Using Glue Drops, wrap a jute cord around the fabric ring, as shown in the image, now attach kites onto the fabric ring structure.

Step - 10
Attach fairy lights around the fabric ring as shown & mount it onto the wall. Your handmade kite dangler is ready!
Steps to Create this Activity
Login to see steps
Step - 01
To create kit dangler, take A4 size OHPsheet, with the help of felt pen draw the diagram of kite as shown in the image.
Step - 02
Cut them with the help of scissors.
Step - 03
To decorate the kites, collect twigs & leaves.
Step - 04
Using Glue Drops, stick leaves between the kite cutouts as shown. Seal the edges of kite with the help of glue drops.
Step - 05
Similarly, using Glue Drops, give borders to the kite back & forth with the help of twigs as shown
Step - 06
Similarly, following the procedure create multiple kites as shown in the image.
Step - 07
To create a kite holder, take jute cord and attach it to the kites as shown.
Step - 08
To create dangler holder, collect fabric ring proportionate to the kites made & a jute cord.
Step - 09
Using Glue Drops, wrap a jute cord around the fabric ring, as shown in the image, now attach kites onto the fabric ring structure.
Step - 10
Attach fairy lights around the fabric ring as shown & mount it onto the wall. Your handmade kite dangler is ready!


