


Cool Race Car Track Craft Activity for Kids at Home - Activity Single - FeviCreate
Race Car Track Students' Craft
Why buy racing tracks when you can create your own at home. Follow this easy steps and make your house the next racing event this vacation.
Paper Crafting Best Out of Waste More than 60 mins 9 to 14 years Art & Craft Class 8


Steps to Create this Activity
Login to see steps

Step - 01
To create race track, take two full imperial sized sheet of mount board , now draw the diagram referring to image to an approx. size. Create symmetrical diagram on another mount board with the help of pencil

Step - 02
Cut them with scissors. Using Rangeela Tempera Colour paint the tracks as shown and let it dry. Make sure to choose a theme for your tracks

Step - 03
Using coloured chart paper of your choice cut out strips measuring width of 2cm . And fence it around the tracks using Fevicol A+ , so that the car doesn’t fall off .

Step - 04
Similarly, take coloured strips and fence it around the track base as well using Fevicol A+ and let it dry.

Step - 05
To create car launcher, take an a4 size corrugated sheet and draw the diagram referring to image with the help of scale and felt pen

Step - 06
Cut them with scissors.

Step - 07
To create launcher construction, take a paper straw and ice cream stick fold above edge as shown.

Step - 08
Using Fevicol A+ insert ice cream stick and rubber bands and lock it with paper straw on it as shown . For it to stay firmly you can also stick a piece of ice cream stick onto it as shown and let it dry .

Step - 09
Take a box board cut a sqaure measuring 2” approx. And roll it to make a coil and seal the edges using fevicol A+ and cut out two small pieces of paper straw as shown

Step - 10
Using Fevicol A+ assemble the cut outs as shown .

Step - 11
Using Fevicol A+ assemble the cut outs as shown .

Step - 12
Now insert through the paper straw as shown .

Step - 13
Now attach both the rubber bands as shown through the launcher part . Once done check whether its movable .

Step - 14
Using Fevicol a+ stick cut outs as shown and let it dry .

Step - 15
Using Fevicol A+ Stick the Launcher as shown and let it dry .

Step - 16
Using Fevicol A+ stick rest of the cut out as shown and let it dry.

Step - 17
Using Rangeela Tempera colour of your choice paint it with the help of fine art brushes and let it dry.

Step - 18
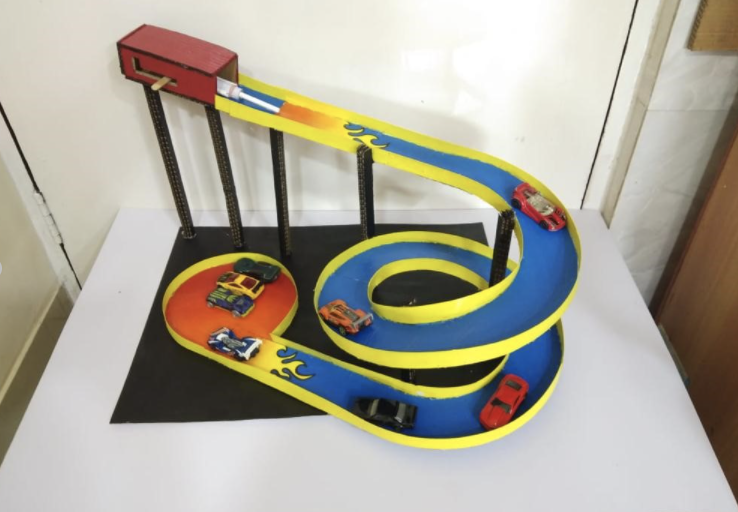
Now take a sheet of mount board as base paint it using Rangeela tempera colour of your choice. Using Fevicol A+ assemble all the part of race tracks as shown. To support race tracks cut out corrugated strips of different sizes, paint them and stick it below tracks as shown and let it dry. Now launch toy cars, handmade race track is ready!
Steps to Create this Activity
Login to see steps
Step - 01
To create race track, take two full imperial sized sheet of mount board , now draw the diagram referring to image to an approx. size. Create symmetrical diagram on another mount board with the help of pencil
Step - 02
Cut them with scissors. Using Rangeela Tempera Colour paint the tracks as shown and let it dry. Make sure to choose a theme for your tracks
Step - 03
Using coloured chart paper of your choice cut out strips measuring width of 2cm . And fence it around the tracks using Fevicol A+ , so that the car doesn’t fall off .
Step - 04
Similarly, take coloured strips and fence it around the track base as well using Fevicol A+ and let it dry.
Step - 05
To create car launcher, take an a4 size corrugated sheet and draw the diagram referring to image with the help of scale and felt pen
Step - 06
Cut them with scissors.
Step - 07
To create launcher construction, take a paper straw and ice cream stick fold above edge as shown.
Step - 08
Using Fevicol A+ insert ice cream stick and rubber bands and lock it with paper straw on it as shown . For it to stay firmly you can also stick a piece of ice cream stick onto it as shown and let it dry .
Step - 09
Take a box board cut a sqaure measuring 2” approx. And roll it to make a coil and seal the edges using fevicol A+ and cut out two small pieces of paper straw as shown
Step - 10
Using Fevicol A+ assemble the cut outs as shown .
Step - 11
Using Fevicol A+ assemble the cut outs as shown .
Step - 12
Now insert through the paper straw as shown .
Step - 13
Now attach both the rubber bands as shown through the launcher part . Once done check whether its movable .
Step - 14
Using Fevicol a+ stick cut outs as shown and let it dry .
Step - 15
Using Fevicol A+ Stick the Launcher as shown and let it dry .
Step - 16
Using Fevicol A+ stick rest of the cut out as shown and let it dry.
Step - 17
Using Rangeela Tempera colour of your choice paint it with the help of fine art brushes and let it dry.
Step - 18
Now take a sheet of mount board as base paint it using Rangeela tempera colour of your choice. Using Fevicol A+ assemble all the part of race tracks as shown. To support race tracks cut out corrugated strips of different sizes, paint them and stick it below tracks as shown and let it dry. Now launch toy cars, handmade race track is ready!


