


How to Make Pichkari Craft for Kids – Easy DIY Pichkari Paper Craft Steps - Activity Single - FeviCreate
A Creative & Fun Holi DIY Pichkari Craft
Give wishes for Holi in a qwirky and creative way by making these water gun messenger
Make Holi extra special with a DIY Pichkari craft. Let students explore their creativity by designing colorful water gun messengers to send quirky wishes. A perfect blend of art and festive fun, this activity makes Holi more exciting. Craft, color, and celebrate with a handmade Pichkari that spreads joy.
Mixed Media Celebration 30 to 60 mins 9 to 14 years Art & Craft Class 7


Steps to Create this Activity
Login to see steps

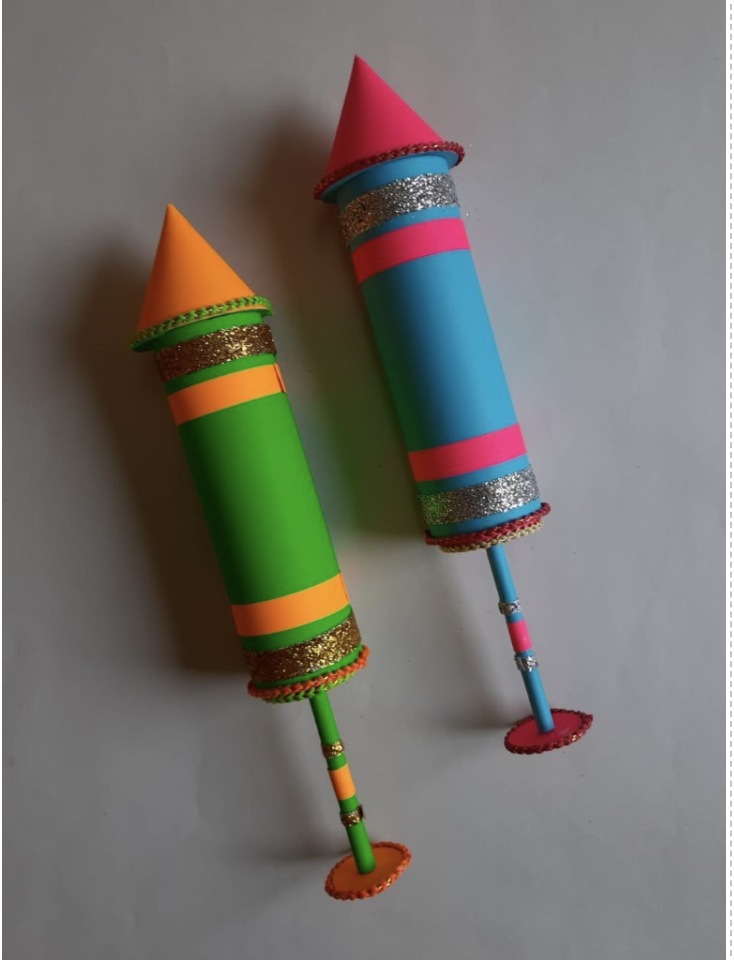
Step - 01
To create phickari, draw and cut two squares from corrugated sheet. Make sure one is slightly smaller than the other as shown

Step - 02
To create an outer body of phickari, take bigger square and roll it into a pipe structure by sealing the edges using Fevicol A+. Now take a coloured chart and cut out a sqaure to cover body and a circle to close it from one end

Step - 03
To create inside body of pichkari take the smaller corrugated square and create a pipe and seal the edges using FEvicol A+. Now cut out a contrast coloured chart paper to cover the coil. Now cut two circles measuring the radius of the coil

Step - 04
Using Fevicol A+, assemble cut outs and let it dry. Now create head of the pichkari in a conical shape using coloured chart paper of your choice and stick a base to the cone using coloured chart paper as shown.

Step - 05
To create pichkari holder, take a straw, cover it with coloured chart paper. Now cut corrugated circle and cover that as well using coloured chart paper of your choice uaing Fevicol A+.

Step - 06
Cut coloured chart paper strip, fan fold it and write text “Happy Holi” with the help of felt pen in each fold as shown.

Step - 07
Using Fevicol A+, Stick 2 sides of the strip into the two parts of the pichkari and let it dry.

Step - 08
Using Fevicol A+, decorate the Pichkari using Glitter powder and colourful chart papers. Your Pichkari Card is ready!
Steps to Create this Activity
Login to see steps
Step - 01
To create phickari, draw and cut two squares from corrugated sheet. Make sure one is slightly smaller than the other as shown
Step - 02
To create an outer body of phickari, take bigger square and roll it into a pipe structure by sealing the edges using Fevicol A+. Now take a coloured chart and cut out a sqaure to cover body and a circle to close it from one end
Step - 03
To create inside body of pichkari take the smaller corrugated square and create a pipe and seal the edges using FEvicol A+. Now cut out a contrast coloured chart paper to cover the coil. Now cut two circles measuring the radius of the coil
Step - 04
Using Fevicol A+, assemble cut outs and let it dry. Now create head of the pichkari in a conical shape using coloured chart paper of your choice and stick a base to the cone using coloured chart paper as shown.
Step - 05
To create pichkari holder, take a straw, cover it with coloured chart paper. Now cut corrugated circle and cover that as well using coloured chart paper of your choice uaing Fevicol A+.
Step - 06
Cut coloured chart paper strip, fan fold it and write text “Happy Holi” with the help of felt pen in each fold as shown.
Step - 07
Using Fevicol A+, Stick 2 sides of the strip into the two parts of the pichkari and let it dry.
Step - 08
Using Fevicol A+, decorate the Pichkari using Glitter powder and colourful chart papers. Your Pichkari Card is ready!


