


Create Your Own Handmade Mailbox with This Craft - Activity Single - FeviCreate
Learn How to Make a Paper Mailbox - Step-by-Step Guide
Create a personalized paper mailbox with a fun and easy arts and crafts project. This simple, step-by-step guide allows you to craft your own mailbox using paper and other materials, making it a great activity for kids. Whether you're a beginner or experienced, this project is perfect for sparking creativity and hands-on learning.
Paper Crafting Brand me 30 to 60 mins 6 to 8 years Art & Craft Class 4


Steps to Create this Activity
Login to see steps

Step - 01
To create mail box base, take a sheet of corrugated draw the diagram referring to the template given with the help of pencil.

Step - 02
Cut them with scissors.

Step - 03
To create dome like structure, take a sheet of corrugated draw the diagram referring to the template given with the help of pencil.

Step - 04
Cut them with scissors.

Step - 05
Using Fevicol A+, assemble the cut outs I.e. base and lid. And let it dry.

Step - 06
Make sure lid fits to the mailbox structure made.

Step - 07
With the help of coloured chart of your choice, cover the cut-outs using Fevicol A+ and let it dry. Now draw and cut-out a small chart paper strip measuring 2”x6” approx.

Step - 08
Using Fevicol A+, stick the strip to base adjoining to lid as shown. Make sure lid is movable.

Step - 09
To create trees, flowers and bushes, take coloured chart papers of your choice, draw and cut of different shape and size as shown, to give details paint it using Rangeela Tempera Colours and let it dry.

Step - 10
Using Coloured chart papers of your choice , create small bunting and write text “THANK YOU” with the help of CD Marker, now stick it onto any cord using Fevicol A+and let it dry.

Step - 11
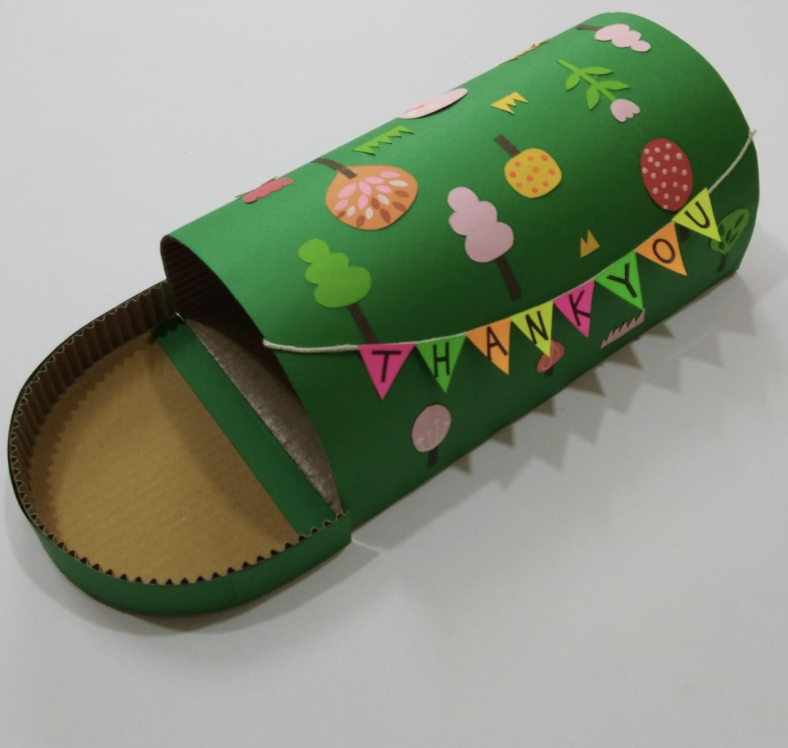
Using Fevicol A+, stick the elements as shown and let it dry.

Step - 12
Handmade mailbox is ready!

Step - 13
Design Template.
Steps to Create this Activity
Login to see steps
Step - 01
To create mail box base, take a sheet of corrugated draw the diagram referring to the template given with the help of pencil.
Step - 02
Cut them with scissors.
Step - 03
To create dome like structure, take a sheet of corrugated draw the diagram referring to the template given with the help of pencil.
Step - 04
Cut them with scissors.
Step - 05
Using Fevicol A+, assemble the cut outs I.e. base and lid. And let it dry.
Step - 06
Make sure lid fits to the mailbox structure made.
Step - 07
With the help of coloured chart of your choice, cover the cut-outs using Fevicol A+ and let it dry. Now draw and cut-out a small chart paper strip measuring 2”x6” approx.
Step - 08
Using Fevicol A+, stick the strip to base adjoining to lid as shown. Make sure lid is movable.
Step - 09
To create trees, flowers and bushes, take coloured chart papers of your choice, draw and cut of different shape and size as shown, to give details paint it using Rangeela Tempera Colours and let it dry.
Step - 10
Using Coloured chart papers of your choice , create small bunting and write text “THANK YOU” with the help of CD Marker, now stick it onto any cord using Fevicol A+and let it dry.
Step - 11
Using Fevicol A+, stick the elements as shown and let it dry.
Step - 12
Handmade mailbox is ready!
Step - 13
Design Template.


