


DIY Clay Rangoli Craft for Kids | FeviCreate - Activity Single - FeviCreate
Clay Rangoli Craft
Make a stunning clay Rangoli by shaping clay into flowers and motifs, placing them on a base, and painting with bright colors. A fun and educational activity for kids to celebrate festivals with creativity.
Make a vibrant rangoli design using clay, foam sheets, and small mirrors. This activity is designed for kids and helps boost creativity through crafting. Step-by-step instructions ensure that even beginners can enjoy the process. It's a fantastic way to introduce children to traditional art while encouraging imaginative play and hands-on learning.
Clay Modelling Celebration 30 to 60 mins 9 to 14 years Art & Craft Class 6


Steps to Create this Activity
Login to see steps

Step - 01
To create a rangoli board, take a corrugated sheet, draw and cut out a square measuring 30 cm. Referring to the template given, draw the contour of the design as shown in the image with the help of a pencil.

Step - 02
Cut them with scissors.

Step - 03
Take any coloured foam sheet of your choice, draw and cut out four partitions referring to the template.

Step - 04
Using Glue drops, stick foam cutouts onto the corrugated base. Similarly, take a corrugated sheet, draw and cut a diagram of a flower referring to the template given and stick it onto the foam base using Glue drops. Make sure the flower made is proportionate to the base made.

Step - 05
To enhance the corrugated flower cut-out, take the Rangeela Creative Clay of your choice, roll it into an even slab with the help of a rolling pin, and trace the petal contour onto the clay slab, as shown in the image.

Step - 06
Cut it with help of clay tool or paper cutter.

Step - 07
Arrange it as shown. For durability and freshness of colours, apply a layer of Fevicol MR on the cut-outs with the help of fine art brushes and let it dry.

Step - 08
Using Fevicol MR, stick the flower onto the corrugated base and let it dry.

Step - 09
To create motifs, take any three coloured foam sheets of your choice, and draw different shapes on each sheet referring to the template.

Step - 10
Cut them with scissors.

Step - 11
Using Glue Drops, stick motifs cut-outs on the rangoli board as shown.

Step - 12
To enhance rangoli board, collect different shapes and sizes of mirrors.

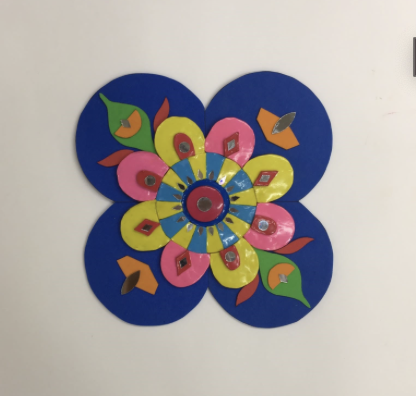
Step - 13
Using Glue Drops, stick mirrors as shown in the image. Handmade Rangoli board is ready!

Step - 14
Design Template.
Steps to Create this Activity
Login to see steps
Step - 01
To create a rangoli board, take a corrugated sheet, draw and cut out a square measuring 30 cm. Referring to the template given, draw the contour of the design as shown in the image with the help of a pencil.
Step - 02
Cut them with scissors.
Step - 03
Take any coloured foam sheet of your choice, draw and cut out four partitions referring to the template.
Step - 04
Using Glue drops, stick foam cutouts onto the corrugated base. Similarly, take a corrugated sheet, draw and cut a diagram of a flower referring to the template given and stick it onto the foam base using Glue drops. Make sure the flower made is proportionate to the base made.
Step - 05
To enhance the corrugated flower cut-out, take the Rangeela Creative Clay of your choice, roll it into an even slab with the help of a rolling pin, and trace the petal contour onto the clay slab, as shown in the image.
Step - 06
Cut it with help of clay tool or paper cutter.
Step - 07
Arrange it as shown. For durability and freshness of colours, apply a layer of Fevicol MR on the cut-outs with the help of fine art brushes and let it dry.
Step - 08
Using Fevicol MR, stick the flower onto the corrugated base and let it dry.
Step - 09
To create motifs, take any three coloured foam sheets of your choice, and draw different shapes on each sheet referring to the template.
Step - 10
Cut them with scissors.
Step - 11
Using Glue Drops, stick motifs cut-outs on the rangoli board as shown.
Step - 12
To enhance rangoli board, collect different shapes and sizes of mirrors.
Step - 13
Using Glue Drops, stick mirrors as shown in the image. Handmade Rangoli board is ready!
Step - 14
Design Template.


