


Beach Themed Clay Polaroid Holder Craft Activity for Kids. - Activity Single - FeviCreate
Beach Themed Polaroid Holder Craft Activity Using Clay
Fevicreate Art & Craft Activities are structured activities that involve a step-by-step method to create an end product. This crafting journey gives you something to show, you enjoy your journey and get a sense of achievement too. What more can one ask for!
Clay Modelling Brand me 30 to 60 mins 9 to 14 years Art & Craft Class 8


Steps to Create this Activity
Login to see steps

Step - 01
To create a polaroid holder base, take a corrugated square sheet measuring 20cm approx. Draw the diagram of an island with the help of a pencil, referring to the image shown.

Step - 02
Cut it with scissors.

Step - 03
To create an ochre shade, take clay strips of yellow, orange, and white and mix them thoroughly.

Step - 04
With the help of a rolling pin, create a slab and stick it onto the corrugated cutout as shown in the image.

Step - 05
With the help of barbeque stick create a texture.

Step - 06
To create a surfboard, take any 3 Rangeela Creative Clay shades of your choice and create thin coils of each shade as shown in the image.

Step - 07
Untie all the coils as shown in the image with the help of your hand.

Step - 08
Create a slab with the help of rolling pin.

Step - 09
With the help of clay tool or paper cutter cut out a shape of surf board as shown in the image. Collect barbeque stick available.

Step - 10
Assemble the surf board cut out onto the barbeque stick as shown in the image. Similarly, following the same procedure create another coloured surf board of your choice.

Step - 11
To create beach slippers, take any coloured clay strip of your choice create a slab with the help of rolling pin, with the help of clay tool or paper cutter cut out the contour of the slippers as shown in the image.

Step - 12
To create slipper holder, create a coil with the help of your hands and place it as shown in the image.

Step - 13
For durability and freshness of colours apply a layer of Fevicol MR on the elements made I.e., island, surfboards and slippers.

Step - 14
To create placard, take a corrugated piece A5 size approx. draw the diagram of an rectangles as shown as the image.

Step - 15
Cut them with scissors.

Step - 16
To create coconut tree, take green chart paper, draw and cut out rectangle measuring 2” x 4” approx., fold it into half.

Step - 17
With the help of scissors cut out into boat like shape as shown in the image.

Step - 18
With the help of scissors cut out the fringes. Similarly, following the procedure create coconuts leaf's.

Step - 19
To create coconut stem, take clay strip of red and green mix it thoroughly to create shade of brown. With the help of your hands create a coil proportionate to coconut leaves made, take a flower wire and insert through the coil made as shown in the image.

Step - 20
Using Glue Drops, assemble all the leaves together and attach stem to it as shown in the Image.

Step - 21
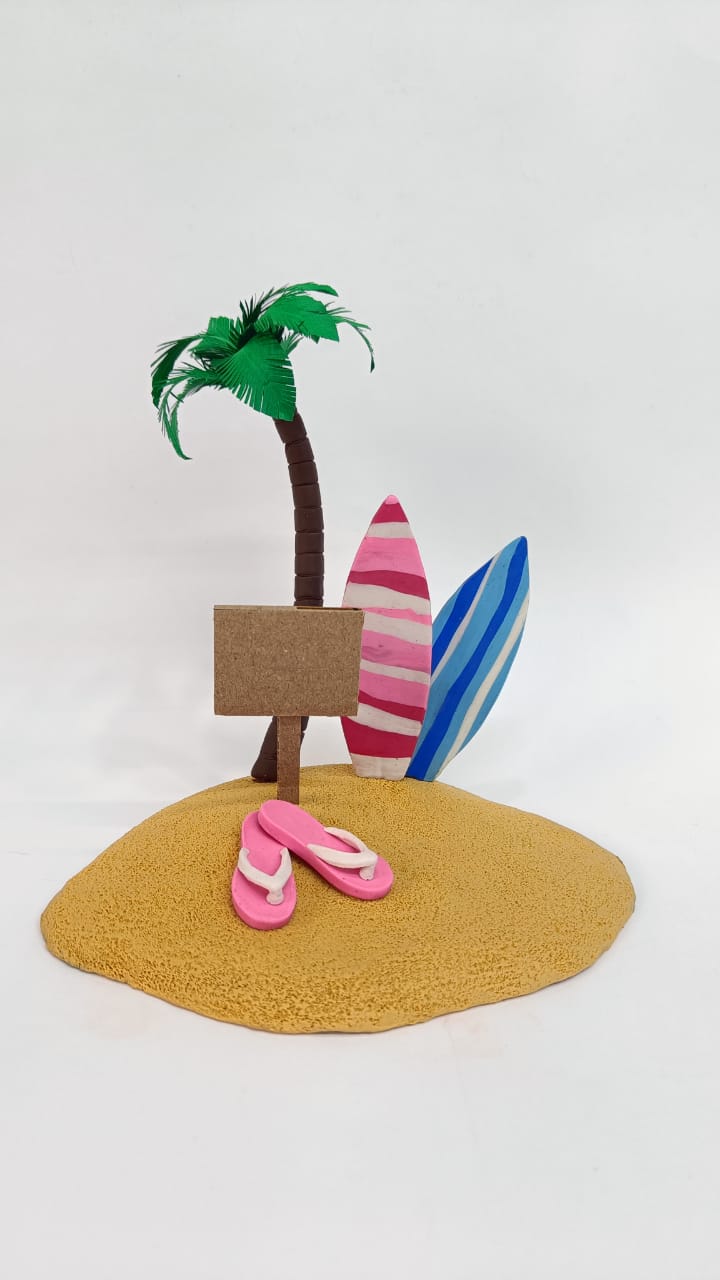
Using Glue drops, assemble the placard cut outs and insert rest of the elements onto island structure made. Handmade polaroid holder is ready!
Steps to Create this Activity
Login to see steps
Step - 01
To create a polaroid holder base, take a corrugated square sheet measuring 20cm approx. Draw the diagram of an island with the help of a pencil, referring to the image shown.
Step - 02
Cut it with scissors.
Step - 03
To create an ochre shade, take clay strips of yellow, orange, and white and mix them thoroughly.
Step - 04
With the help of a rolling pin, create a slab and stick it onto the corrugated cutout as shown in the image.
Step - 05
With the help of barbeque stick create a texture.
Step - 06
To create a surfboard, take any 3 Rangeela Creative Clay shades of your choice and create thin coils of each shade as shown in the image.
Step - 07
Untie all the coils as shown in the image with the help of your hand.
Step - 08
Create a slab with the help of rolling pin.
Step - 09
With the help of clay tool or paper cutter cut out a shape of surf board as shown in the image. Collect barbeque stick available.
Step - 10
Assemble the surf board cut out onto the barbeque stick as shown in the image. Similarly, following the same procedure create another coloured surf board of your choice.
Step - 11
To create beach slippers, take any coloured clay strip of your choice create a slab with the help of rolling pin, with the help of clay tool or paper cutter cut out the contour of the slippers as shown in the image.
Step - 12
To create slipper holder, create a coil with the help of your hands and place it as shown in the image.
Step - 13
For durability and freshness of colours apply a layer of Fevicol MR on the elements made I.e., island, surfboards and slippers.
Step - 14
To create placard, take a corrugated piece A5 size approx. draw the diagram of an rectangles as shown as the image.
Step - 15
Cut them with scissors.
Step - 16
To create coconut tree, take green chart paper, draw and cut out rectangle measuring 2” x 4” approx., fold it into half.
Step - 17
With the help of scissors cut out into boat like shape as shown in the image.
Step - 18
With the help of scissors cut out the fringes. Similarly, following the procedure create coconuts leaf's.
Step - 19
To create coconut stem, take clay strip of red and green mix it thoroughly to create shade of brown. With the help of your hands create a coil proportionate to coconut leaves made, take a flower wire and insert through the coil made as shown in the image.
Step - 20
Using Glue Drops, assemble all the leaves together and attach stem to it as shown in the Image.
Step - 21
Using Glue drops, assemble the placard cut outs and insert rest of the elements onto island structure made. Handmade polaroid holder is ready!


