


DIY Christmas Gift Box For Kids - Activity Single - FeviCreate
DIY Christmas Gift Box
Create a customised Christmas gift box using cardboard and decorative paper, perfect for wrapping presents. This activity encourages children to engage in holiday preparations while developing their crafting abilities. The final gift box adds a personal touch to any present, making it more memorable
Add a festive flair to your child's holiday with this DIY Christmas gift box activity. Let your kids unleash their creativity, decorating and personalising their own gift boxes. It's not just a craft; it's a joyful lesson in giving and spreading holiday cheer!
Mixed Media Celebration 30 to 60 mins 9 to 14 years Art & Craft Class 6


Steps to Create this Activity
Login to see steps

Step - 01
To create gift box, take an upcycled box available.

Step - 02
Take green chart paper, cover the base and sides of the lid using Fevicol MR, and let it dry.

Step - 03
Referring to the template given, draw the fireplace diagram onto the lid. To create bricks, take shades of brown chart paper and cut them into rectangular strips according to the drawing on the top. Using fevicol MR, stick the cutouts as shown in the image. Similarly, draw and cut out a gateway of the fireplace using brown chart paper and stick it.

Step - 04
Take a corrugated sheet, referring to the template given, draw and cut out elements, I.e., shrub, the base of the fireplace, a gateway, and flames.

Step - 05
Using Rangeela Creative Clay of your choice, fill up the shrub and flames as shown. Now using shades of brown chart papers, draw and cut out the gateway and base diagram, stick it onto the corrugated cut-out using FEvicol MR, and let it dry.

Step - 06
Draw and cut socks using Chart papers using the template given.

Step - 07
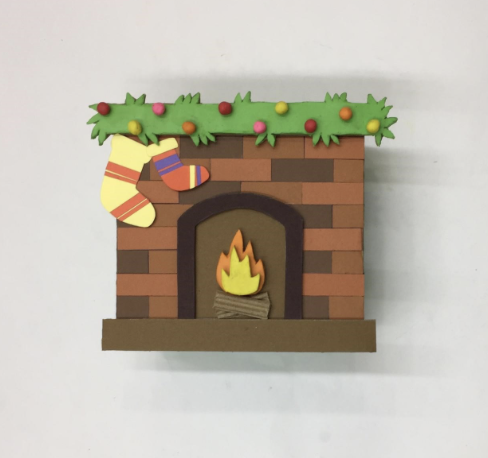
Using Glue Drops, stick the elements I.e. shrub, gateway, flames, base, and wood, as shown. To enhance the shrub, create tiny colourful spheres out of Rangeela Creative Clay and place them as shown in the image. For durability and freshness of colour, apply a layer of Fevicol MR onto the clay elements made and let it dry.

Step - 08
Using Glue drops, stick socks on either side of the fireplace. The handcrafted gift box is ready!

Step - 09
Design Template.
Steps to Create this Activity
Login to see steps
Step - 01
To create gift box, take an upcycled box available.
Step - 02
Take green chart paper, cover the base and sides of the lid using Fevicol MR, and let it dry.
Step - 03
Referring to the template given, draw the fireplace diagram onto the lid. To create bricks, take shades of brown chart paper and cut them into rectangular strips according to the drawing on the top. Using fevicol MR, stick the cutouts as shown in the image. Similarly, draw and cut out a gateway of the fireplace using brown chart paper and stick it.
Step - 04
Take a corrugated sheet, referring to the template given, draw and cut out elements, I.e., shrub, the base of the fireplace, a gateway, and flames.
Step - 05
Using Rangeela Creative Clay of your choice, fill up the shrub and flames as shown. Now using shades of brown chart papers, draw and cut out the gateway and base diagram, stick it onto the corrugated cut-out using FEvicol MR, and let it dry.
Step - 06
Draw and cut socks using Chart papers using the template given.
Step - 07
Using Glue Drops, stick the elements I.e. shrub, gateway, flames, base, and wood, as shown. To enhance the shrub, create tiny colourful spheres out of Rangeela Creative Clay and place them as shown in the image. For durability and freshness of colour, apply a layer of Fevicol MR onto the clay elements made and let it dry.
Step - 08
Using Glue drops, stick socks on either side of the fireplace. The handcrafted gift box is ready!
Step - 09
Design Template.


