


Craft Unique Father’s Day Bookends for a Special Gift! - Activity Single - FeviCreate
Fathers Day Bookends Craft
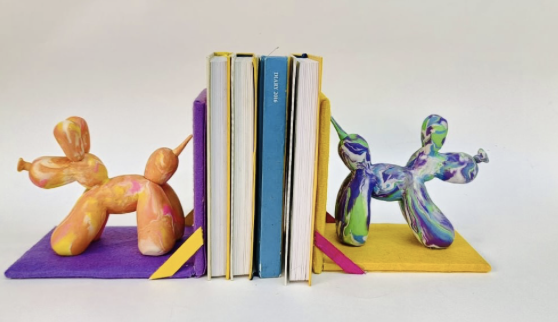
Craft unique bookends for Father’s Day using cardboard and paint. Kids can personalize them with designs that reflect dad’s interests. It’s a thoughtful project that blends function with creativity while helping children build something practical and heartfelt.


Steps to Create this Activity
Login to see steps

Step - 01
To create 3D figurine of a dog, take Rangeela Creative Clay in any 3 to 4 shades of your choice. To create marble effect out of it, create coils of each coloured clay strip now twirl all the shades to together and mix it as shown in the image. Now create different sizes of sphere’s as shown in the image.

Step - 02
Referring to the image, create forms out of spheres made with the help of your hand.

Step - 03
Take a barbeque stick insert it through torso back and forth as shown. Now attach legs as shown in the image.

Step - 04
Make sure the legs attach thoroughly as shown in the image.

Step - 05
Referring to the image insert barbeque stick as shown to attach neck.

Step - 06
Now assemble the neck through a barbeque stick as shown. With the help of your hands, merge the edge of the channel along with the torso, as shown in the image.

Step - 07
Similarly, attach the ears and mouth of the dog as shown. Insert barbeque stick on the mark of the tail as shown.

Step - 08
Assemble the rest of the features shown, I.e., tail and nose. For durability and freshness of colour, apply a layer of Fevicol MR and let it dry.

Step - 09
To create bookends, take corrugated sheet draw and cut out rectangles proportionate to the figurine.

Step - 10
To cover the rectangles take a coloured felt sheet of your choice and stick it using glue drops.

Step - 11
To create a support holder for bookends, cut an ice cream stick in half and give an angular cut from the edges, as shown in the image.

Step - 12
Using Glue Drops assemble the cut outs as shown in the image.

Step - 13
Using Fevicol MR, stick the 3d Figurine onto the bookends as shown and let it dry.

Step - 14
Similarly, create another one following the same procedure. Handmade bookends are ready!
Steps to Create this Activity
Login to see steps
Step - 01
To create 3D figurine of a dog, take Rangeela Creative Clay in any 3 to 4 shades of your choice. To create marble effect out of it, create coils of each coloured clay strip now twirl all the shades to together and mix it as shown in the image. Now create different sizes of sphere’s as shown in the image.
Step - 02
Referring to the image, create forms out of spheres made with the help of your hand.
Step - 03
Take a barbeque stick insert it through torso back and forth as shown. Now attach legs as shown in the image.
Step - 04
Make sure the legs attach thoroughly as shown in the image.
Step - 05
Referring to the image insert barbeque stick as shown to attach neck.
Step - 06
Now assemble the neck through a barbeque stick as shown. With the help of your hands, merge the edge of the channel along with the torso, as shown in the image.
Step - 07
Similarly, attach the ears and mouth of the dog as shown. Insert barbeque stick on the mark of the tail as shown.
Step - 08
Assemble the rest of the features shown, I.e., tail and nose. For durability and freshness of colour, apply a layer of Fevicol MR and let it dry.
Step - 09
To create bookends, take corrugated sheet draw and cut out rectangles proportionate to the figurine.
Step - 10
To cover the rectangles take a coloured felt sheet of your choice and stick it using glue drops.
Step - 11
To create a support holder for bookends, cut an ice cream stick in half and give an angular cut from the edges, as shown in the image.
Step - 12
Using Glue Drops assemble the cut outs as shown in the image.
Step - 13
Using Fevicol MR, stick the 3d Figurine onto the bookends as shown and let it dry.
Step - 14
Similarly, create another one following the same procedure. Handmade bookends are ready!


