


Fun DIY Chunnar Bottle Decor Craft for Kids With Paper Mache - Activity Single - FeviCreate
Chunnar Bottle Décor
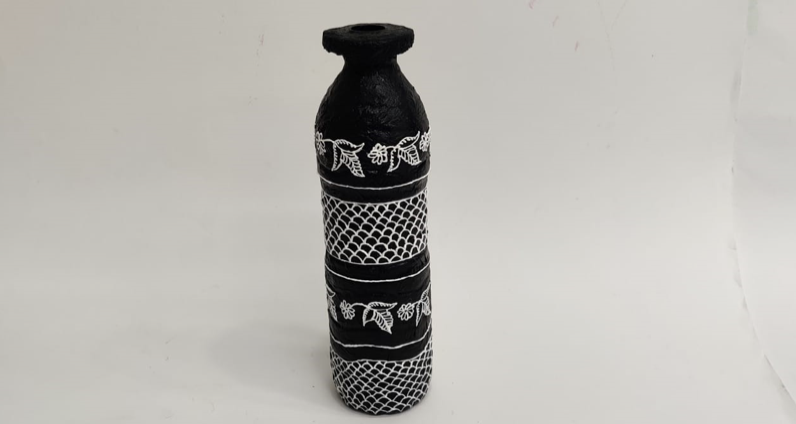
Learn how to make an easy chunnar bottle decor with tissue paper & plastic bottle using step-by-step guide provided by fevicreate. Click to do this fun activity
Painting Brand me 30 to 60 mins 9 to 14 years Art & Craft Class 8
Steps to Create this Activity
Login to see steps

Step - 01
To create chunnar bottle décor, you will need an upcycled plastic bottle. With the help of some tissue papers cover the plastic bottle using Fevicol A+ and let it dry. Now make some tissue mâché. Take a bowl, add pieces of some tissue papers in it, some water and Fevicol A+. Mix it well until it becomes like dough. Make sure tissue paper mâché is fine enough. With the help of your hands, create a disc-like structure as shown in the image

Step - 02
Using Fevicol A+, stick the disc onto the bottle mouth as shown; let it dry. Now stick another layer of tissue paper over the structure using Fevicol A+ and let it dry.

Step - 03
Using Fevicryl Acrylic Colour Black, paint the bottle using Fine Art brushes and let it dry.

Step - 04
Referring to image, create floral and geometric pattern using Fevicryl 3D Outliner white and let it dry. Your personalised chunnar décor vase is ready!
Steps to Create this Activity
Login to see steps
Step - 01
To create chunnar bottle décor, you will need an upcycled plastic bottle. With the help of some tissue papers cover the plastic bottle using Fevicol A+ and let it dry. Now make some tissue mâché. Take a bowl, add pieces of some tissue papers in it, some water and Fevicol A+. Mix it well until it becomes like dough. Make sure tissue paper mâché is fine enough. With the help of your hands, create a disc-like structure as shown in the image
Step - 02
Using Fevicol A+, stick the disc onto the bottle mouth as shown; let it dry. Now stick another layer of tissue paper over the structure using Fevicol A+ and let it dry.
Step - 03
Using Fevicryl Acrylic Colour Black, paint the bottle using Fine Art brushes and let it dry.
Step - 04
Referring to image, create floral and geometric pattern using Fevicryl 3D Outliner white and let it dry. Your personalised chunnar décor vase is ready!


