


DIY Christmas Bunting Craft to Spread Cheer on Your Holidays - Activity Single - FeviCreate
Personalized Christmas Bunting for the Holidays
Create a warm, personalized Christmas bunting with this easy craft project. Perfect for adding a festive touch to your decorations, this simple activity will make your holiday celebrations even more special.
Paper Crafting Celebration 30 to 60 mins 9 to 14 years Art & Craft Class 4


Steps to Create this Activity
Login to see steps

Step - 01
Ona corrugated sheet, draw Christmas elements of your choice (or refer to the given image). Ensure you draw the elements up to approx. A6 size.

Step - 02
Cut the elements with scissors.

Step - 03
To decorate the Christmas tree, draw and cut a green chart paper for the base, colourful chart papers and coloured corrugated sheets to enhance it.

Step - 04
Using Fevistik Power, stick the cut-outs as shown and let them dry. To add more detailing, collect any paper and use any coloured Rangeela Paper Glitter of your choice.

Step - 05
Outline the tree forms with Rangeela Paper Glitter, as shown. Now stick the paper cord randomly around it.

Step - 06
Similarly, use different materials like chart papers, coloured corrugated, buttons, paper cords, and foam sheets, to decorate all the elements as shown. Use Rangeela Paper Glitter to enhance it further. To create a bunting holder, take any coloured ribbon of your choice.

Step - 07
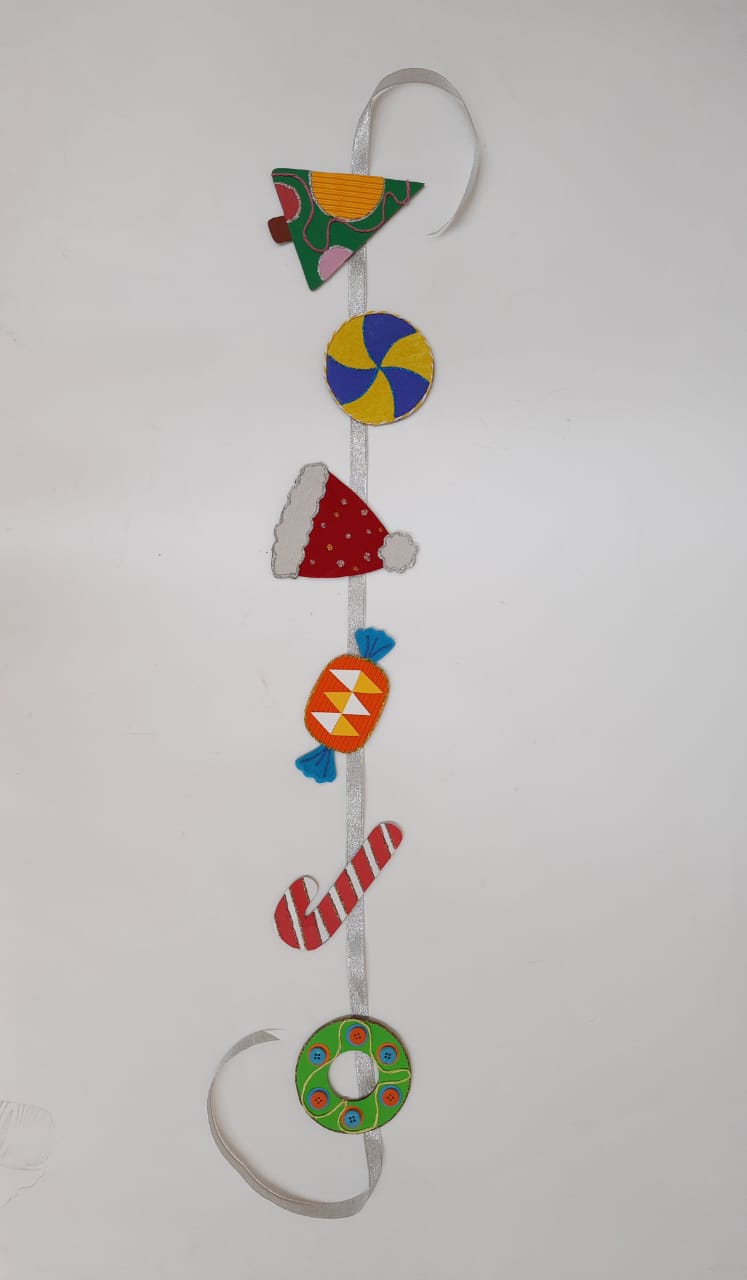
Using Fevistik Power, stick the Christmas elements onto the bunting and let it dry. Your handmade Christmas Bunting is ready!

Step - 08
Design Template
Steps to Create this Activity
Login to see steps
Step - 01
Ona corrugated sheet, draw Christmas elements of your choice (or refer to the given image). Ensure you draw the elements up to approx. A6 size.
Step - 02
Cut the elements with scissors.
Step - 03
To decorate the Christmas tree, draw and cut a green chart paper for the base, colourful chart papers and coloured corrugated sheets to enhance it.
Step - 04
Using Fevistik Power, stick the cut-outs as shown and let them dry. To add more detailing, collect any paper and use any coloured Rangeela Paper Glitter of your choice.
Step - 05
Outline the tree forms with Rangeela Paper Glitter, as shown. Now stick the paper cord randomly around it.
Step - 06
Similarly, use different materials like chart papers, coloured corrugated, buttons, paper cords, and foam sheets, to decorate all the elements as shown. Use Rangeela Paper Glitter to enhance it further. To create a bunting holder, take any coloured ribbon of your choice.
Step - 07
Using Fevistik Power, stick the Christmas elements onto the bunting and let it dry. Your handmade Christmas Bunting is ready!
Step - 08
Design Template


