


Make a Butterfly 3D Model Craft - Activity Single - FeviCreate
Butterfly 3D Model Craft
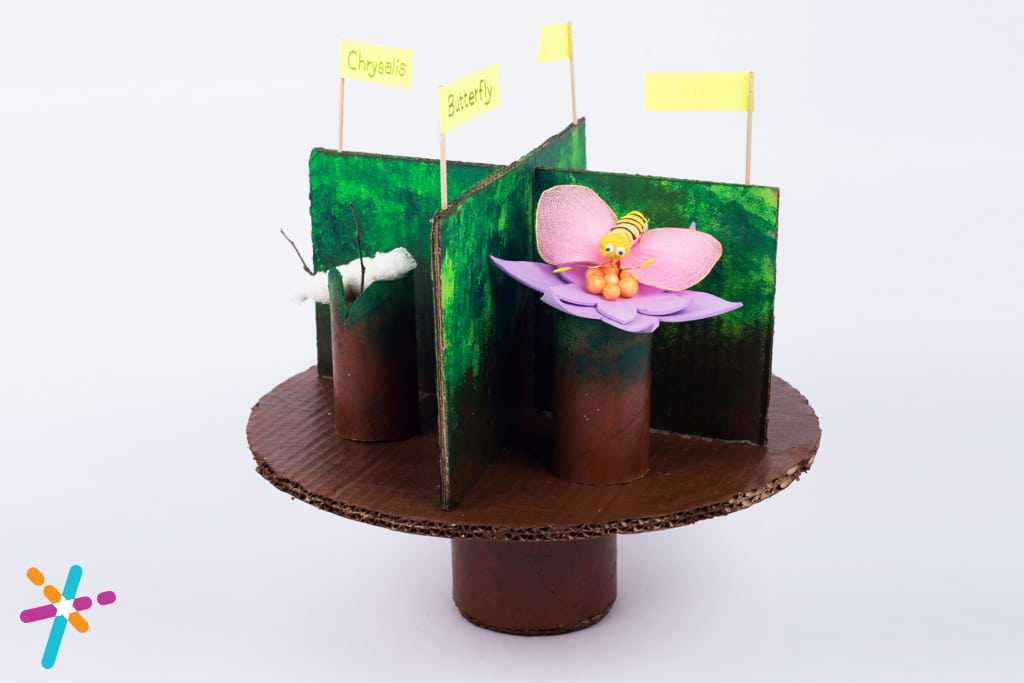
Learn about the beautiful Butterflies creatively by making a Butterfly 3D Model for your Craft Classes. Click now to make learning easy with Fevicreate.
Mixed Media Best Out of Waste More than 60 mins 9 to 14 years Science Class 8


Steps to Create this Activity
Login to see steps

Step - 01
Take some coloured chart paper and draw flowers and leaves as shown above. Cut them out with the help of safety scissors.

Step - 02
Stick the flowers with Fevicol A+ and also stick the beads on the flower.

Step - 03
Make the butterfly using flower making wire, stocking for the wings and cotton mesh, thread and wire for the body and the antenna.

Step - 04
Stick all the materials together with Fevicol A+. Paint the butterfly's head with Fevicryl Acrylic Colour and outline its body with Fevicryl 3D Outliner. Stick the googly eyes and the antenna with Fevicol A+.

Step - 05
To make the cocoon, wrap the cotton mesh with threads as shown above. Also, paint the twig with Fevicryl Acrylic Colours.

Step - 06
To make the centipede, mould small balls and coils from Rangeela Moulding Dough and stick them together with Fevicol A+. Apply a coat of Fevicol A+ for a sturdy centipede.

Step - 07
Cut out an empty tissue paper roll and cover it with a corrugated sheet from top and the bottom and stick it with Fevicol A+. Paint the whole tissue paper roll with Fevicryl Acrylic Colours. Make a hole in the lid as well as on the upper part of the tissue paper roll for the toothpick to enter freely. Stick them all with Fevicol A+.

Step - 08
Place a circular painted corrugated sheet above the toothpick.

Step - 09
Place a rectangular painted corrugated sheet above the circle and cut a slit from the centre.

Step - 10
Make another similar rectangle such that it fits perfectly above the previous rectangle.

Step - 11
Stick four empty painted tissue paper rolls on each section.

Step - 12
Stick all the elements as shown above with Fevicol A+.

Step - 13
Create labels for each section with chart paper strips and toothpicks.

Step - 14
Stick the labels on each section by inserting the toothpicks and sticking it with Fevicol A+.
Steps to Create this Activity
Login to see steps
Step - 01
Take some coloured chart paper and draw flowers and leaves as shown above. Cut them out with the help of safety scissors.
Step - 02
Stick the flowers with Fevicol A+ and also stick the beads on the flower.
Step - 03
Make the butterfly using flower making wire, stocking for the wings and cotton mesh, thread and wire for the body and the antenna.
Step - 04
Stick all the materials together with Fevicol A+. Paint the butterfly's head with Fevicryl Acrylic Colour and outline its body with Fevicryl 3D Outliner. Stick the googly eyes and the antenna with Fevicol A+.
Step - 05
To make the cocoon, wrap the cotton mesh with threads as shown above. Also, paint the twig with Fevicryl Acrylic Colours.
Step - 06
To make the centipede, mould small balls and coils from Rangeela Moulding Dough and stick them together with Fevicol A+. Apply a coat of Fevicol A+ for a sturdy centipede.
Step - 07
Cut out an empty tissue paper roll and cover it with a corrugated sheet from top and the bottom and stick it with Fevicol A+. Paint the whole tissue paper roll with Fevicryl Acrylic Colours. Make a hole in the lid as well as on the upper part of the tissue paper roll for the toothpick to enter freely. Stick them all with Fevicol A+.
Step - 08
Place a circular painted corrugated sheet above the toothpick.
Step - 09
Place a rectangular painted corrugated sheet above the circle and cut a slit from the centre.
Step - 10
Make another similar rectangle such that it fits perfectly above the previous rectangle.
Step - 11
Stick four empty painted tissue paper rolls on each section.
Step - 12
Stick all the elements as shown above with Fevicol A+.
Step - 13
Create labels for each section with chart paper strips and toothpicks.
Step - 14
Stick the labels on each section by inserting the toothpicks and sticking it with Fevicol A+.


