


Learn How to Make Bunny Trinket Easter Craft Ideas for Kids - Activity Single - FeviCreate
Easy to Make Bunny Trinket Easter Craft for Preschool
Fevicreate Art & Craft Activities are structured activities that involve a step-by-step method to create an end product. This crafting journey gives you something to show, you enjoy your journey and get a sense of achievement too. What more can one ask for!
Mixed Media Family & Friends More than 60 mins 9 to 14 years Art & Craft Class 8


Steps to Create this Activity
Login to see steps

Step - 01
To create bunny and trinket structure, take three balloons and blow it up as shown in the image. Make sure balloons blown are proportionate to one another. Cover the balloons with the help of tissue paper using the mixture of Fevicol MR and water. Make sure to apply two to three layers and let it dry.

Step - 02
Once dried, using Rangeela Tempera Colour paint the balloon I.e., bunny torso and face in colour white and the egg in red or colour of your choice with the help of fine art brushes and let it dry.

Step - 03
To create features of bunny, make tissue mâché. Take a bowl, add pieces of tissue papers in it, some water and Fevicol MR. Mix it well until it becomes like dough. Make sure tissue paper mâché is fine enough as shown in the image.

Step - 04
With the help of your hands create features I.e, feet, hands and ears. To create feet and hands make drop like structure as shown in the image, to create ears make hollow conical structure as shown in the image. Using Rangeela Tempera Colour of your choice paint the hands, feet and ears with the help of fine art brushes and let it dry.

Step - 05
To create elements on egg, take Rangeela Creative Clay of your choice and create flowers out of it. To create flowers, take any shade of your choice make tiny spheres and assemble it together, now to create pollen take any contrast shade make a sphere and attach it in the centre of flower made as shown. similarly, create multiple flowers.

Step - 06
Brust the balloons and take it off from the moulds made. With the help of paper cutter give a slit as shown.

Step - 07
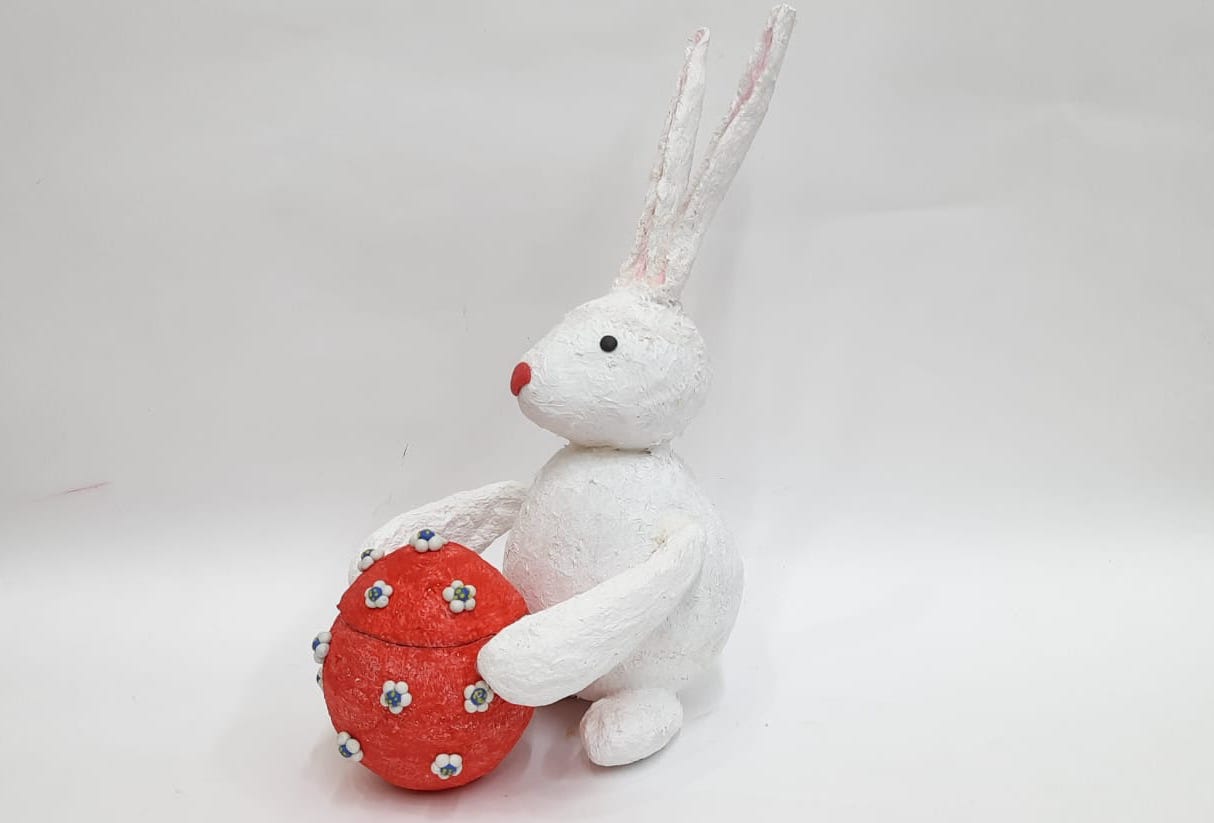
Using Fevicol MR, assemble the features I.e., face,ears,torso, hands and feet and let it dry, now stick clay flowers onto the trinket randomly as shown. Using Glue Drops, stick the trinket as shown. Using Rangeela Creative Clay, make bunny Features, I.e., eyes and nose and place it as shown. Your handmade Easter Bunny Trinket is ready!
Steps to Create this Activity
Login to see steps
Step - 01
To create bunny and trinket structure, take three balloons and blow it up as shown in the image. Make sure balloons blown are proportionate to one another. Cover the balloons with the help of tissue paper using the mixture of Fevicol MR and water. Make sure to apply two to three layers and let it dry.
Step - 02
Once dried, using Rangeela Tempera Colour paint the balloon I.e., bunny torso and face in colour white and the egg in red or colour of your choice with the help of fine art brushes and let it dry.
Step - 03
To create features of bunny, make tissue mâché. Take a bowl, add pieces of tissue papers in it, some water and Fevicol MR. Mix it well until it becomes like dough. Make sure tissue paper mâché is fine enough as shown in the image.
Step - 04
With the help of your hands create features I.e, feet, hands and ears. To create feet and hands make drop like structure as shown in the image, to create ears make hollow conical structure as shown in the image. Using Rangeela Tempera Colour of your choice paint the hands, feet and ears with the help of fine art brushes and let it dry.
Step - 05
To create elements on egg, take Rangeela Creative Clay of your choice and create flowers out of it. To create flowers, take any shade of your choice make tiny spheres and assemble it together, now to create pollen take any contrast shade make a sphere and attach it in the centre of flower made as shown. similarly, create multiple flowers.
Step - 06
Brust the balloons and take it off from the moulds made. With the help of paper cutter give a slit as shown.
Step - 07
Using Fevicol MR, assemble the features I.e., face,ears,torso, hands and feet and let it dry, now stick clay flowers onto the trinket randomly as shown. Using Glue Drops, stick the trinket as shown. Using Rangeela Creative Clay, make bunny Features, I.e., eyes and nose and place it as shown. Your handmade Easter Bunny Trinket is ready!


